
How to:
Sculpting Insects
These insects are made of sugar paste with edible rice-paper wings. The translucent wings are painted with silver dust and attached to the bodies with royal icing.
TOOLS:
- different colors Sugar Paste (page 59)
- cornstarch in a muslin bag for dusting
- plastic wrap
- veining tool
- parchment paper
- baking sheet
- edible rice paper
- utility knife
- Royal Icing (page 64)
- fine-tip paintbrush
- FDA-certified edible silver dust
- vodka
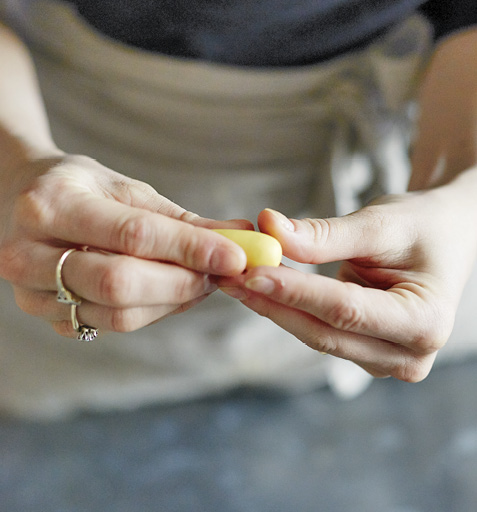
 Knead a few different colorful hues
of sugar paste on a cornstarch-dusted nonstick surface to bring to
room temperature. Keep each piece wrapped in plastic wrap while
working to prevent the sugar paste from drying out. Dust your hands
lightly with cornstarch if the sugar paste feels sticky. Start with
a grape-size amount of sugar paste, and sculpt it into a rounded
cone shape to make the insect’s body. Make different shapes and
sizes for a variety of insects.
Knead a few different colorful hues
of sugar paste on a cornstarch-dusted nonstick surface to bring to
room temperature. Keep each piece wrapped in plastic wrap while
working to prevent the sugar paste from drying out. Dust your hands
lightly with cornstarch if the sugar paste feels sticky. Start with
a grape-size amount of sugar paste, and sculpt it into a rounded
cone shape to make the insect’s body. Make different shapes and
sizes for a variety of insects.
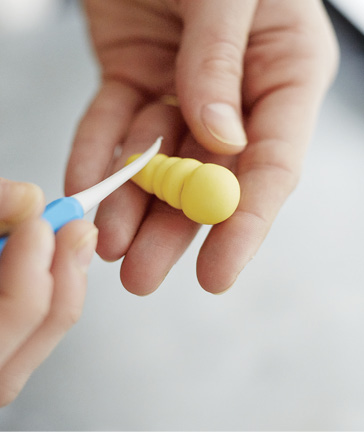
 Use a veining tool to create
horizontal lines for the segments on the insect’s body. Curve the
tail and body in a subtle fashion. Place on a parchment-lined
baking sheet to dry for 48 hours before applying the wings.
Use a veining tool to create
horizontal lines for the segments on the insect’s body. Curve the
tail and body in a subtle fashion. Place on a parchment-lined
baking sheet to dry for 48 hours before applying the wings.
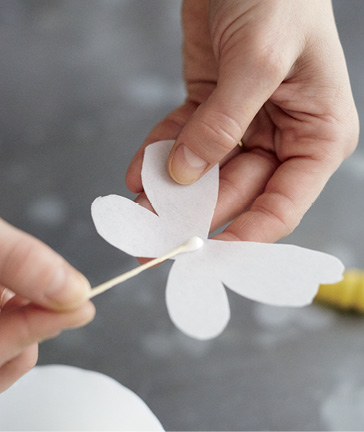
 To create the wings, trace or draw a
different shaped set of mirrored wings per insect body onto edible
rice paper. Handle with care—rice paper can be very brittle! Use a
utility knife to cut out the traced wings. Use the first sets of
wings as templates and cut out as many wings needed. Once the bug
body has dried for at least 48 hours, dab a small amount of royal
icing onto the center of the wings.
To create the wings, trace or draw a
different shaped set of mirrored wings per insect body onto edible
rice paper. Handle with care—rice paper can be very brittle! Use a
utility knife to cut out the traced wings. Use the first sets of
wings as templates and cut out as many wings needed. Once the bug
body has dried for at least 48 hours, dab a small amount of royal
icing onto the center of the wings.

 Adhere the wings to the underside of
the body. Press the wings gently up. Allow to dry for 24 hours
against the inside edge of a sheet pan. To create veins on the
wings, paint delicate lines with a fine-tip paintbrush and silver
dust mixed with vodka. Use a small amount of royal icing to apply
the bugs to a fondant-covered cake. If decorating an iced cake, use
small dots of the same icing to keep the bugs in place.
Adhere the wings to the underside of
the body. Press the wings gently up. Allow to dry for 24 hours
against the inside edge of a sheet pan. To create veins on the
wings, paint delicate lines with a fine-tip paintbrush and silver
dust mixed with vodka. Use a small amount of royal icing to apply
the bugs to a fondant-covered cake. If decorating an iced cake, use
small dots of the same icing to keep the bugs in place.