15 Creating a Fixed-Layout EPUB
Lesson Overview
In this lesson, you’ll learn how to do the following:
-
Create a new document for mobile delivery.
-
Create animations using a motion preset and a motion path.
-
Configure the timing of multiple animations.
-
Create buttons that trigger various actions.
-
Preview animations and interactivity within InDesign.
-
Add a movie, a sound, a slideshow, buttons, and a hyperlink.
-
Export a fixed-layout EPUB and preview it in a viewing app.

This lesson will take approximately 60 minutes to complete.
Please log in to your account on peachpit.com to download the lesson files for this chapter, or go to the “Getting Started” section at the beginning of this book and follow the instructions under “Accessing the Lesson Files and Web Edition.” Store the files on your computer in a convenient location.

The fixed-layout EPUB capabilities of InDesign let you create media-rich publications with animations, movies, slideshows, sounds, and hyperlinks, and you can include buttons that enable viewers to perform a variety of actions, from clicking through a slideshow to playing a sound file.
Getting started
In this lesson, you’ll begin by creating a new InDesign document using settings appropriate for a fixed-layout EPUB. After you’ve set up the new document, you’ll open a partially completed version of the publication, add several multimedia and interactive elements, and then save and preview a fixed-layout EPUB that can be viewed on a variety of EPUB readers.
 Note: If you have not already
downloaded the project files for this lesson to your computer from
your Account page, make sure to do so now. See “Getting Started” at the beginning of the
book.
Note: If you have not already
downloaded the project files for this lesson to your computer from
your Account page, make sure to do so now. See “Getting Started” at the beginning of the
book.
-
To ensure that the preferences and default settings of your Adobe InDesign program match those used in this lesson, move the InDesign Defaults file to a different folder following the procedure in “Saving and restoring the InDesign Defaults file” on pages 4–5.
-
Start Adobe InDesign. To ensure that the panels and menu commands match those used in this lesson, choose Window > Workspace > [Digital Publishing], and then choose Window > Workspace > Reset Digital Publishing. This optimizes the panel arrangement for the work you’ll do in this lesson and provides quick access to several of the controls you’ll use.
-
To see what the finished document looks like, open the 15_End.indd file in the Lesson15 folder. (If the Missing Fonts dialog box displays, click Sync Fonts, and then click Close after the fonts have successfully synced from Typekit.) If an alert informs you that the document contains links to sources that have been modified, click Update Links.
-
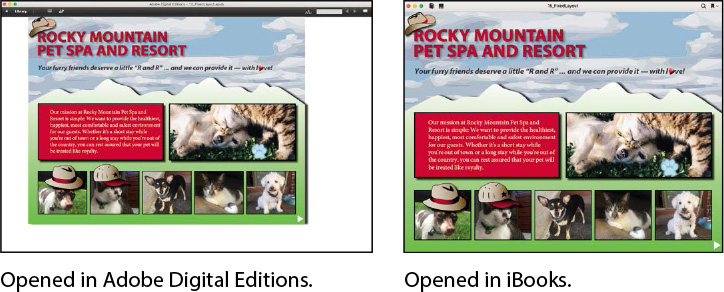
Navigate through the finished document to view the cover page and the page that follows.
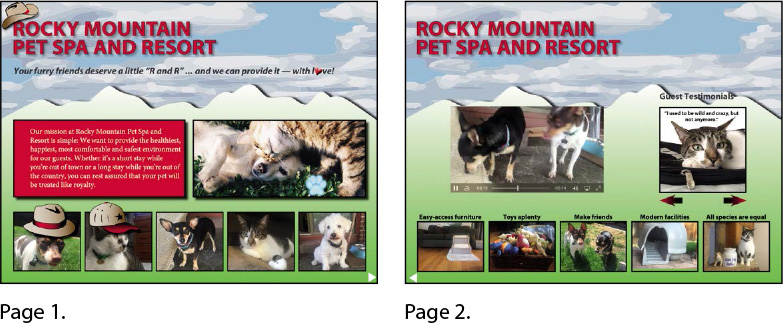
In all previous lessons that use sample print documents, the completed InDesign layouts look the same onscreen and in print; however, because the exported publication in this lesson is intended for display on an EPUB reader, what you seen onscreen when you open the sample files in InDesign doesn’t exactly match the appearance of the exported EPUB. The following images show what the completed lesson file looks like when displayed in an ereader.
-
Close the 15_End.indd file after you have finished examining it, or you can leave this document open for reference.
Creating a new document for fixed-layout export
Because exported EPUBs are viewed onscreen (on mobile devices such as tablets or on desktop computers, for example) and can include elements such as buttons, animations, and video that can’t be included in print documents, creating a document that’s intended for export in the EPUB format differs in some ways from creating a print document. That said, all the typographic and page-layout features covered in this book are available and work the same when creating digital publications. To begin, you’ll create a new mobile document.
Note: Setting a new
document’s Intent to Mobile (or Web) deselects the Facing Pages
option, sets the default page orientation to Landscape, and changes
the unit of measurement to pixels. It also sets the Transparency
Blend Space (Edit > Transparency Blend Space) to RGB and the
default color swatches in the Swatches panel to Process RGB for the
new document.
-
Choose File > New > Document.
-
In the New Document dialog box, choose the Mobile tab and then iPad from the Page Size menu. Also specify the following:
In the Number of Pages box, type 2, and deselect Primary Text Frame. Leave all other settings unchanged, and click Create.

-
Choose File > Save As, name the file 15_Setup.indd, navigate to the Lesson15 folder, and click Save.
Rather than creating the remainder of the document from scratch, you’ll continue this lesson by opening a partially completed document that already contains most of the required objects. You can keep the 15_Setup.indd document open or close it and continue.
EPUB: reflowable versus fixed-layout
An EPUB is a document created for viewing on a device such as a tablet, rather than for printing on paper. This allows for capabilities such as adding many kinds of multimedia elements and interactive features, or reflowing text for the particular device.
The biggest difference between a fixed-layout EPUB and a reflowable EPUB, which is the other option for exporting EPUBs, is that a fixed-layout EPUB retains the design of the InDesign document (like a PDF) regardless of the device on which it’s displayed. In contrast, a reflowable EPUB displays content in a continuous thread and reflows the content based on the size of the ereader screen and the zoom level. Readers of reflowable EPUBs can change the font and font size to suit their preference.
The fixed-layout format lets you include buttons, animations, video, and audio in your publications, and viewers of fixed-layout EPUBs can view the pages and interact with the buttons and multimedia elements. This format is better suited for more design-intensive publications, such as children’s books, textbooks, and comic books—anything for which the visual layout is critical to the experience for the reader. The reflowable format is the preferred choice for text-intensive publications such as fiction and non-fiction books where the visual layout is not as important.
Adding animation
Animation effects let you add movement and other visual effects to InDesign objects and groups. For example, you can animate a graphics frame by making it fly into place from outside the page, or you can fade in a text frame so that it turns from invisible to opaque. InDesign includes several motion presets, which are preset animations that you can quickly apply to objects. You can also use any object as a motion path for another object or group.
Next, you’ll examine a group that has already been assigned animation settings that cause it to automatically “fly” onto the page when a viewer opens the exported EPUB file. You’ll preview this animation within InDesign, and then you’ll create some animations of your own that automatically play when the page is displayed. To complete this section, you’ll adjust the timing of the animations so that they play in the desired sequence.
Using a motion preset to create animation
The quickest and easiest way to animate an object or group is to apply any of more than 40 built-in motion presets. After you apply a preset, you have several options for controlling how the animation is played, including the event that triggers the animation and the duration.
-
Choose File > Open, and then open the 15_FixedLayout_Partial file in the Lesson15 folder.
-
Choose File > Save As, name the file 15_FixedLayout.indd, and save it in the Lesson15 folder.
Before you create an animation, you’ll take a look at a group that’s already had animation effects applied to it.
-
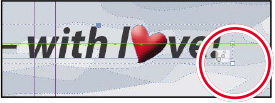
Use the Zoom tool to zoom in on the text frame in the top half of page 1 beneath the main heading that begins “and we can provide it …” and then use the Selection tool (
 ) to click the
text frame. A dotted-line border indicates that you’ve selected a
group, which includes the text frame and the red, heart-shaped
object.
) to click the
text frame. A dotted-line border indicates that you’ve selected a
group, which includes the text frame and the red, heart-shaped
object.Notice the small icon in the lower-right corner of this group of objects. This indicates that an animation has been applied to the group. Notice, too, that a green line extends from the pasteboard to the center of the group. The circle at the right end of the green line indicates the starting point of the path; the arrowhead at the left end is the end point of the path.
The icon in the lower-right corner indicates that the group has been animated.

The green line indicates the path along which the group will move.
-
Choose Window > Interactive > Animation, or click the Animation icon (
 ) to open the Animation panel.
Notice that the group has a name (Animated Group), and Custom (Fly
In From Right) is selected from the Preset menu. (The word “Custom”
at the beginning of the preset name indicates that the default
settings for this preset have been modified. You’ll modify other
presets later in this lesson.) On Page Load is selected in the
Event(s) menu, which means the animation will start playing
automatically as the page is displayed.
) to open the Animation panel.
Notice that the group has a name (Animated Group), and Custom (Fly
In From Right) is selected from the Preset menu. (The word “Custom”
at the beginning of the preset name indicates that the default
settings for this preset have been modified. You’ll modify other
presets later in this lesson.) On Page Load is selected in the
Event(s) menu, which means the animation will start playing
automatically as the page is displayed.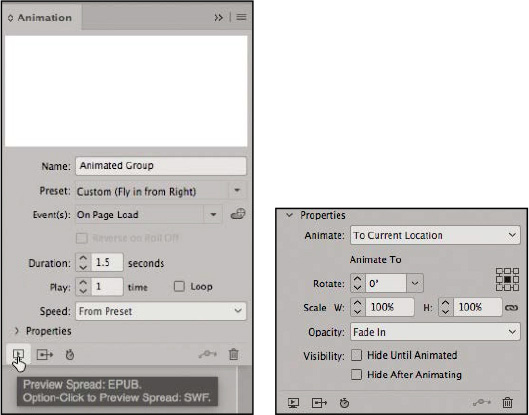
Clicking the triangle next to Properties in the Animation panel expands the panel and provides access to several additional animation controls.
-
To preview the animation, click the Preview Spread button (
 ) at the bottom left of the Animation panel.
The EPUB Interactivity Preview panel opens. Drag the lower-right or
-left corner of the panel to make it large enough to view the
publication. Click the Play Preview button, which is the farthest
left along the bottom control panel, and the animated headline
flies in from the right side of the page. See the sidebar on the
next page for a full explanation of the EPUB Interactivity Preview
panel.
) at the bottom left of the Animation panel.
The EPUB Interactivity Preview panel opens. Drag the lower-right or
-left corner of the panel to make it large enough to view the
publication. Click the Play Preview button, which is the farthest
left along the bottom control panel, and the animated headline
flies in from the right side of the page. See the sidebar on the
next page for a full explanation of the EPUB Interactivity Preview
panel. -
Drag the EPUB Interactivity Preview panel to the bottom of the dock, as you’ll use it throughout this lesson. The panel icon (
 ) displays in the dock.
Next, you’ll add a preset to another group and then to a text frame, and you’ll customize the settings of both animations.
-
Choose View > Fit Page In Window.
-
With the Selection tool (
), click any of the dog or
cat graphics at the bottom of the page except the one on the far
left, which you will work with separately later in the lesson.
Clicking any of the graphics selects the group of four
graphics. Tip: When you choose a motion
preset, a proxy preview of the animation is displayed at the top of
the Animation panel. Move the pointer within the proxy window to
repeat the preview of the selected preset.
Tip: When you choose a motion
preset, a proxy preview of the animation is displayed at the top of
the Animation panel. Move the pointer within the proxy window to
repeat the preview of the selected preset. -
Open the Animation panel (
) and choose Fly In From
Bottom from the Preset menu. Notice how the proxy preview shows you
what the preset does using a pink butterfly image. Try several
presets and then return to Fly In From Bottom. Ensure that On Page
Load is selected in the Event(s) menu.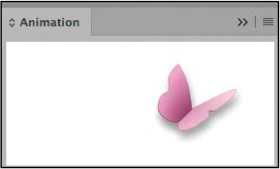
-
Select the red text frame with white text. In the Animation panel, ensure that On Page Load is selected in the Event(s) menu. Apply the Fade In preset and set the Duration to 2 seconds.
-
Click the Play Preview button in the lower-left corner of the EPUB Interactivity Preview panel to view the animations. Notice that the group at the top of the page appears first, followed shortly by the group of graphics at the bottom of the page, and finally the red text frame. The sequence is a result of the order in which the animations were created. Next, you’ll modify the order in which these animations play.
The EPUB Interactivity Preview panel
-
Play Preview (
 ): Click to play a preview of the
document. Alt-click (Windows) or Option-click (macOS) to replay the
preview.
): Click to play a preview of the
document. Alt-click (Windows) or Option-click (macOS) to replay the
preview. -
Clear Preview (
 ): Click to clear the
preview.
): Click to clear the
preview. -
Navigate between previous page (
 ) and next page
(
) and next page
( ):
Click the left or right arrows to navigate between previous and
next pages. Preview Document Mode must be enabled to navigate to
the previous or next page. Click Play to enable the previous page
and next page buttons.
):
Click the left or right arrows to navigate between previous and
next pages. Preview Document Mode must be enabled to navigate to
the previous or next page. Click Play to enable the previous page
and next page buttons.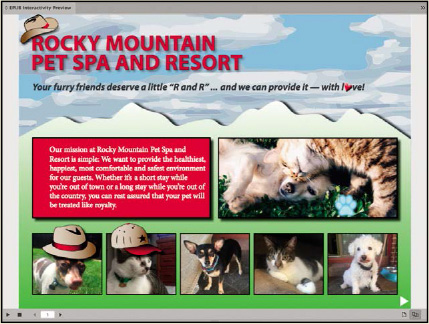
-
Set Preview Spread Mode (
 ): Click to set the mode
to preview spread mode. This is the default mode and is especially
useful for testing interactive elements on the current page.
): Click to set the mode
to preview spread mode. This is the default mode and is especially
useful for testing interactive elements on the current page. -
Set Preview Document Mode (
 ): Click to set the mode
to preview document mode. This mode allows you to run through each
page of the document and test the interactive elements.
): Click to set the mode
to preview document mode. This mode allows you to run through each
page of the document and test the interactive elements. -
Collapse/Expand panel (
 ): Click to
expand/collapse the EPUB Interactivity Preview panel.
): Click to
expand/collapse the EPUB Interactivity Preview panel.
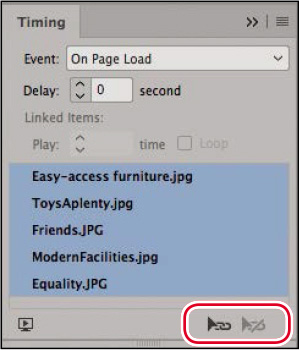
Adjusting the timing of animations
The Timing panel lists the animations on a page or spread and lets you change the order in which animations are played, play animations simultaneously, or delay animations. You’ll use the Timing panel to change the order in which the three animations on page 1 are played and to play two of the animations simultaneously.
-
Choose Window > Interactive > Timing or click the Timing icon (
 ) to open the Timing panel from the dock.
Ensure that On Page Load is selected in the Event menu. The three
animations you worked with in the previous section are listed,
along with others you’ll work with later in this
lesson.
) to open the Timing panel from the dock.
Ensure that On Page Load is selected in the Event menu. The three
animations you worked with in the previous section are listed,
along with others you’ll work with later in this
lesson.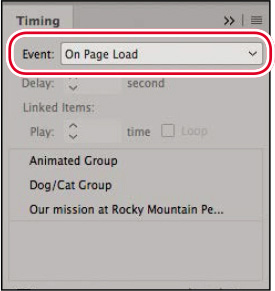
-
Click Animated Group in the list of animations. Because it was created first, it’s at the top of the list and will play first.
-
Drag Animated Group to the bottom of the list so that it plays last.
-
Select the Dog/Cat Group, and then Shift-click the animation named “Our mission …” to select it as well.
-
Click the Play Together button (
 ) at the bottom
of the Timing panel.
) at the bottom
of the Timing panel.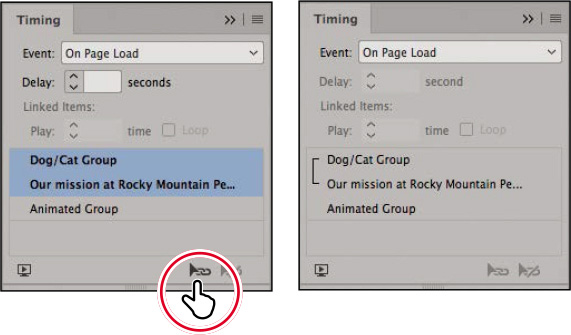
-
Select only the Dog/Cat Group and specify a delay of 1.5 seconds. This will delay the display of this animation when the page opens. After the delay, the Dog/Cat Group will fly in, and the red text frame will simultaneously fade in.
-
Click the Preview Spread button at the bottom of the Timing panel to open the EPUB Interactivity Preview panel, and then click Play Preview to preview the page.
-
Choose File > Save to save your work.
Buttons
Buttons are one of the most versatile tools for adding multimedia features to a publication. A button can trigger many actions. Next, you’ll configure buttons to play animations and add two buttons using two different possible actions.
Note: A good way to keep
organized and to make sure the buttons are on top of other content
is to put the buttons on their own layer. This has already been
done in the file you’re using for this lesson.
Using buttons to play animations
The animations you worked with in the previous section are configured to play automatically when the page in the exported EPUB is displayed. You can also create animations that play when you perform other actions, such as moving the pointer over an animated object or clicking an object or group that’s been configured to work as a button.
In this section, you’ll first examine an object that’s already been animated and converted into a button that plays an animation. Then you’ll create a new button that animates an already-animated object.
-
Use the scroll bar on the right side of the document window to scroll down slightly. You’ll see a hat on the dog’s head, illustration below the dog on the far left. Use the Selection tool (
) to position the hat, matching the screen
capture below, and then choose View > Fit Page In Window.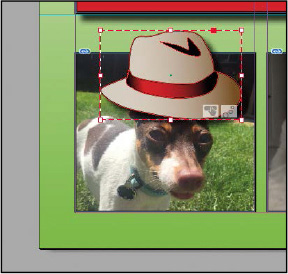
Notice the two icons in the lower-right corner of the group’s bounding box: The icon on the right indicates that the group is animated; the icon on the left indicates that the group is also a button.
-
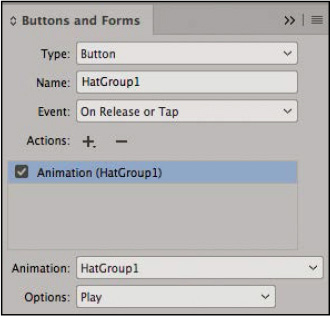
The hat illustration is made up of several paths created with the Pen tool, and the paths have been grouped together (Object > Group). With the hat group selected, open the Animation panel. Its name is HatGroup1.
Notice that the Spin preset has been applied, and Release is selected in the Event(s) menu. This means that a button will trigger the animation. The Duration and Play values show that the animation will take one second to play and will play two times.
 Note: Throughout this lesson,
if you have trouble with the interactivity functioning in the EPUB
Interactivity Preview panel, press the Clear Preview button
() and
then press the Play button () again.
Note: Throughout this lesson,
if you have trouble with the interactivity functioning in the EPUB
Interactivity Preview panel, press the Clear Preview button
() and
then press the Play button () again. -
Close the Animation panel and open the Buttons And Forms panel (
 ), which is located in the dock on the right
when you use the [Digital Publishing] workspace. Or choose Window
> Interactive > Buttons And Forms. Notice that the group has
been configured to work as a button that plays the HatGroup1
animation.
), which is located in the dock on the right
when you use the [Digital Publishing] workspace. Or choose Window
> Interactive > Buttons And Forms. Notice that the group has
been configured to work as a button that plays the HatGroup1
animation. -
Click the Preview Spread button (
) at the bottom
of the Buttons And Forms panel to open the EPUB Interactivity
Preview panel. After the opening animations are displayed, click
the hat group to play the animation and then close the panel.
Next, you’ll configure a button that animates a different object.
-
Select the hat illustration in the lower-right corner of the page.
The icon in the lower-right corner indicates that this group is animated; however, you may have noticed that when you preview the page, the group is not visible. That’s because although the group is configured to fly in from above the page, there’s no way to play the animation. To address this, you’ll convert the accompanying pet graphic into a button.
-
Select the Rectangle Frame tool (
 ) in the Tools
panel and draw a frame over the photo with the white dog in the
lower-right corner of the page. You should still be on the Buttons
layer, but if not, open the Layers panel and move this frame up to
the Buttons layer. Make sure the frame is set to None for both Fill
and Stroke. This makes an object you can use as a button that
appears to be one of the visual elements on the page but is
actually a separate object on the Buttons layer above, making sure
you don’t disturb the artwork.
) in the Tools
panel and draw a frame over the photo with the white dog in the
lower-right corner of the page. You should still be on the Buttons
layer, but if not, open the Layers panel and move this frame up to
the Buttons layer. Make sure the frame is set to None for both Fill
and Stroke. This makes an object you can use as a button that
appears to be one of the visual elements on the page but is
actually a separate object on the Buttons layer above, making sure
you don’t disturb the artwork.The size of the frame becomes the tappable or clickable area in the EPUB, so you can use a frame with no fill and no stroke to make a button with a larger tappable area than a small graphic would have.
-
In the Buttons And Forms panel, click the + sign next to Actions: (
 ) and choose Animation from the drop-down
menu. Then choose HatGroup5 from the Animation menu, which shows
the animations in the current file.
) and choose Animation from the drop-down
menu. Then choose HatGroup5 from the Animation menu, which shows
the animations in the current file.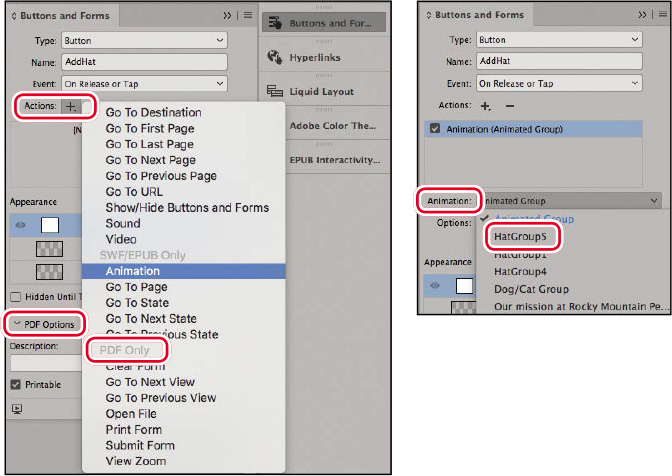
-
Name the button AddHat. Always name your buttons; otherwise things will get very confusing because InDesign will automatically name them Button 1, Button 2, and so on. Make sure On Release Or Tap is selected in the Event(s) menu.
You don’t need to choose a Type first because when you add an action the object is automatically turned into a button. Notice the list of possible actions, but note that the bottom group is only for PDFs. In the Buttons And Forms panel, click the triangle next to PDF Options at the bottom of the panel to close that area. You won’t need those while working on an EPUB.
-
Click the Preview Spread button at the bottom of the Buttons And Forms panel to open the EPUB Interactivity Preview panel. After the opening animations are displayed, move the pointer over the photo of the white dog and click to play the new animation, and then close the panel. Notice that the pointer becomes a pointing finger when you hover over something such as this button that the reader can click to activate.
-
Choose File > Save to save your work.
Using a button to trigger custom motion paths for animations
Many of the motion presets in InDesign cause an object to move along a path. In addition to using this type of preset to animate an object, you can use any InDesign object as the path for animating another object by converting it to a motion path. Next you’ll configure a button to play an animation that already has a custom path; then you’ll create a custom path of your own and use it as a motion path.
-
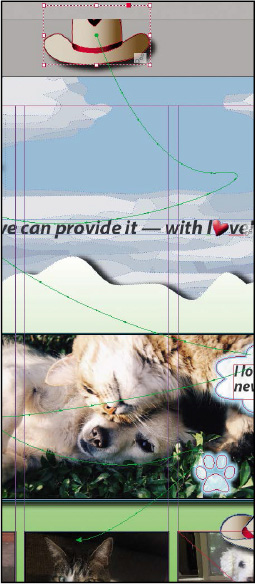
Use the scroll bar on the right side of the document window to scroll up slightly. You’ll see a hat illustration above the fourth column. Use the Selection tool (
) to
select the graphic.As you’ve seen with the animations you worked on earlier, the green motion path indicates how the hat will move when the animation is played. This custom path was created in InDesign using the Pen tool.
Next, you’ll convert the graphics frame at the bottom of the column into a button that plays the already-configured hat animation. Then, you’ll create your own custom path for a different hat and configure a button to play it.
-
Choose View > Fit Page In Window. Select the Rectangle Frame tool (
) and draw a frame over the photo with the
cat at the bottom of the fourth column, making sure that it has no
stroke and no fill and that it is on the Buttons layer. -
In the Buttons And Forms panel, click the + sign next to Actions: (
) and choose Animation from the drop-down
menu. Then choose HatGroup4 from the Animation menu. -
Name the button FloatingHat1. Make sure On Release Or Tap is selected in the Event(s) menu.
-
Click the Preview Spread button at the bottom of the Buttons And Forms panel to open the EPUB Interactivity Preview panel. After the opening animations are displayed, move the mouse over the photo with the cat at the bottom of the fourth column. Notice that the pointer changes to a pointing hand because it is sensing the button you just created. Click to play the new animation, and then close the panel.
Now that you know how a custom motion path works, you’ll create your own custom animation path and then configure a button to play it.
-
Use the scroll bar on the right side of the document window to scroll up slightly. You’ll see a hat illustration above the third column.
-
Use the Pen tool (
 ) to draw a zigzag path that
begins near the middle of the hat and ends slightly above the
middle of the dog’s head in the third column. To create straight
path segments rather than curved segments, make sure you click and
release the mouse each time you create a point. (If you’re
comfortable, you can use the Pen or Pencil tool to draw a more
complex path.)
) to draw a zigzag path that
begins near the middle of the hat and ends slightly above the
middle of the dog’s head in the third column. To create straight
path segments rather than curved segments, make sure you click and
release the mouse each time you create a point. (If you’re
comfortable, you can use the Pen or Pencil tool to draw a more
complex path.) -
Use the Selection tool to select both the hat group above the third column and the line you just created, and then click Convert To Motion Path (
 ) at the bottom of the Animation panel.
On Page Load is selected in the Event(s) menu. Deselect it by
choosing On Page Load again and set the Duration to 2 seconds.
) at the bottom of the Animation panel.
On Page Load is selected in the Event(s) menu. Deselect it by
choosing On Page Load again and set the Duration to 2 seconds.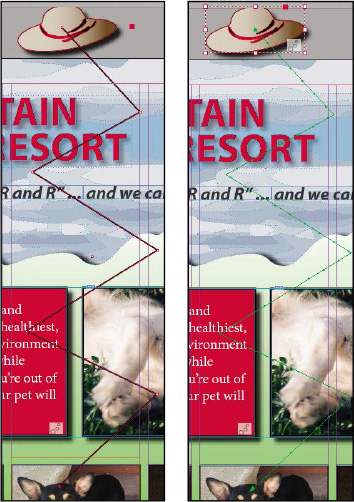
Left: Create path with Pen tool.
Right: After converting to motion path.
-
Select the Rectangle Frame tool (
) and draw a
frame over the photo of the dog at the bottom of the third column,
making sure that it has no stroke and no fill and that it is on the
Buttons layer. -
Click the + sign next to Actions in the Buttons And Forms panel (
) and choose Animation from the drop-down
menu. Then choose HatGroup3 from the Animation menu. Name the
button FloatingHat2. -
Click the Preview Spread button at the bottom of the Buttons And Forms panel to open the EPUB Interactivity Preview panel. After the opening animations are displayed, click the dog photo in the third column (which is the button you just configured to play the new animation), and then close the panel.
If you need to modify the position of the endpoint of the motion path so that the hat is placed accurately at the end of the animation, use the Selection tool (
) to select the hat group;
then switch to the Direct Selection tool ( ) and use it to move the
endpoint of the path or, optionally, to modify other points or
segments of the path.
) and use it to move the
endpoint of the path or, optionally, to modify other points or
segments of the path. -
One pet remains without a hat. Use the scroll bar to display the pasteboard below page 1 and the remaining hat. Use any of the animation techniques you’ve learned so far or experiment with other techniques to position the hat on the pet above it. (Note: The 15_End file uses the Fly In From Bottom preset.)
-
Choose File > Save to save your work.
Creating a navigation button
The next button you’ll create will be a navigation button for the reader to move through the pages. This is one of the most common uses for buttons.
Tip: Many apps for viewing
EPUBs include navigation buttons, but each app will perform
navigation differently. Adding your own buttons ensures that the
reader will easily see the navigation buttons.
-
Select the Rectangle Frame tool (
) and draw a
frame over the white triangle in the lower-right corner of the
page, making sure that it has no stroke and no fill and that it is
on the Buttons layer. Make it larger than the triangle so that the
reader does not have to click it exactly.
-
Open the Buttons and Forms panel (
) and click the
+ sign next to Actions: (). Choose Go To Next Page. Name this button
Next Page.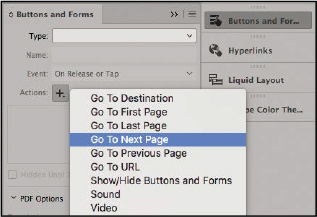
-
Open the EPUB Interactivity Preview panel, and this time choose the Preview Document Mode button (
) so that you
can preview more than the current page. If you have trouble with
the interactivity functioning, press the Clear Preview button
(),
double check that you have chosen the Preview Document Mode button,
and press Play () again. Tip: In a long document,
create the navigation buttons on the master page. If there are
several master pages, use the parent master so that you can create
the buttons once and ensure that they are consistent on all
pages. -
After the opening animations are displayed, click the white navigation button you just created, and the next page will display. You will see other animations on page 2 that you’ll work with later in this lesson.
-
Click the white triangle in the lower left to navigate back to the first page.
Creating a pop-up caption
Pop-up captions are frequently used in EPUBs. There are many ways to create them. Using InDesign’s ability to hide and show objects is one of the simplest methods. You’ll learn that next.
-
Select the paw graphic on top of the large photo of the dog and cat. First you’ll add some animation so that the reader is prompted to click it.
-
Open the Animation panel (
). Name the animation
Paw Caption Trigger. Choose the Fade In preset,
Duration 1.5 seconds, and Play 4
times. -
Open the Buttons And Forms panel (
), click the +
sign next to Actions: (), and choose Show/Hide Buttons And Forms.
Name the button Caption Trigger. -
Select the caption above that says “I love making new friends.” This is a group of InDesign text and path objects with effects applied. Click the + sign next to Actions: (
), and
again choose Show/Hide Buttons And Forms in the Buttons And Forms
panel (), and name this button
Caption. Tip: The Visibility list
available to the Show/Hide action lists all of the buttons on the
current page or spread. You can’t use this action to work with
buttons elsewhere in a document. -
In the Visibility section, leave everything on Ignore (
 ) except Caption and Caption Trigger. Click
the Ignore () symbol next to Caption and click again to
cycle through the options until it is set to Hide (
) except Caption and Caption Trigger. Click
the Ignore () symbol next to Caption and click again to
cycle through the options until it is set to Hide ( ). Do the same
with Caption Trigger until it is set to Show (
). Do the same
with Caption Trigger until it is set to Show ( ). Also select Hidden
Until Triggered below the Appearance area.
). Also select Hidden
Until Triggered below the Appearance area. -
Select the paw object that you converted to a button in step 3. In the Buttons And Forms panel (
) (which will
still be open), change the Visibility of Caption to Show () and Caption
Trigger to Hide ().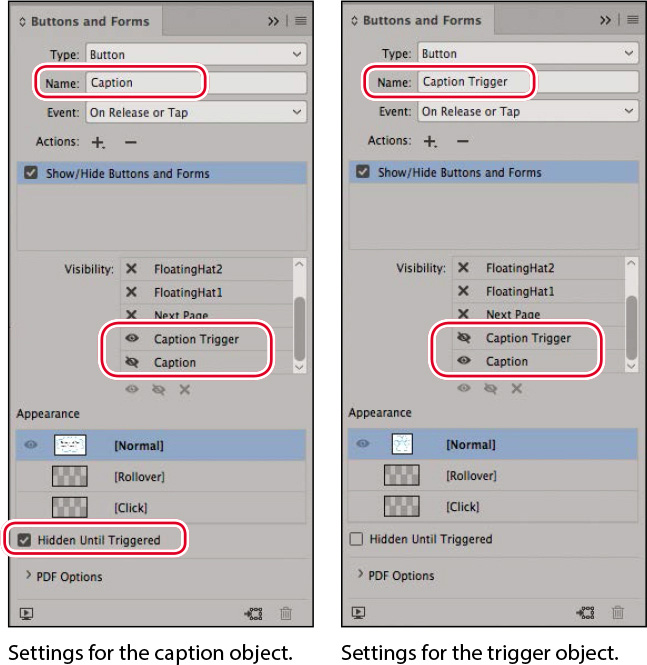
As a result, the trigger object will be visible when the reader opens the page, and the caption object will be hidden. When the trigger object is clicked or tapped, it will disappear, and the caption object will appear. When the caption object is clicked or tapped, it will disappear and the trigger object will reappear.
-
Open the EPUB Interactivity Preview panel and test this by clicking the paw trigger object and then the caption.
-
Choose File > Save to save your work.
Adding multimedia and interactive elements
The ability to add movies and sounds to an InDesign document that will be exported as a fixed-layout EPUB means that you can create media-rich, interactive publications that aren’t possible with print publishing.
In many ways, imported movies and sounds are like other InDesign objects. For example, you can copy, paste, move, and delete movies and sounds just like other objects—but they also have unique properties that you can adjust within InDesign.
Adding a movie
Adding a movie to a fixed-layout EPUB InDesign document is similar to adding a photo or illustration to a print document. Next, you’ll import a movie into the document, scale it, and use the Media panel to choose a poster image that’s displayed when the movie isn’t playing.
Note: You can import video
files in H.264-encoded MP4 format and audio files as MP3 format.
You can use the Adobe Media Encoder application that is part of a
Creative Cloud membership to convert other video or audio formats
to MP4 or MP3.
-
Navigate to page 2. Choose File > Place. Select the CuteClips.mp4 video file in the Links folder in the Lesson15 folder, and then click Open.
-
Click the loaded video icon (
 ) where the
horizontal ruler guide below the mountain peaks intersects with the
vertical ruler guide in the middle of the leftmost column. Clicking
the loaded video icon places the video at full size, which is too
large for the layout, so you need to make it smaller.
) where the
horizontal ruler guide below the mountain peaks intersects with the
vertical ruler guide in the middle of the leftmost column. Clicking
the loaded video icon places the video at full size, which is too
large for the layout, so you need to make it smaller.
-
Make sure that the top-left reference point is selected at the left end of the Control panel (
 ). Enter 43 in the Scale
X Percentage or Scale Y Percentage box in the Control panel and
press Return or Enter. The movie now fits within the predrawn
guides. Note: A static poster image
is displayed in an ereader before the video plays.
). Enter 43 in the Scale
X Percentage or Scale Y Percentage box in the Control panel and
press Return or Enter. The movie now fits within the predrawn
guides. Note: A static poster image
is displayed in an ereader before the video plays. -
Choose Window > Interactive > Media to open the Media panel, or click the Media icon (
 ) to open it from the
dock. If you want, use the controls below the movie image to
preview the movie.
) to open it from the
dock. If you want, use the controls below the movie image to
preview the movie.Instead of displaying the first frame of the movie when the movie is not playing, you’ll choose a poster image to display instead.
-
Drag the slider below the preview window almost all the way to the right. The final seconds of the movie show a catchphrase. You’ll specify the selected frame as the default poster image. From the Poster menu in the Media panel, choose From Current Frame. Click the Click To Use Current Frame As Poster button (
 ) to select the frame and display it in the
movie frame.
) to select the frame and display it in the
movie frame. Note: Each ereader app will
have different video player controls. After you export your EPUB,
test the video player in different ereaders.
Note: Each ereader app will
have different video player controls. After you export your EPUB,
test the video player in different ereaders. -
Click the Preview Spread button at the bottom of the Media panel to view the page. In the EPUB Interactivity Preview panel, click the Play preview button to preview the page, and then click the Play/Pause button in the movie controller to play and pause the movie. There is a separate control to adjust the sound volume.
-
Close the EPUB Interactivity Preview panel.
-
Choose File > Save.
Adding a sound
Adding a sound to a page is the same as adding a movie, but the options for controlling how sounds are displayed and played are a little different from those for modifying movies because movies and sounds are different types of media.
Next, you’ll add a sound to the cover page, and then you’ll convert one of the objects on the page into a button that plays the sound when clicked. You’ll also hide the sound object so that it’s not visible on the page.
-
Navigate to page 1. Choose File > Place, select the BckgMusic.mp3 sound file in the Links folder in the Lesson15 folder, and then click Open.
-
Click the pasteboard outside the upper-left corner of the page. Don’t worry about placing the sound precisely because you’ll hide this object later.
 Note: By default, a
controller is displayed for a sound file. The Media panel doesn’t
include an option that enables you to turn off display of the
controller for a sound file.
Note: By default, a
controller is displayed for a sound file. The Media panel doesn’t
include an option that enables you to turn off display of the
controller for a sound file.
-
Open the Media panel (
), and notice the options
available for a sound file. If you want, use the Play and Pause
buttons to preview the sound. Leave the default settings
unchanged.This is all you need to do to add a sound, but for this lesson, instead of displaying sound controls in the ereader, as would happen if you left the object where it is, you’ll make it smaller, hide it, and then configure a button to play it.
-
In the Control panel, change the Width and Height of the sound frame to 30 (pixels).
-
Use the Selection tool to position the sound frame on top of the hat illustration.
-
Choose Object > Arrange > Send To Back.
-
Use the Selection tool to select the hat illustration that’s now in front of the sound frame.
-
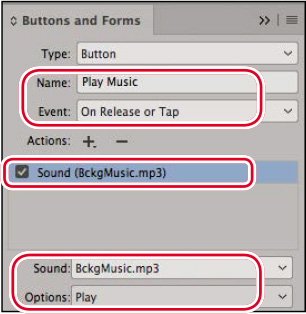
Open the Buttons And Forms panel. Choose Button from the Type menu in the Buttons And Forms panel, and enter Play Music in the Name field.
-
Make sure On Release Or Tap is selected in the Event menu. Click the + sign next to Actions: (
) and choose
Sound. Because the page has only one sound, it is automatically
selected in the Sound menu. Ensure that Play is selected in the
Options menu. -
Click the Preview Spread button. Click the Play Preview button in the EPUB Interactivity Preview panel, and then click within the hat illustration to play the sound. The audio clip (approximately 30 seconds in length) will play once and stop.
-
Close the EPUB Interactivity Preview panel.
-
Choose File > Save.
Creating a slideshow
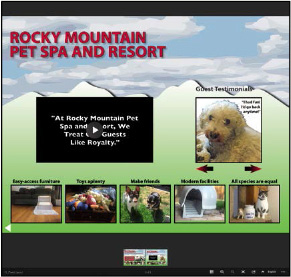
A slideshow is a sequence of stacked images displayed one at a time as a viewer taps Previous and Next buttons. The sample document for this lesson already includes the graphics you need to create an interactive slideshow. You’ll arrange these graphics in a stack, convert them into a multi-state object, and then configure buttons that enable a viewer to navigate through the slides.
-
Navigate to page 2 of the document.
-
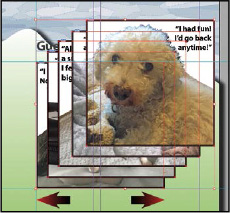
Using the Selection tool (
), select the top image of
the dog, the frontmost of the five overlapping graphics frames, to
the right of the movie frame. -
Press Shift, and then select each of the other four overlapping graphics frames in succession from front to back. Release the Shift key after you’ve selected all five frames.
-
Choose Window > Object & Layout > Align. In the Align panel, choose Align To Selection (
 ) from the Align
To menu if it’s not already selected. Click the Align Left Edges
button (
) from the Align
To menu if it’s not already selected. Click the Align Left Edges
button ( ), and then click the Align Bottom Edges
button (
), and then click the Align Bottom Edges
button ( ).
).
-
With the graphics frames still selected, choose Window > Interactive > Object States to display the Object States panel, or click the Object States icon (
 ) to open it
from the dock, and then click the Convert Selection To Multi-State
Object button (
) to open it
from the dock, and then click the Convert Selection To Multi-State
Object button ( ) at the bottom of the panel. If necessary,
lengthen the panel to display the names of all objects. (The panel
looks empty until you do the conversion.) Tip: Each state in a
multi-state object can be named. The stack is like a layer stack
and the order of the objects can be changed by dragging them up or
down.
) at the bottom of the panel. If necessary,
lengthen the panel to display the names of all objects. (The panel
looks empty until you do the conversion.) Tip: Each state in a
multi-state object can be named. The stack is like a layer stack
and the order of the objects can be changed by dragging them up or
down. -
In the Object States panel, enter Guest Quotes in the Object Name box, and then press Enter or Return.
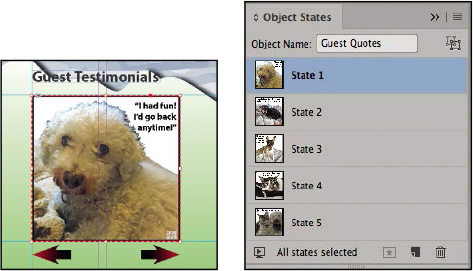
Graphics frames combined into a multistate object. Each image appears as a separate state in the Object States panel.
Now that you’ve created a multi-state object, you’ll provide a way to let viewers scroll through the images.
-
Use the Selection tool to select the red arrow below the lower-left corner of the multi-state object and open the Buttons And Forms panel (
). This will be the button to scroll
backwards through the slides. Tip: When there are multiple
multi-state objects on a page, you may need to choose the correct
multi-state object from the Object menu in the Buttons And Forms
panel. In this file, InDesign automatically selects the Guest
Quotes multi-state object because it’s the only one on the
page. -
In the Buttons And Forms panel, click Convert To Button (
 ) at the bottom of the panel, and enter
Previous in the Name box.
) at the bottom of the panel, and enter
Previous in the Name box.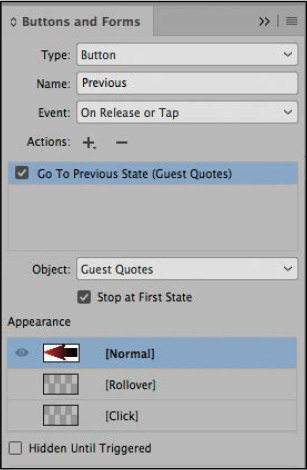
-
Click the + sign next to Actions: (
) and choose Go
To Previous State from the menu. (The “Guest Quotes” multi-state
object is automatically added to the list of actions.) -
Select Stop At First State. This prevents the button from selecting the last state when it’s clicked and the first state is selected.
-
Select the right-pointing red arrow and repeat steps 2–5 to configure a button named Next. To make a button that scrolls forward through the slides, when you click Add New Action For Selected Event, choose Go To Next State from the Actions menu, and then select Stop At Last State.
-
Open the EPUB Interactivity Preview panel, click the Play Preview button, and then click the Previous and Next buttons you created to view the slideshow.
-
Close the EPUB Interactivity Preview panel.
-
Choose File > Save.
Creating a hyperlink
Hyperlinks let viewers jump to other locations in a document, as well as to other documents or to websites. A hyperlink includes a source element (text, a text frame, or a graphics frame) and a destination, which is the URL, email address, page, or text anchor to which the hyperlink jumps. Next, you’ll create a hyperlink to a website using a graphics frame.
-
Use the Selection tool to select the graphics frame in the lower-right corner of page 2. An animation icon is displayed in the lower-right corner because the graphics frame—along with the other graphics frames along the bottom of the page—is configured to fly in when the page loads.
-
Choose Window > Interactive > Hyperlinks to display the Hyperlinks panel, or click the Hyperlinks icon (
 )
to open it from the dock.
)
to open it from the dock. -
Choose New Hyperlink from the Hyperlinks panel flyout menu.
-
Select URL from the Link To menu, and type a URL in the URL box (the sample document uses http://www.humanesociety.org). Deselect Shared Hyperlink Destination.
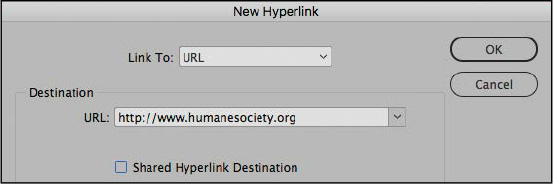
-
Open the EPUB Interactivity Preview panel, click the Play Preview button, and then click the text frame to which you added the hyperlink. The Humane Society of the United States home page is displayed in your browser.
-
Return to InDesign, and display the first page of the document.
-
Close the EPUB Interactivity Preview panel.
-
Choose File > Save.
Exporting an EPUB file
Much as the settings in the Print dialog box control the appearance of printed pages, the settings you use when you export an InDesign document as an EPUB control the appearance of the EPUB.
-
Choose File > Export.
-
In the Export dialog box, choose EPUB (Fixed Layout) from the Save As Type menu (Windows) or the Format menu (macOS).
-
In the File Name box (Windows) or the Save As box (macOS), name the file 15_FixedLayout.epub and save the file in the Lesson15 folder, located inside the Lessons folder within the InDesignCIB folder on your hard drive. Click Save.
Note: Rasterize First Page
creates an image that will be used as an icon for the publication
in the ebook reader app and on an ebook storefront. -
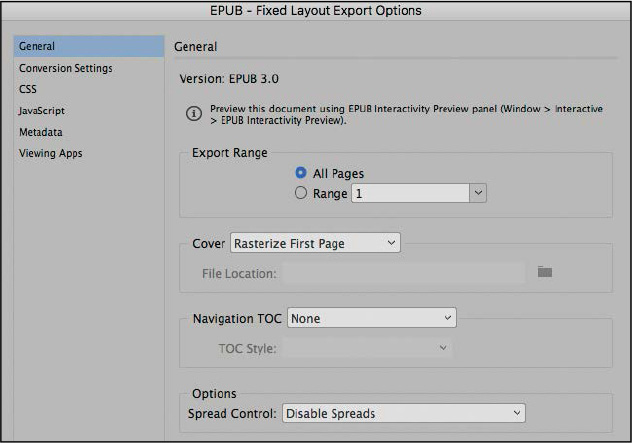
In the General section of the EPUB – Fixed Layout Export Options dialog box, notice that EPUB 3.0 is automatically displayed for Version. This is the only EPUB version available for fixed-layout EPUBs. Make sure the following options are selected:
-
Export Range: All Pages
-
Cover: Rasterize First Page
-
Navigation TOC: None
-
Spread Control: Disable Spreads
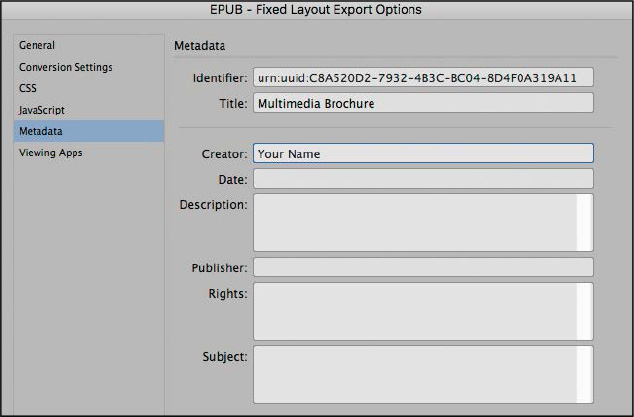
 Tip: If your EPUB will be
formally published, the information in the Metadata dialog box is
very important. Ebook sites require that this information be
provided. Download the metadata specifications from the
publisher.
Tip: If your EPUB will be
formally published, the information in the Metadata dialog box is
very important. Ebook sites require that this information be
provided. Download the metadata specifications from the
publisher. -
-
Click Metadata in the list on the left of the EPUB – Fixed Layout Export Options dialog box. Enter Multimedia Brochure in the Title field and your name in the Creator field.
-
Click Conversion Settings in the list on the left of the EPUB – Fixed Layout Export Options dialog box. Choose PNG from the Format menu to ensure that the graphics in grouped objects are displayed correctly in the exported EPUB.
-
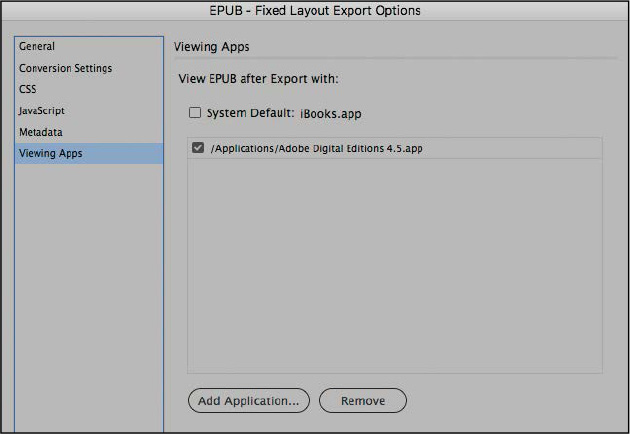
Click Viewing Apps in the list on the left of the EPUB – Fixed Layout Export Options dialog box.
The System Default in the Viewing Apps section will vary depending on your operating system. For this lesson, we’ll use Adobe Digital Editions as the viewing application (ebook reader). If you’ve installed Adobe Digital Editions and it’s not listed as an application, click Add Application and select it from the Program folder (Windows) or Applications folder (macOS) on your computer, and then select it as the preferred viewing application. Alternatively, select another program that reads EPUBs. When the EPUB is exported, it is automatically opened in the selected program. The Adobe Digital Editions software is available as a free download from www.adobe.com and is available on Creative Cloud.
-
Click OK to export a fixed-layout EPUB. If an alert is displayed warning that certain objects might not appear as expected after export, click OK to continue and view the EPUB.
If Adobe Digital Editions is installed on your computer, the EPUB file will open automatically, and you can navigate through it to view the content and work with the multimedia and interactive elements you created. You can also open the EPUB file on any device that supports the EPUB format. If you selected both iBooks.app and Adobe Digital Editions, the EPUB opens in both programs.
Notice the differences in the interface between different ebook readers. Part of the process of creating a digital publication such as a fixed-layout EPUB is to test the functionality on the various devices the target audience might use.
-
Return to InDesign.
-
Choose File > Save.
Congratulations! You’ve created a fixed-layout EPUB with multimedia and inter-activity that will have the same layout across all viewing devices.
InDesign CC Publish Online
Tip: You can also select
Publish Online After Printing in the General section of the Print
dialog box (File > Print) to distribute a document online when
you print it.
Tip: If you don’t intend to
distribute your documents online, you can hide all Publish Online
commands and controls by selecting Disable Publish Online in the
Publish Online section of the Preferences dialog box.
-
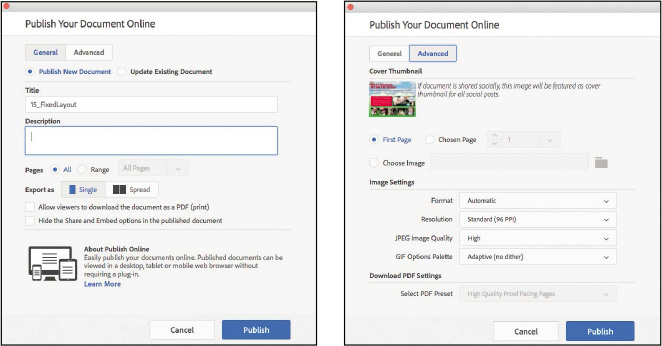
To publish the currently displayed document online, click Publish Online in the Application bar or choose File > Publish Online.
-
In the General section of the Publish Your Document Online dialog box, use the default name or enter a new one in the Name field and, optionally, add a Description.
-
The Advanced section of the Publish Your Document Online dialog box lets you choose a cover page and specify image export settings. Make any changes you want in this dialog box, and then click Publish.
A window displays as the document uploads and provides a preview of the first page, the name of the document, the description (if any), a status bar showing the progress of the upload, and the opportunity to cancel the upload.
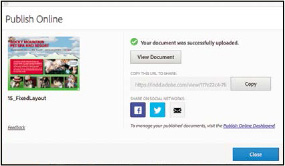
-
When the upload is complete, click View Document to display the document in a web browser and click Copy to copy the URL to the Clipboard. You can also click the Facebook, Twitter, or email buttons to share the link on social networks. Test the interactive features in your browser. Note that it may take a few minutes for both pages to be loaded and working. Also notice that the interface looks different from the ebook readers and will vary between browsers.
-
After viewing your file online, return to InDesign and click Close to close the Publish Online window and return to your document.
After you publish documents online, you can easily access the five most recently published documents from within InDesign by choosing File > Recently Published. (The Recently Publish menu does not appear until after your have published your first document.) Choose a name from the list to open the document in your web browser.
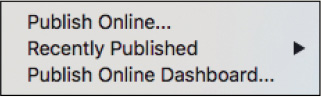
The Publish Online Dashboard lets you view, share, and delete all published documents. If you want to remove a document that you’ve published online, choose File > Publish Online Dashboard. A web page opens in your default browser and displays in chronological order a list of the documents you’ve uploaded with the most recent at the top. To delete a published document, point at it in the list, and then click the trash can icon on the right.
Exploring on your own
For additional practice, try some of the following exercises. You can continue working on the sample document and save your changes, or you can choose File > Save As and save a new document with a new name to the Lesson15 folder.
Timing animations
In this lesson, you used the Timing panel to configure the timing of three animated objects on page 1 that play automatically when the page opens. The controls in the Timing panel also let you play the animations sequentially in any order you want, and you can even create combinations of simultaneous and sequential timing.
-
With page 2 displayed in the document window, make sure nothing is selected, and then open the Timing panel.
-
The five animations are listed in the order in which they were created. Use the Selection tool (
) to select the
first animation, then Shift-click the last animation to select all
animations. Click the Play Together button () at the bottom of the
panel. -
Click the Preview Spread button at the bottom of the panel to preview the page to see what happens.
-
Select all of the animations again, and then click Play Separately (
 ) at the bottom of the Timing panel.
 -
Continue to adjust the settings in the Timing panel. The Delay field lets you add pauses between animations. Experiment with this field by selecting individual animations and specifying a Delay value. Preview the page each time you make a change.
-
Continue to experiment by creating different combinations of sequential and simultaneous animations. For example, configure two of the animations to play together first, and configure the remaining animations to play together after a short delay.
Adding sound control buttons
You also can add controls to a sound file in the Media panel. After you imported a sound file in this lesson, you configured a button to play the sound. You also hid the sound object, which also hides the sound controller in the exported file. See what happens if you choose to display the sound.
-
Place the same BckgMusic.mp3 sound file in the Links folder in the Lesson15 folder onto the pasteboard, and then drag it onto one of the pages.
-
Enter 300 in the Scale X Percentage or Scale Y Percentage box in the Control panel and press Enter or Return. (Enlarging the object makes the sound controls in the exported EPUB more visible and easier to operate.)
-
In the Media panel, choose Standard from the Poster menu. This displays a sound icon within the frame on the InDesign page, as well as in an exported interactive PDF file.
-
Preview the page in the EPUB Interactivity Preview panel. Use the controls on the sound controller to play and pause and to mute and unmute the sound. Optionally, export a fixed-layout EPUB and see how the sound controls are displayed and function in the selected viewing app(s).

Viewing your EPUB on a tablet
It’s important to test the experience that readers of your epub will have when using an ebook reader on devices such as a tablet. First, install one or more ebook readers on the device, such as Adobe Digital Editions. The easiest way to view your EPUB on an iPad or Android tablet is to email it to yourself as an attachment. On the tablet, open the email and tap the attachment to download it and choose the ebook reader on your device to open it, such as Adobe Digital Editions or iBooks. (The exact steps will vary with different email apps on different devices.) Test the interactive features in the ebook reader.
Once you know the audience for your publication, it’s a best practice to test the publication in the ebook readers they are most likely to use and make adjustments if necessary.
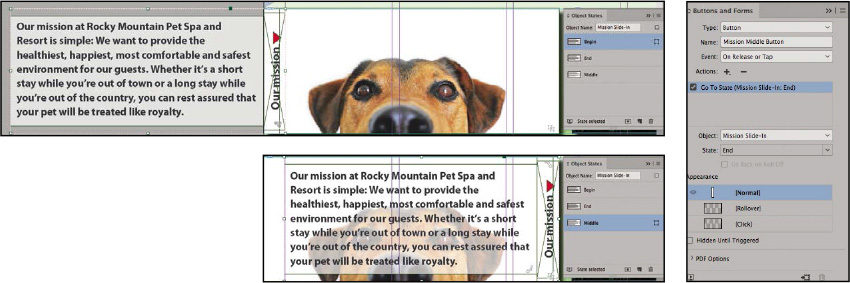
Examine a slide-in caption
Another type of caption effect is the slide-in caption. It’s complex to create, so instead you’ll examine the finished effect to see how it works.
A step-by-step guide to creating this caption effect is available with the lesson download.
-
Open the file 15_FixedLayout-Alternate. The box with the mission statement has been changed to a slide-in caption.
-
Open the EPUB Interactivity Preview panel and click the red triangle above the words “Our Mission” on the far left of the picture of the dog’s head with a white background. A text box containing the mission statement slides in from the left, over the picture of the dog.
-
Click the red triangle again and the mission statement slides back off the photo and the button returns to the start position. Close the EPUB Interactivity Preview panel.

-
This effect is created using three duplicate object states with different button actions, animation, and timing settings. Click the object and open the Object States panel to start exploring the structure.
-
What’s the primary difference between a reflowable EPUB and a fixed-layout EPUB?
-
InDesign provides two methods for animating objects. What are they, and how do they differ?
-
By default, animations play in the order in which they were created. How can you change the order in which animations are played, and how can you play multiple animations simultaneously?
-
How can you preview multimedia and interactive elements within InDesign?
-
How do you create a slideshow?
-
The reflowable EPUB format allows the EPUB reader to optimize the content depending on the display device. For example, the viewer of a reflowable EPUB can adjust the display size of the text, which affects the amount of text on a given page and the flow of text from page to page. In fixed-layout EPUBs, the dimensions of the original InDesign pages are maintained, as is the fidelity to the original layout.
-
You can animate objects in groups by choosing a motion preset in the Animation panel, or you can create a motion path. A motion path consists of two elements: the animated object or group and a motion path along which the animated object moves.
-
The controls in the Timing panel let you control when animations are played. All animations associated with the selected Event (such as On Page Load) are displayed. You can drag the names within the list to change the order in which they’re played. To play them simultaneously, you can select multiple animations and click the Play Together button (
). -
The EPUB Interactivity Preview panel lets you preview and test multimedia and interactive elements. The Animation, Timing, Media, Object States, and Buttons And Forms panels all include a Preview Spread button, and you can also display the panel by choosing Window > Interactive > EPUB Interactivity Preview.
-
To create a slideshow, first create a stack of objects, and then use the Object States panel to create a multi-state object. Next, create and configure two buttons: one that displays the previous state of the multi-state object, and one that displays the next state.