14 Creating Adobe PDF Files with Form Fields
Lesson Overview
In this lesson, you’ll learn to do the following:
-
Set up a workspace for forms.
-
Add and configure different types of form fields.
-
Learn the differences between different types of form fields.
-
Use prebuilt form elements.
-
Set the tab order of form fields.
-
Add a Submit button to a form.
-
Export an Adobe PDF (Interactive) file with form fields.
-
Test your form in Adobe Acrobat Reader.

This lesson will take approximately 45 minutes to complete.
Please log in to your account on peachpit.com to download the lesson files for this chapter, or go to the “Getting Started” section at the beginning of this book and follow the instructions under “Accessing the Lesson Files and Web Edition.” Store the files on your computer in a convenient location.
Adobe InDesign CC provides all the tools you need to create simple PDF forms, and you have the option of using Adobe Acrobat Pro DC to add features and functionality that aren’t available in InDesign.
Getting started
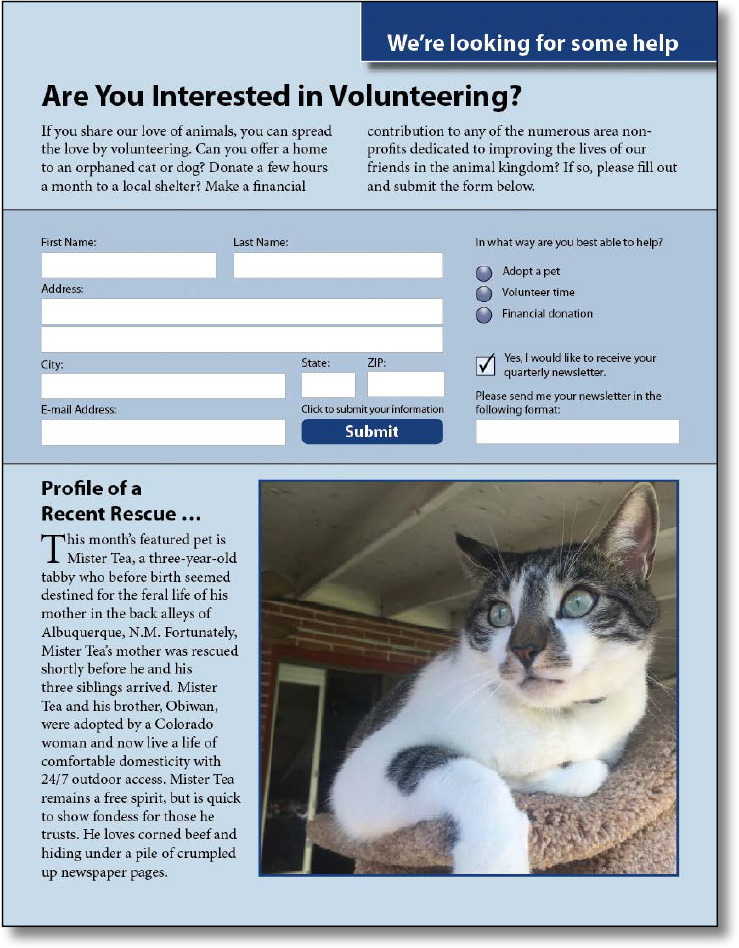
In this lesson, you’ll add several different types of form fields to a volunteer registration form, export an Adobe PDF (Interactive) file, and then open the exported file in Adobe Acrobat Reader and test the fields you created.
 Note: If you have not already
downloaded the project files for this lesson to your computer from
your Account page, make sure to do so now. See “Getting Started” at the beginning of the
book.
Note: If you have not already
downloaded the project files for this lesson to your computer from
your Account page, make sure to do so now. See “Getting Started” at the beginning of the
book.
-
To ensure that the preferences and default settings of your Adobe InDesign program match those used in this lesson, move the InDesign Defaults file to a different folder following the procedure in “Saving and restoring the InDesign Defaults file” on pages 4–5.
-
Start Adobe InDesign. To ensure that the panels and menu commands match those used in this lesson, choose Window > Workspace > [Interactive For PDF], and then choose Window > Workspace > Reset Interactive For PDF. To begin working, you’ll open an InDesign document that is already partially completed.
Note: If an alert informs you
that the document contains links to sources that have been
modified, click Update Links. -
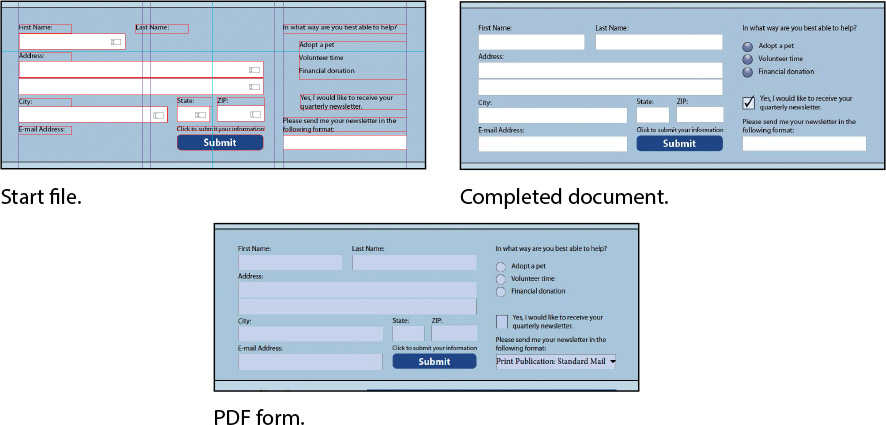
Choose File > Open, and open the 14_Start.indd file in the Lesson14 folder, located inside the Lessons folder within the InDesignCIB folder on your hard drive. This one-page document is a registration form. (If the Missing Fonts dialog box displays, click Sync Fonts, and then click Close after the fonts have successfully synced from Typekit.)
-
To see what the finished document looks like, open the 14_End.indd file in the Lesson14 folder.
-
Close the 14_End.indd file after you have finished examining it, or you can leave this document open for reference.
-
Open the 14_Start.indd file and choose File > Save As, rename the document 14_PDF_Form.indd, and save it in the Lesson14 folder.
Set up a workspace for forms
When creating a fillable form with InDesign, you’ll start with a page that has already been designed. The step of taking a designed form and turning it into a form that can be filled out in a PDF uses specific tools. The Interactive For PDF workspace has many of the tools you’ll need readily available. But if you customize the workspace a little, you will be that much more efficient.
-
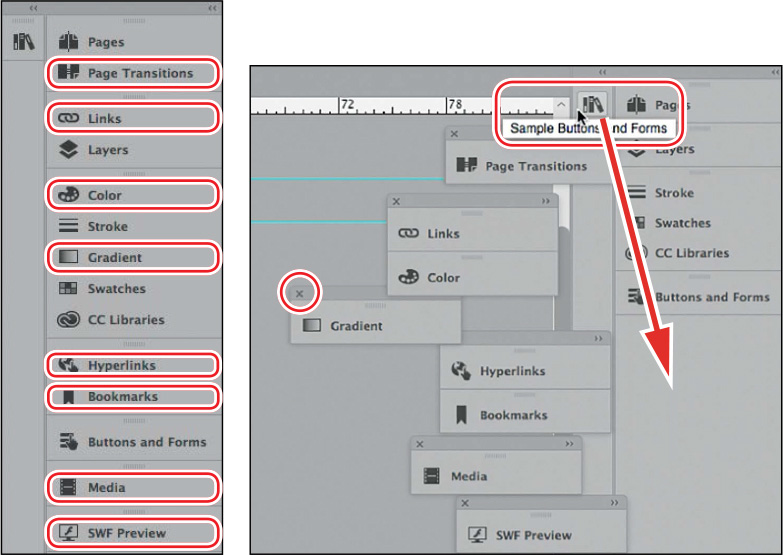
First, drag panels off the panel dock that are not needed for forms: Page Transitions, Hyperlinks, Bookmarks, Media, and SWF Preview. Click each panel and drag it to the left over the pasteboard. These are useful for other types of interactive PDFs but are not needed for forms. Also drag the Links, Color, and Gradient panels to the pasteboard, as they won’t be used for forms. It doesn’t matter if some of them dock together as you drag them.
-
Close each of the panels you just dragged dragged to the pasteboard.
-
Drag the Sample Buttons And Forms panel under the Buttons And Forms panel. This InDesign library includes pre-built buttons for check boxes, radio buttons, buttons that can be used to submit or print a form, and some form fields.
-
Save this workspace so you can use it again. Choose Window > Workspace > New Workspace. Use a name like Forms-Basic or whatever makes sense to you. (For more complicated and long forms, you will want additional tools in the dock, including the Paragraph Styles, Character Styles, and Object Styles panels, as well as the Articles panel.)
Adding form fields
Some setup work on the form fields has already been done. You’ll complete the form by adding some more fields and then modifying some of them.
Adding text fields
In a PDF form, a text field is a container into which the person who fills out the form can enter text. All but two of the frames have already been converted into text fields. You’ll add two new frames and convert them into text fields.
Note: You can simplify the
display of the page by hiding Layer 1 in the Layers panel. Only the
objects in the form area are displayed when you hide Layer 1.
-
Open the Layers panel. Notice that the file is set up with a separate layer, Form Elements, for the objects that are part of the form. Lock the other layer, Layer 1, so that you can work with the form objects without accidentally moving anything else.
-
Use the Zoom tool (
 ) to zoom in on the area in the
top half of the page that contains the form objects. This is where
all of your work in this lesson will be done.
) to zoom in on the area in the
top half of the page that contains the form objects. This is where
all of your work in this lesson will be done. -
Select the Selection tool (
 ), and move the pointer
over the text field below “First Name.” Notice that a red dotted
line is displayed around the object, and a small graphic of a text
field is displayed at the lower right. The dotted line indicates
that the object is a PDF form element; the icon of the text frame
indicates that the element is a text field. Click in the text field
to select the object. Note: When adjusting the
appearance of a combo box, list box, text field, or signature
field, keep in mind that only a solid stroke and fill are retained
when you export as Adobe PDF. These attributes are visible in an
exported PDF file when Highlight Existing Fields is not selected in
Adobe Acrobat Reader DC or Adobe Acrobat Pro DC when the form is
opened.
), and move the pointer
over the text field below “First Name.” Notice that a red dotted
line is displayed around the object, and a small graphic of a text
field is displayed at the lower right. The dotted line indicates
that the object is a PDF form element; the icon of the text frame
indicates that the element is a text field. Click in the text field
to select the object. Note: When adjusting the
appearance of a combo box, list box, text field, or signature
field, keep in mind that only a solid stroke and fill are retained
when you export as Adobe PDF. These attributes are visible in an
exported PDF file when Highlight Existing Fields is not selected in
Adobe Acrobat Reader DC or Adobe Acrobat Pro DC when the form is
opened. -
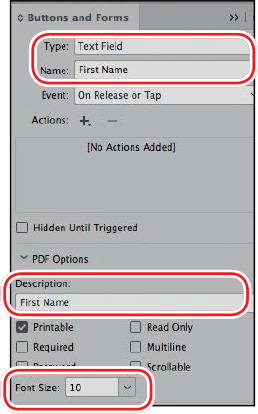
Click the Buttons And Forms panel icon (
 ) to
display the Buttons And Forms panel. Notice the settings for the
text field. Text Field is selected in the Type menu, and the Name
of the element is First Name. Text entered in the Description field
is displayed when the pointer rolls over a field to provide
additional guidance to viewers who fill out a form. The Description
for this field is also First Name. Printable is checked to enable
printing of this form, and the Font Size is 10 because the default
of 12 is just too big in many cases.
) to
display the Buttons And Forms panel. Notice the settings for the
text field. Text Field is selected in the Type menu, and the Name
of the element is First Name. Text entered in the Description field
is displayed when the pointer rolls over a field to provide
additional guidance to viewers who fill out a form. The Description
for this field is also First Name. Printable is checked to enable
printing of this form, and the Font Size is 10 because the default
of 12 is just too big in many cases.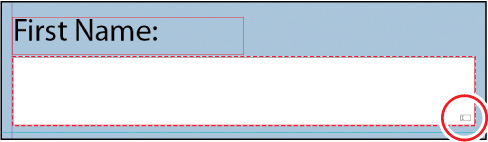
Different types of form fields have different icons in the lower-right corner. This is a text field icon.
-
Select the frame of the “First Name” form field and Alt - (Windows) or Option - (macOS) drag a copy of it to below “Last Name.” Resize it to make it longer, ending in alignment with the fields below, by dragging the center right handle to the left. The Smart Guides will appear when the pointer is aligned.
-
In the Buttons And Forms panel, notice that the name of this field is First Name 1. This is an InDesign behavior to be aware of when creating forms: No fields can have the same name. InDesign enforces this rule by adding sequential numbers to the name of duplicated fields. To make this a unique field with the correct information, change both the Name and Description fields to Last Name.
-
To create a field from scratch, choose the Rectangle tool (
 ) in the Tools panel and draw a frame under
the text frame under “E-mail Address.” Align the right edge with
the City frame above and the top edge with the bottom of the
“E-mail Address” text frame. You can convert any kind of
frame—text, graphics, or unassigned—into a PDF form field. A text
field does not have to be made from a text frame.
) in the Tools panel and draw a frame under
the text frame under “E-mail Address.” Align the right edge with
the City frame above and the top edge with the bottom of the
“E-mail Address” text frame. You can convert any kind of
frame—text, graphics, or unassigned—into a PDF form field. A text
field does not have to be made from a text frame. -
Now we will assign the same fill and stroke as the other text fields. An object style for the text field boxes has already been created for this lesson. Choose Window > Styles > Object Styles to open the Object Styles panel. Choose the Selection tool (
), and click the box you just drew if it’s not
still selected. Click the object style called Text Field Box. Now
the same fill and stroke have been applied to the new frame. Next,
make the text field the same height as the other fields by changing
the reference point in the Control panel to the upper left
( ) and
clicking the up arrow on H: to
1p10. Close the Object Styles panel.
) and
clicking the up arrow on H: to
1p10. Close the Object Styles panel. -
In the Buttons And Forms panel, choose Text Field from the Type menu, and assign it the Name and Description E-mail Address. Make the Font Size 10 point and make sure that Printable and Scrollable are selected. Scrollable means that if the user types more characters than will fit in the box, the field will allow them to keep typing, but not all of the text will be visible in the field. This option is appropriate for email addresses since they can be very long.
-
Choose File > Save.
Adding either/or choices: radio buttons
Radio buttons present the person filling out the form with two or more choices, but only one choice can be selected at a time. A group of radio buttons is considered one field, with a unique value for each button. Check boxes can look like a similar list, but each check box in the list can be on or off.
Note: Use a radio button for
Either/Or choices, such as whether someone must specify a status
that can have only one answer—for example, whether they are a
member, non-member, or student member of an organization.
Note: Use a check box when a
question can be followed by “check as many as apply.” For example,
a training school might ask, “Which programs are you interested
in?” Then list several, such as InDesign, Photoshop, Illustrator,
and Acrobat. The person filling out the form could be interested in
more than one.
Radio buttons are often simple circles; however, you can design your own, more elaborate buttons or choose from several sample buttons included with InDesign. In this lesson, you’ll use one of the sample radio buttons. The prebuilt buttons in this library are simply vector shapes with various attributes for fill, stroke, and effects.
-
Choose View > Fit Page In Window, and then use the Zoom tool (
) to magnify the “In what way are you best
able to help?” portion of the form. -
Choose the Sample Buttons And Forms panel (
 ) that
you dragged below the Buttons And Forms panel () in the dock to display
the Sample Buttons And Forms panel.
) that
you dragged below the Buttons And Forms panel () in the dock to display
the Sample Buttons And Forms panel. -
Drag the radio button named “018” from the Sample Buttons And Forms panel and position it below the text frame with the text “In what way are you best able to help?” Close the panel by clicking the double arrows (
 ) at the upper right of the
panel. Align the top of the topmost radio button with the top of
the line of text to the right. Refer to the screen capture below
for the correct position.
) at the upper right of the
panel. Align the top of the topmost radio button with the top of
the line of text to the right. Refer to the screen capture below
for the correct position. -
In the Control panel, make sure that the upper-left reference point is selected in the reference point locator (
), enter 40% in either of
the Scale Percentage boxes, make sure that the link for the Same
Settings button ( ) is selected, and then press Enter or
Return. If necessary, move the buttons to match the figure
below.
) is selected, and then press Enter or
Return. If necessary, move the buttons to match the figure
below.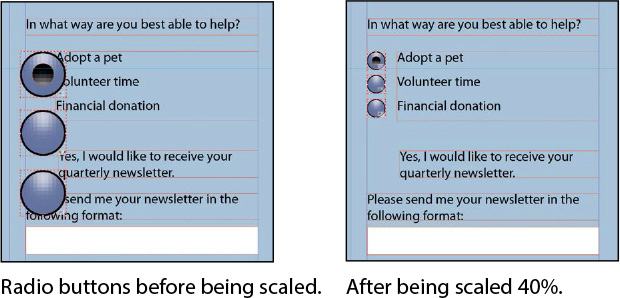
-
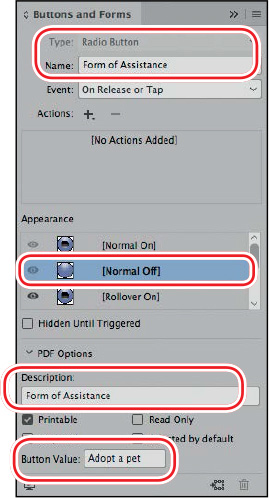
With all three buttons still selected, in the Buttons And Forms panel, enter Form of Assistance in the Name and Description boxes, and then press Enter or Return. Notice that the Type is already set to Radio Button.
-
Choose Edit > Deselect All or click an empty area of the page or pasteboard.
-
Use the Selection tool (
) to select the first radio
button (to the left of “Adopt a pet”). -
In the Buttons And Forms panel, enter Adopt a pet in the Button Value field at the bottom of the panel, and then press Enter or Return. Under Appearance, click [Normal Off]. This means that when the user first opens the form, the button will be unselected.
-
Repeat steps 7 and 8 to change the Button Value of the middle button Volunteer time and the bottom button Financial donation. Notice that the name of the field is the same for all three buttons; only the Button Value changes.
-
Choose File > Save.
Adding yes or no choices: check boxes
A check box presents a yes-or-no choice for an individual item. A viewer of the form can click the empty check box (the default setting in the exported PDF) to add a check mark or leave it unchecked. Next, you’ll add a check box.
-
Use the Selection tool (
) to drag the check box
named “001” from the Sample Buttons And Forms panel, and place it
so that the top of the check mark that extends above the box aligns
with the top of the text frame that contains “Yes, I would like to
receive your quarterly newsletter.” -
Press Shift+Ctrl (Windows) or Shift+Command (macOS) and scale the check box graphic so that it is the same height as the text frame to the right.
-
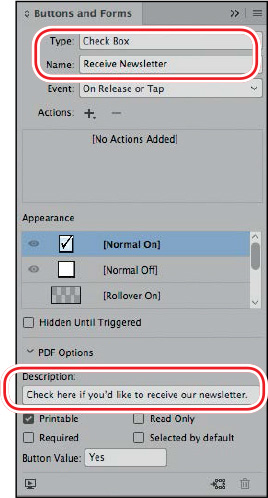
In the Buttons And Forms panel, enter Receive Newsletter in the Name field, and then press Enter or Return. Notice that the Type is already set to Check Box and that the icon for the field is a check mark. In the Description field, enter Check here if you’d like to receive our newsletter.

Check box after being scaled.
-
The check box and radio buttons that you dragged from the Sample Buttons And Forms panel should have red highlights because they should be on the Form Elements layer. Items that you drag from the library should be added to the active layer. As you work, it’s a good practice to check that elements are on the layer where they belong. This helps keep your work organized and will be especially important when you work on complicated forms. Select all the buttons you dragged from the library with the Selection tool (
) and open the Layers panel. If the new items
are not on the Form Elements layer, correct this by dragging the
square in the Layers panel to the Form Elements layer. -
Choose File > Save.
Adding a list of choices: combo box
A combo box is a menu that lists multiple predefined choices. A viewer of the form can select only one of the choices. Next, you’ll create a combo box that offers three choices.
-
Use the Selection tool (
) to select the text frame
below the heading “Please send me your newsletter in the following
format:.” Note: List boxes are similar
to combo boxes in that you add list items; however, combo boxes
allow you to select only one item from a list in the PDF form. If
you select Multiple Selection for a list box, a viewer of the PDF
can select more than one choice. -
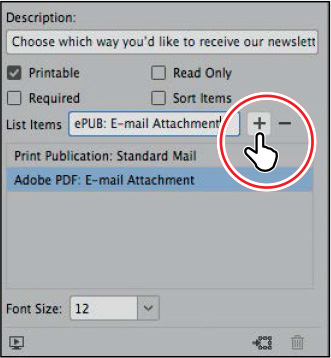
In the Buttons And Forms panel, choose Combo Box from the Type menu, and then enter Newsletter Format in the Name field. In the Description field, enter Choose which way you’d like to receive our newsletter. Change the Font Size to 10. To provide the viewer of the PDF form with different choices, you’ll add three list items.
-
In the lower half of the Buttons And Forms panel, in the List Items box, enter Print Publication: Standard Mail, and then click the plus sign to the right of the box. Notice that the text you entered is now displayed in the list below the box.
 Tip: To sort list items
alphabetically, select Sort Items in the Buttons And Forms panel.
You can also modify the order of list items by dragging them up or
down in the list.
Tip: To sort list items
alphabetically, select Sort Items in the Buttons And Forms panel.
You can also modify the order of list items by dragging them up or
down in the list. -
Repeat the previous step to add Adobe PDF: E-mail Attachment and ePUB: E-mail Attachment to the list.
 Tip: To display a combo box
without a default selection, make sure that none of the list items
is selected. When a list item is selected, it becomes the default
selection when the PDF is opened.
Tip: To display a combo box
without a default selection, make sure that none of the list items
is selected. When a list item is selected, it becomes the default
selection when the PDF is opened. -
Click Print Publication: Standard Mail in the list of items to make it the default selection. When a viewer opens the exported PDF file, Print Publication: Standard Mail will already be selected.
-
Choose File > Save.
Setting the tab order of the fields
The tab order you establish for a PDF form determines the order in which fields are selected as a user of the form presses the Tab key. These must be in a logical order to make the form user-friendly. Next, you’ll set the tab order for the fields on the page.
-
From the Object menu, choose Interactive > Set Tab Order.
-
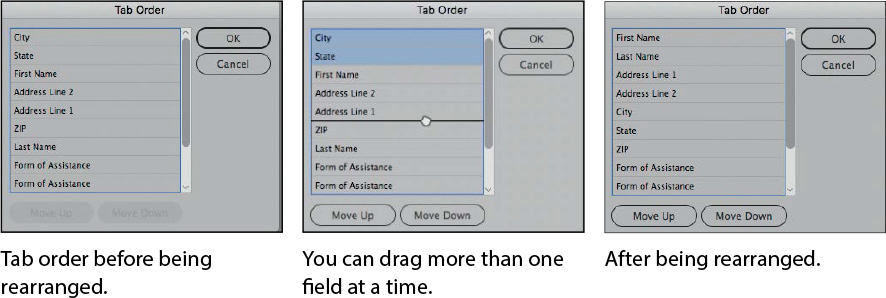
In the Tab Order dialog box, click Last Name (the name of the text field you created that holds the surname of the person filling out the form), and then click Move Up until it appears below First Name near the top of the list. Use the Move Up and Move Down buttons or drag field names up or down to rearrange them so that they match the order on the page. Click OK to close the dialog box.
-
Choose File > Save.
Adding a button to submit the form
If you distribute a PDF form, you’ll want to include a way for anybody who fills out the form to return it to you electronically. To accomplish this, you’ll create a button that sends the filled-out PDF form to your email address.
Tip: Any object or group can
be converted into a button. For example, a text frame with a fill
color and the text “Submit” could become a Submit button. To
convert a selected object or group into a button, choose Button
from the Type menu in the Buttons And Forms
panel.
-
Use the Selection tool (
) to select the
rounded-corner text frame with a blue fill and the text
“Submit.” -
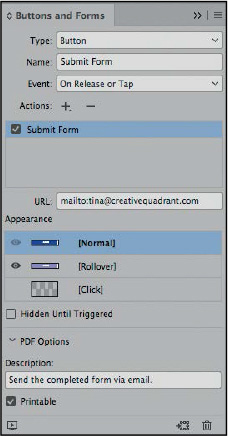
In the Buttons And Forms panel, choose Button from the Type menu, enter Submit Form in the Name field, and then press Enter or Return. Enter Send the completed form via email for the Description.
-
Click the Add New Action For Selected Event (
 )
button, and then choose Submit Form from the drop-down menu.
)
button, and then choose Submit Form from the drop-down menu. -
In the URL field, enter mailto:. Make sure you enter a colon after “mailto”. Do not enter a space or a period before or after the colon.
-
Enter your email address (for example, [email protected]) after mailto:. This will return the completed form to you.
Tip: A button’s appearance can
have three different states. The state that’s displayed depends on
the user’s interaction. The Normal state is the default display
when no interaction occurs; the Rollover state displays when the
mouse pointer is over the button; and the Click state displays when
the mouse button is clicked.To cause the button’s appearance to change when a user of the PDF form moves the pointer over the Submit button, you’ll add a Rollover appearance.
-
Click [Rollover] in the Buttons And Forms panel. Open the Swatches panel, enter 50 in the Tint field, press Enter or Return, and then close the panel.
-
Return to the Buttons And Forms panel. Notice that the [Rollover] appearance is now lighter than the [Normal] appearance, reflecting the tint change you just made. Click [Normal] to display the default appearance.
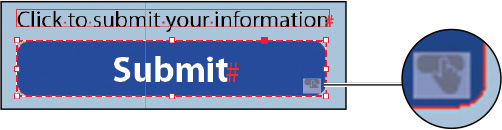
Zoom in to see that the icon for the button is a finger pointing to a rounded-corner rectangle.
-
Open the Layers panel (Windows > Layers) and make sure all layers are visible (in case you hid Layer 1 earlier in the lesson).
-
Choose File > Save.
Exporting an interactive Adobe PDF file
Now that you’ve finished work on the form fields, you’re ready to export an interactive Adobe PDF file and then test the exported file.
-
Choose File > Export.
-
In the Export dialog box, choose Adobe PDF (Interactive) from the Save As Type menu (Windows) or Format menu (macOS). Name the file 14_PDF_Form.pdf and save it to the Lesson14 folder, located inside the Lessons folder within the InDesignCIB folder on your hard drive. Click Save.
-
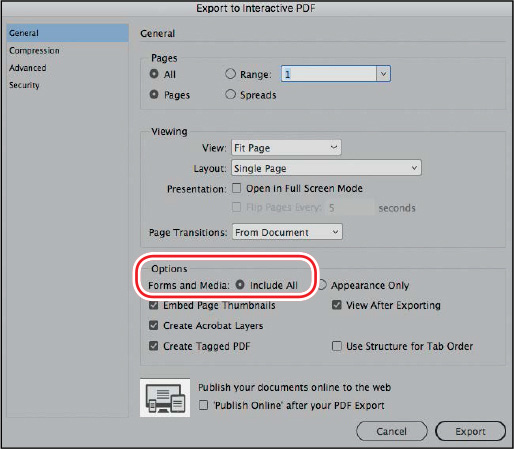
In the General tab, in the Options section of the Export To Interactive PDF dialog box, make sure that Include All is selected for Forms And Media. This most important setting makes the form fields work in the PDF.
-
Choose Fit Page from the View menu in the Export To Interactive PDF dialog box to display the entire page when the exported PDF is opened. Leave all other settings unchanged. Click Export, and then click OK to close the alert about document color conversion.
Form field types
 Button: The most
versatile interactive element. A button can trigger many
actions.
Button: The most
versatile interactive element. A button can trigger many
actions.
 Check box: For yes or no
choices, a check box is either checked or not checked. Use check
boxes for “Check all that apply” questions.
Check box: For yes or no
choices, a check box is either checked or not checked. Use check
boxes for “Check all that apply” questions.
 Combo box: The user can
choose only one answer from a list.
Combo box: The user can
choose only one answer from a list.
 List box: Similar to a
combo Box except that the user can choose more than one answer.
List box: Similar to a
combo Box except that the user can choose more than one answer.
 Radio button: For
either/or choices, the user can choose only one answer.
Radio button: For
either/or choices, the user can choose only one answer.
 Signature field: Enables
the user to sign a form with a digital signature.
Signature field: Enables
the user to sign a form with a digital signature.
 Text field: For the user
to type text information.
Text field: For the user
to type text information.
Testing your form in Adobe Acrobat Reader
You should always test your forms in Adobe Acrobat Reader because the end-user is most likely to use that when filling out the form. (Most people do not have Adobe Acrobat Pro.) If you do not have Adobe Acrobat Reader, install it now. The current version is called Adobe Acrobat Reader DC. It’s a free download at https://get.adobe.com/reader/.
-
Open Adobe Acrobat Reader and open the PDF you just exported. First, click in the First Name field and press the Tab key. Continue to tab through all the fields to make sure that the tab order is correct.
-
Next, click the radio buttons under “In what way are you best able to help?” and notice that you can only turn on one choice at a time.
-
Then click the check box for “Yes, I would like to receive your quarterly newsletter” to see that it turns on. Then choose one of the newsletter formats from the drop-down menu below.
-
Move the pointer across each field, pausing for a moment, and notice the tips that pop up. These are the Descriptions that you entered in the Buttons And Forms panel for each field.
If you find any errors, go back to the InDesign file and fix them. Then export and test again.
-
When you’re done, click the button that emails the filled-out form to you. (A security warning dialog box may display when Acrobat creates an email message with the completed form as an attachment.) Click Allow and then click Continue in the next dialog box to submit the form information, or click Cancel. Return to InDesign.
-
Look at the email you received and notice the subject line: Form Returned: 14_PDF_Form.pdf. This is a default function of the Submit Form action within the Submit button. Therefore it’s important to consider the name of the PDF when you create forms to be emailed.
Congratulations! You’ve created a PDF form and tested it.
Exploring on your own
Now that you’ve created a simple PDF form, you can explore a little further by creating other kinds of fields and by creating your own custom-designed buttons.
-
Open a new document, create a text frame, and then use the Buttons And Forms panel to convert it to a signature field. A signature field in a PDF form lets the user apply a digital signature to the PDF file. Assign the field a name, and then export an Adobe PDF (Interactive) file. Open Adobe Acrobat Pro DC or Adobe Acrobat Reader DC to test the signature field by clicking it and then following the onscreen instructions to create a digital signature. Click Cancel if you get a dialog box about Trusted Certificates. That is part of a system of securely identifying signatures, which is not needed for creating a signature.
-
Use the Ellipse tool (
 ) to create a small
circular frame. Use the Gradient panel to fill the circle with a
radial gradient. If you want, use the Swatches panel to change the
colors of the gradient. Use the Buttons And Forms panel to convert
the frame into a button. Assign the button the Go To URL action and
enter a complete URL in the URL field (for example, http://www.adobe.com). To test this
button, export an Adobe PDF (Interactive) file and click the
button.
) to create a small
circular frame. Use the Gradient panel to fill the circle with a
radial gradient. If you want, use the Swatches panel to change the
colors of the gradient. Use the Buttons And Forms panel to convert
the frame into a button. Assign the button the Go To URL action and
enter a complete URL in the URL field (for example, http://www.adobe.com). To test this
button, export an Adobe PDF (Interactive) file and click the
button. -
Experiment with one of the other prebuilt form fields in the Sample Buttons And Forms panel. Drag one onto the page, and then view its properties in the Buttons And Forms panel. Try different modifications to its appearance, change some of its properties, or both. Export and test the result.