CHAPTER 6
FABRICATING THE PARTS
The main workshop for this project is a vast metal-roofed structure not far from the main Yakushiji complex and adjacent to the Sanzō-in. It is dirt-floored and warmly lit by sunlight filtering down onto the workers from a dozen or so translucent panels (Figs. 56-59). There is, of course, electricity for lights and power tools, and large doors on all sides admit additional light as well as timber-laden trucks and forklifts. The workshop is much quieter now than when Nishioka was alive. Then, one tiny room served as a rest area, with large tea decanters, shelves for personal effects, and, in winter, a kerosene stove. In summer, there was no respite from the heat. A nearby shed of similar dimensions functioned as a painting room and storage for finished parts. A third large building was jammed with enormous logs undergoing a three-year seasoning (Fig. 62). Building materials were constantly being shifted from one shed to another, ultimately finding their way to the construction site and into their predestined locations in the finished structure, marking the end of a process that began several centuries and thousands of miles away when the logs were seedlings on a Taiwanese hillside.
Activity in the workshop was never frenzied, but progressed at a steady and deliberate pace on several elements at once, rarely falling behind schedule. If a deadline seemed to be approaching too quickly, extra hours were added to the work week, an option considered infinitely preferable to rushing the work.

Figure 56 A carpenter shapes a column with a chona (adze).
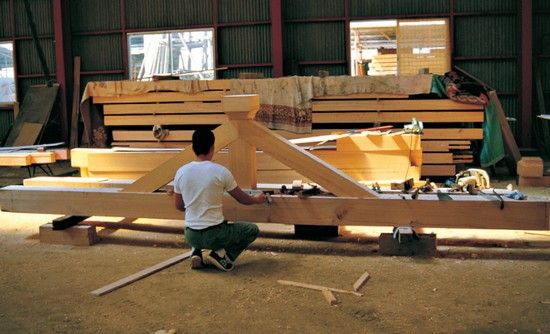
Figure 57 The gable end beams present a particular challenge as the horizontal beam is not straight but curves upward gently at the ends. The joints must be fitted to accommodate this. (See Figs. 70, 205, 210.)
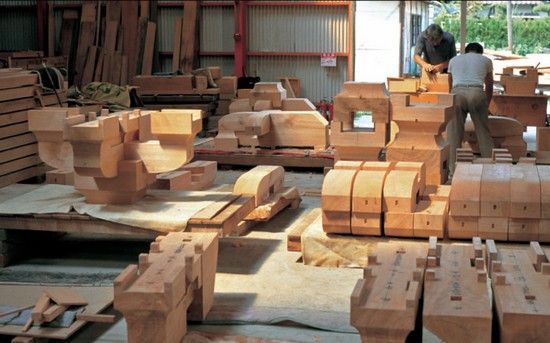
Figure 58 Bracket complexes being fabricated as identical sets. (See Figs. 138-148.)
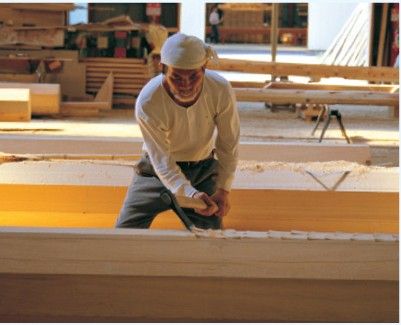
Figure 59 Much of the initial work on parts like columns is done with basic tools like axes and adzes. A skilled carpenter can wield these tools very precisely.

Figure 60 The axe leaves rhythmically spaced tool marks on the face of this column.
The actual fabrication of an element begins after the completion of its template, which the chief assistant then passes on to one of the assistant masters. The logs to be used for major components, such as the columns and huge hip rafters, have been selected and marked in advance. The lumber for other particular components is chosen at this point, the first stage in a process known as ki-dori, or wood preparation. Here, the carpenter must examine such characteristics as wood grain and knots, and try to predict how the wood will change. He must visualize the finished components that lie dormant within the rough lumber, and do so in such a way as to take full advantage of each log’s idiosyncrasies. Many carpenters consider this to be the single most important stage of their work. The skills it requires are not physical but mental: imagination, visualization, and an intuitive grasp of the wood’s “personality.”
Ki-dori proceeds in several stages as each log is reduced to smaller and smaller components. The primary milling is conducted at a nearby sawmill, and the lumber transported back to the workshop, where the smaller pieces are roughly cut on large-capacity band saws and table saws (Fig. 64). Since most components come in sets, usually several pieces of rough lumber identical in size and configuration need to be cut. They are then moved to a corner of the shop.
The workshop is spacious enough for about eight different major operations to be carried out simultaneously. Generally speaking, one assistant master undertakes the fabrication of an entire set of identical components, assisted by a junior apprentice from time to time. The carpenters confer with each other frequently, but interference in another’s project is taboo. Each takes full responsibility not only for his own work but that of his helper.
After basic preparation, the information from the templates is transferred to the pieces to be cut. This is called sumitsuke, or layout (Fig. 63). Using the templates and shop drawings as a guide, cut lines and other notations are transferred to the workpiece in ink. The primary layout tools include the inkpot and line, metal square, and bamboo marking pen. Marks are made in black ink, with occasional notations in red. The ink is indelible, so any corrections require previous notations on the wood surface to be planed off. Generally speaking, identical parts are all laid out at once, but this is a matter of personal choice. The indelibility of the ink is an asset for future restorers, who frequently refer to the original labels and notations. Disassembly and reassembly, as well as tracing the original function of a piece that has subsequently been moved, are all facilitated by adequate notation.

Figure 61 Fabricating ridge beams in the main workshop. (See Figs. 196, 200.)

Figure 62 Taiwanese hinoki logs stacked for seasoning. The one in the foreground is nearly two meters in diameter.
Initial shaping is now usually done with power tools, but it can be carried out by hand. Use of power tools is discouraged until the apprentice has mastered the requisite hand tools. The aim is to provide the carpenter with as many options as possible. It is not uncommon to see a carpenter laboriously cutting or planing a board by hand when an electric tool would be faster and equally accurate. Hand tools, particularly Japanese hand tools, provide a tremendous amount of subtle tactile information about a particular piece of wood. The delicate readings and detailed observations possible when working slowly by hand are lost with a noisy, dangerously gyroscopic blade or drill. But again, the choice of tools is personal. The apprentice sometimes finds himself the victim of conflicting suggestions, forced to remember each of his seniors’ predilections in order to avoid criticism. Fundamentally, there is no operation that cannot be carried out through the judicious application of saw, hammer and chisel, and plane.
One remarkable fact, alluded to above, is that each carpenter works in relative isolation. His templates, plans, and knowledge constitute only a partial picture of the overall interrelationship among the parts. When instructed to provide a mortise, he provides it; when instructed to shape a compound curve, he shapes it. While it is dangerous to generalize, it is probably safe to say that a Westerner, particularly an American, often finds it difficult to perform complex work without understanding exactly how his job relates to the whole. As a result, he asks a lot of questions. There is, perhaps, an underlying belief that if one understands the overall intention, one may be able to avoid errors or even improve upon the design of one’s superior. This does not seem to be the case with the Japanese carpenter. He may not always know who is making the tenon that will fit his mortise, or why the curve is necessary, but he is fully confident that if instructions are followed, the pieces will fall perfectly into place. In short, he trusts not only his superiors but his colleagues, as well as the system in which they work. This is an outgrowth of, and the reason for, the long apprenticeship.
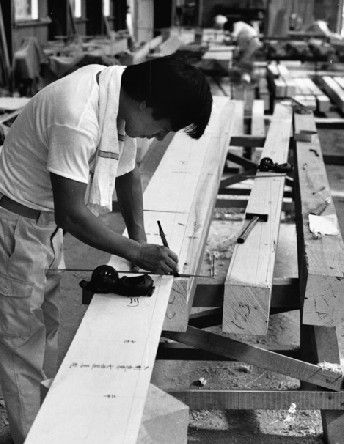
Figure 63 Kogaitō-san, an assistant master carpenter, does an initial layout with the aid of templates, a steel square, an inkpot and line, and a bamboo marking pen.
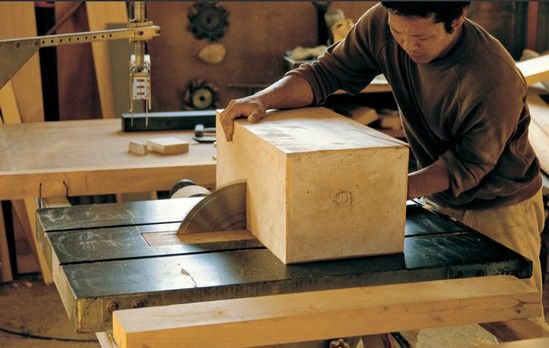
Figure 64 The carpenters do use machinery on occasion, particularly for milling wood to rough dimensions.
Each piece requires several successive operations of cutting, trimming, and smoothing, with the final surface for exposed pieces demanding increasingly finer planing to achieve a glasslike smoothness (Fig. 66). The finished components are then handed over to the painter.
As mentioned above, painted architecture was an innovation brought to Japan from Korea along with other techniques in the sixth century AD. The Japanese people had up to that time constructed durable structures of unpainted wood, and in fact even today a natural wood surface, color, and grain are an important enduring Japanese aesthetic. After painted Buddhist architecture had taken root and evolved in Japan, unpainted wooden temples began to make their appearance, and many of them have now withstood the test of centuries. I believe it is safe to say that painting is not required for protecting the wood, and this applies particularly to hinoki, but is an aesthetic choice.
There were relatively few pigments available in ancient times. Red was obtained from iron oxides, green from copper oxide, yellow from earth, white from the calcium in bones and seashells, and black from carbon. Bright blues were precious, requiring lapis lazuli, but dark blue could be obtained from indigo. In eighth-century Nara, temples were usually painted red overall, with green and white details. Ceilings often featured complicated floral patterns in a variety of colors against a white ground. These principles were followed at Yakushiji.
The painting is usually carried out by one man, perhaps with a single assistant, who begins by mixing the colors from natural dry pigments, water, and a seaweed-derived binder. He then coats the areas of the individual components that are to be exposed, leaving the other surfaces bare. A few days are generally allowed for the paint to dry completely before another coat is added. Four coats are applied in all, and then the pieces are stacked to await final assembly.
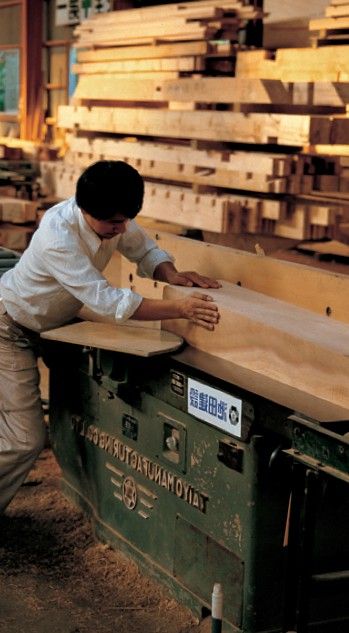
Figure 65 Rough cutting material on an industrial-grade machine.
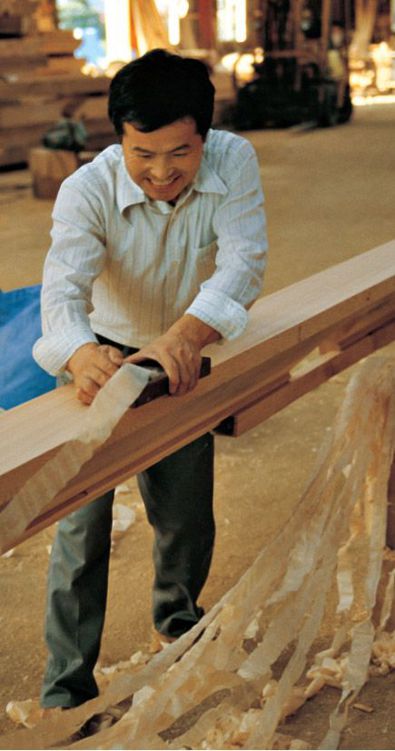
Figure 66 Hayashi-san applies a hand plane to an outside horizontal brace beam. The shavings are tissue paper thin and several meters long.