10.3 Giving Lion a Voice
Before we can talk to a Mac, we must first enable its speech recognition server. Note that the speech recognition server had been broken on the OS X 10.5 and 10.6 releases and was finally fixed in the 10.7 Lion release. This once again makes the Mac a viable speech recognition platform.
In order to configure the Mac to use its speech recognition capabilities, click on the Speech icon in the System Preferences panel, as shown in Figure 46, Accessing OS X speech settings.
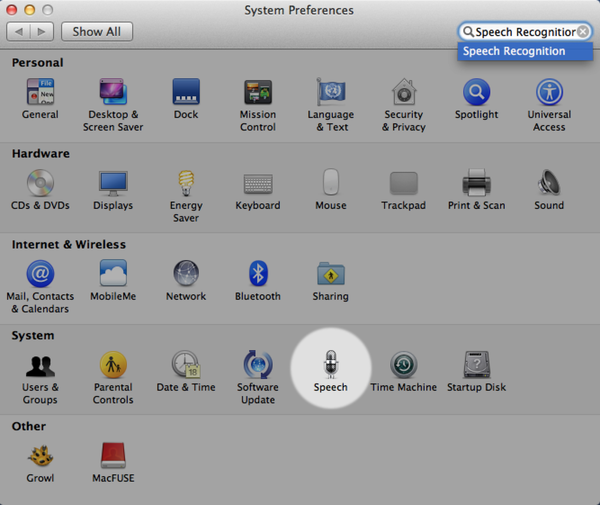
Figure 46. Accessing OS X speech settings
Select the Speech Recognition tab and turn on the Speakable Items, as shown in Figure 47, Turn on speakable items.
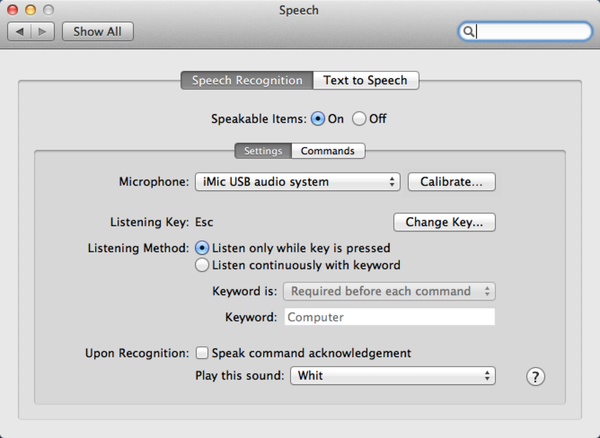
Figure 47. Turn on speakable items.
Read the tips dialog box that is displayed the first time you enable this option and take heed of the recommendations. Speech recognition algorithms are not yet powerful enough to effortlessly understand a variety of dialects, accents, and volume levels, but the technology is getting better all the time.
I find I have to be especially loud and clear when speaking to the Mac, making an effort to slowly enunciate my commands with almost no background noise. You may also need to play around with microphone gain and placement from your mouth as well as acclimate to the cadence for the speech recognizer to work with the vocabulary we’ll be defining in our script. Note that the Mac sets the Microphone setting to use the Internal Microphone by default. We will revisit this setting later when we change this to use the iMic adapter, but it’s okay to leave the setting as it is for now.
When the Speakable Items option is activated, you will see a round microphone graphic appear on your computer’s screen. This is the speech recognizer window. You activate the recognizer by holding down the Escape key on the keyboard. We will remove this keyboard requirement once we have our talking home script running and our wireless microphone set up, but for now we’ll leave it be so that we can more easily debug our script.
Before closing the Speech preference panel, we have one more option to set. Click on the Text to Speech tab (see Figure 48, Text to Speech settings) and select a System Voice from the drop-down list.

Figure 48. Text to Speech settings
You can preview voices by clicking the Play button. The default voice is Alex. It’s pretty good, but I prefer the American female voice Samantha. Since the voice files are quite large, Apple doesn’t ship all of the selections with Lion. Instead, you have to obtain them by selecting the Customize... System Voice menu option. Doing so will display the dialog box shown in Figure 49, Lion voice selections, which lists the voices freely available for download from Apple.
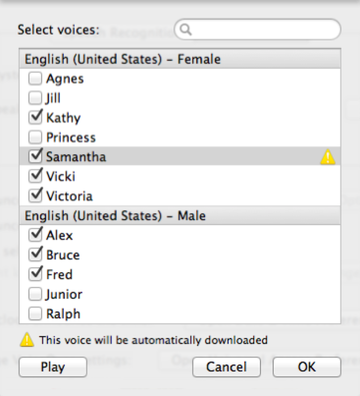
Figure 49. Lion voice selections
There are plenty of voices to choose from, and you can preview each one before downloading them by clicking the Play button. Once you select a voice that you like, it may take a while to download and configure the selected voice files on your computer, depending on your Internet connection and Mac CPU speed. As an example, the Samantha voice file is over 450 megabytes in size.
Once downloaded and installed, you can further tweak the voice playback by moving the Speaking Rate slider for faster or slower playback. I suggest keeping it on the normal default for now and modifying it if necessary once you have the whole wireless mic rig and speaker system working. Speaking of which, our next task is to get the wireless mic hooked up and calibrated for speech recognition.