7.6 Writing the Code for the Android Client
You might be wondering why you should go through the trouble of building a native Android client when the web application we wrote can be accessed by the Android mobile web browser. Well, if all you wanted to do was toggle light switches on and off, then I would say you don’t need a native client. The web interface works just fine and can be further enhanced using AJAX and slick HTML5/CSS3 user interface effects. But if you want to give a little more intelligence to the app, such as activating power switches based on your proximity to them or running an Android service that monitors inbound X10 events like motion detection and then sounds an alert on your phone to bring such events to your attention, a dynamic web page just won’t do.
If you haven’t already done so, download, install, and configure the Eclipse IDE, the latest Android SDK, and the ADK plug-in for Eclipse. Visit the Android SDK website for details on how to do so.[73]
You will also need to create an Android Virtual Device (AVD) so that you can use it to test the client application in an Android emulator before sending the program to your Android device.[74] I suggest creating an AVD that targets Android 1.5 (API Level 3) so that it emulates the largest number of Android phones available.
Launch the Eclipse environment and select
File→New→Android Project. Depending on the version of
Eclipse you are running, this option might also be found on the
File menu via New->Other->Android->Android Project. Call
the project LightSwitch and
select Build Target as Android 1.5. You can choose a higher Android
version depending on what level of Android device you want to
deploy the application to, but since the LightSwitch program will
be sweet and simple, Android 1.5 should be adequate for this sample
application.
In the Properties area, fill in the Application name
as Light Switch and the Package
name as com.mysampleapp.lightswitch,
and check the Create Activity checkbox and enter LightSwitch. You can specify the Min SDK
Version if you wish, but since we’re developing for one of the more
popular lowest-common-denominator versions of Android, we’ll leave
it blank for now. Before you continue, check to see if your New
Android Project dialog box looks like the one shown in Figure 26,
Creating a
new Android Project dialog box with completed
parameters.
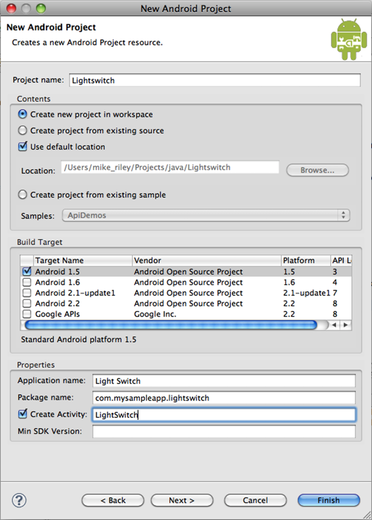
Figure 26. Creating a new Android Project dialog box with completed parameters
Android developers with good testing practices would then click the Next button in the New Android Project dialog box to set up a Test Project resource. However, in the interest of space and time, we’ll go ahead and click the Finish button.
Once the Android Development Tools Eclipse plug-in
generates the skeleton Light Switch application code, double-click
the main.xml in the res/layout folder to open it into Android’s
simple form editor. Drag a ToggleButton control from the Form
Widgets palette onto the main.xml graphical layout. Don’t worry
about perfectly aligning the control in the right spot for now. For
this exercise, we’re more interested in function over form.

Figure 27. The graphical form layout of the Light Switch application
Because this application won’t require anything
beyond the basic features found in the earlier Android operating
system releases, change the Android version in the upper right
corner drop-down box of the form editor to Android 1.5. Also, feel
free to delete the default Hello world
TextView element from the layout. When done, the layout should look
similar to the screen shown in Figure 27, The graphical form
layout of the Light Switch application. Save the
main.xml file.
Expand the src→com.mysampleapp.lightswitch tree and
double-click the LightSwitch.java file. Because we will be using
the ToggleSwitch widget, the first thing we need to import is the
android.widget.ToggleButton
class.
Next, add the java.net.URL and java.io.InputStream libraries, since we’ll be
creating URL objects to pass to Java InputStream object. The import statement section
of the LightSwitch.java file
should now look like this:
package
com.mysampleapp.lightswitch; |
|
import
android.app.Activity; |
|
import
android.os.Bundle; |
|
import
android.widget.ToggleButton; |
|
import
android.view.View; |
|
import
java.net.URL; |
|
import
java.io.InputStream; |
Now we have to make the LightSwitch aware of the ToggleSwitch by finding it by ID in the LightSwitch class’s OnCreate event and adding an event listener to monitor when the switch is toggled on and off:
public
class LightSwitch extends Activity { |
|
/** Called when the activity is first created.
*/ |
|
@Override |
|
public void onCreate(Bundle savedInstanceState)
{ |
|
super.onCreate(savedInstanceState); |
|
setContentView(R.layout.main); |
|
final String my_server_ip_address_and_port_number
= |
|
"192.168.1.100:3344"; |
|
final ToggleButton toggleButton
= |
|
(ToggleButton) findViewById(R.id.toggleButton1); |
|
toggleButton.setOnClickListener(new
View.OnClickListener() |
|
{ |
|
public void onClick(View
v) { |
|
if (toggleButton.isChecked())
{ |
|
try { |
|
final InputStream is = new URL("http://"+ |
|
my_server_ip_address_and_port_number
+"/command/on").openStream(); |
|
} |
|
catch (Exception e) { |
|
} |
|
}
else { |
|
try { |
|
final InputStream is = new URL("http://"+ |
|
my_server_ip_address_and_port_number
+"/command/off").openStream(); |
|
} |
|
catch (Exception e) { |
|
} |
|
} |
|
} |
|
}); |
|
} |
|
} |
Be sure to set the my_server_ip_address_and_port_number string in the
example above to the IP address and port that you plan to use to
run the Rails application server we wrote in Section 7.4, Writing the
Code for the Web Client. And that’s it! Go ahead and run
the application in the Android emulator to make sure it compiles
and shows up on the screen correctly.