9.4 Writing the Android Server
Time to write the door lock server. Instead of relying on a personal computer to perform the heavy lifting of running Python scripts to respond to incoming requests, we are going to use the computing power embedded in the Android smartphone itself. Even older Android phones are computationally more powerful than desktop computers were only a few years before the Android OS was introduced.
Besides, an Android phone acting as this project’s server offers a number of advantages:
-
Power requirements are far lower than a desktop computer, making for much greener energy consumption.
-
The phone has onboard Wi-Fi, allowing it to be placed anywhere within range of the home’s wireless access point.
-
The phone has an onboard camera that can be programmed using standard SDK calls to capture images.
-
The phone has other features like Bluetooth and speech synthesis that we will be using in the Chapter 10, Giving Your Home a Voice project.
The phone-based web server application will need to perform the following functions:
-
Establish a standard web server instance and listen for inbound requests for a specific URL.
-
When the URL is requested, send a signal for five seconds to power IOIO board pin 3. This will release the electric lock long enough to allow entry.
-
After the five seconds, use the built-in camera on the web server host device to take a photo of the person entering the door.
-
Send the captured image as an email attachment to a designated recipient.
-
Return to an idle state and await another properly formatted inbound request to begin the cycle anew.
In order to construct the web server, we will borrow code snippets from the open source GNU GPLv3 Android Web Server project available on Google Code.[98] We will also incorporate code (generously posted by Jon Simon) for sending email messages with attachments from an Android application without having to rely on intents to do so. [99]

According to the Android developer documentation, an intent is “an abstract description of an operation to be performed.”[100] In layman’s terms, intents are used to transmit and receive messages between Android activities and services. Intents can also send messages to the same application that generates them, though intents are more frequently used to send a message from one application, say a web browser that has downloaded an audio file, to another application, such as a music program.
When multiple applications have been registered to receive certain Intent messages, a pop-up dialog box might appear, asking the user to select which application to send the message to. If you’re an experienced Android device user, you have no doubt seen this pop-up appear at one time or another. Android allows users to select via a checkbox in the pop-up dialog the default application to send such messages to so as not to annoy you with chronic pop-ups all the time.
As a result of such user interaction requirements, intents are rarely optimal for entirely autonomous operations, such as sending email, since the message receiving the Intent message (in this case, an email application) might still require user interaction to complete the intended action (i.e., the user would need to click the Send button in the email program to actually send the email message initiated by the original Intent-transmitting program).
Since most intents typically rely on user interaction, it won’t work for our standalone web server scenario. Combining these two projects with the IOIO code will allow our program to autonomously listen for and react to door unlock requests. Lastly, we will rely on bits of Camera Sample code written by Krishnaraj Varma to capture an image and save it on the Android’s SD card.[101] It will be this image that we will send as an email attachment. However, before we can start working on this Android program mashup, we need a more definitive way to access the IP address of the Android phone.
Setting a Static IP Address
By converting the phone’s Wi-Fi IP address from a dynamic to a static address, it will be much easier to repeatedly locate the phone on a home wireless local area network. If you haven’t already created a static IP range on your wireless router, either do so or set the IP address to something higher than 200, since it’s unlikely you will have that many devices requesting an IP address from the DHCP server in your wireless router anytime soon.
You can access the configuration setting on most Android phones by selecting the Settings icon, followed by the Wireless and Network menu selection. Then select Wi-Fi settings and press the menu button on the Android phone itself to bring up a pop-up menu with Scan and Advanced selections. Click the Advanced menu option. You will then see a screen of menu choices allowing you to modify a number of network settings, one of which is a Use static IP checkbox. Click that checkbox to enable the ability to set the Wi-Fi radio’s IP, subnet, and gateway address as shown in Figure 41, Configuring an Android device to use a static IP. Set these according to your wireless router network configuration. For example, if your wireless network router is leasing an address range beginning at 192.168.1.2, your settings can most likely be configured to the following:
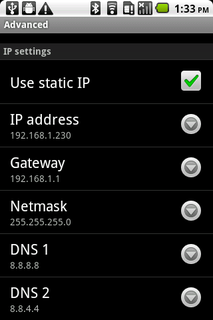
Figure 41. Configuring an Android device to use a static IP
-
IP Address: 192.168.1.230
-
Gateway: 192.168.1.1
-
Netmask: 255.255.255.0
Set the DNS1 and DNS2 values to the DNS address of your choice (I used Google’s Public DNS in my configuration), though it’s best to set these addresses to the same domain name servers that your other network clients are using to maintain consistency on your local area network. When you have entered the static values, click the Menu button on your Android device and select the Save option.
Test access to the static IP on the phone by pinging it from another computer on your network. If you set up the static IP address information successfully, you should see positive ping results. If not, check your settings and be sure to save your changes. With the static IP address confirmed, we’re ready to proceed with writing and testing some Android web server code.
Creating an Android Web Server
Android runs a modified version of the Java Virtual Machine and as such, brings to it a number of standard Java libraries. That’s a good thing, since one of the libraries helps to make creating and running a web server trivial by using just a few lines of code.
Rather than taking up book space showing the
contents of the dozens of files that comprise the full program
listing, visit the book’s website and download the DoorLockServer.zip file. Once downloaded and
uncompressed, import the project into your Android SDK-configured
Eclipse environment via the File->Import... menu option. If you
examine the file’s contents, you will notice a file named
AndroidDoorLockServerActivity.java. Look for
the two lines of code in the private void
startServer(int port) method that uses the Android phone’s
Wi-Fi IP address, port number, and default message handler to start
the web server on the phone.
server =
new
Server(ipAddress,port,mHandler); |
|
server.start(); |
This instruction imports the ServerSocket reference and tells Android to listen for requests on port 80 on our assigned static IP address. Naturally, there is much more to manage, such as starting and stopping the server from the UI, making the server a service so Android keeps it running in the background, keeping the phone from entering sleep mode, acting on inbound requests, and handling errors.
Now that we have the basic requirements for running a web server from an Android device, the next task we need to tackle is to combine it with the IOIO board functionality we enabled in Section 9.3, Controlling the Android Door Lock.
Web Server + IOIO Board
This is where things get interesting. By combining
the IOIO test application we wrote in Section 9.3, Controlling
the Android Door Lock, with the web server in the last
section, an inbound HTTP request will trigger digital pin 3 on the
IOIO board. This will signal the PowerSwitch Tail to allow power to
go to the electric door strike. Essentially, we will transplant the
IOIO trigger routine into the web server’s response to an HTTP
request. For example, calling a URL like http://192.168.1.230 will ultimately energize
the door lock and allow entry.
We don’t want to leave the door permanently unlocked
by keeping digital pin 3 on, so we will have to turn off power
after a set amount of time. Five seconds should be adequate for our
testing purposes. To do so, we will call upon Android’sThread.sleep() function to pause program execution
for a set duration. Experienced Android application developers know
that this isn’t the most elegant way to handle pausing program
execution because it can make user interface elements appear
unresponsive. However, since the Android device will be used as a
server rather than a client, we won’t have to worry too much about
optimizing the interactive user experience for this program. I set
the delay to five seconds (Thread.sleep(5000)), though you’re welcome to change
that value to close the lock sooner or later, depending on your
response time needs.
As before, refer to the code in the DoorLockServer.zip file. Open the project in
Eclipse and focus on the AndroidDoorLockServerActivity class. Note the use
of the try block that activates power to
the PowerSwitch Tail for five seconds and makes the camerasurface.startTakePicture() call to the photo
capture routine that will use the built-in Android camera.
| AndroidDoorLock/DoorLockServer/src/com/mysampleapp/androiddoorlockserver/AndroidDoorLockServerActivity.java | |
@Override |
|
protected
void loop() throws ConnectionLostException { |
|
|
|
if (mToggleButton.isChecked())
{ |
|
if
(LockStatus.getInstance().getLockStatus()) { |
|
try { |
|
powertail_.write(false); |
|
// pause for 5 seconds to keep the lock
open |
|
sleep(5000); |
|
powertail_.write(true); |
|
LockStatus.getInstance().setMyVar(false); |
|
// Take a picture and send it as an email
attachment |
|
camerasurface.startTakePicture(); |
|
}
catch (InterruptedException e)
{ |
|
} |
|
}else { |
|
try { |
|
sleep(10); |
|
}
catch (InterruptedException e)
{ |
|
} |
|
} |
|
}
else { |
|
powertail_.write(true); |
|
} |
|
} |
|
Compile and run this DoorLockServer project on your Android device. Start the web server on your Android device. Make sure it is properly connected to the IOIO board and the board is correctly wired to the PowerSwitch Tail. Access the IP address of the web server using any web browser that can access your local area network. If all goes according to plan, your electric door lock should unlock for several seconds and then relock. Cool!
We’re two-thirds finished with this project. The final component is to take advantage of the fact that most Android devices (at least the Android phones) have a built-in camera. We’re going to take advantage of that hardware asset by snapping a photo inside the door area several seconds after an unlock request and sending that photo to a designated email recipient. This way you know not only when an unlock request occurred but also who entered the door at the designated time.
Taking a Picture
For this part of the project, examine the
CameraSurface.java file in the
unzipped DoorLockServer directory.
The key functions used to establish a camera surface and image
capture are well documented in the Android SDK, and literally
hundreds of Android photo-capturing code snippets and tutorials are
available on the Internet.[102] I based the image capture
portion of the web server application off of Android developer
Krishnaraj Varma’s Camera sample.
Setting up the camera for use in an Android
application requires us to import several Android namespaces. To do
so, we will need to perform a few additional steps to set up the
display surface. The key libraries being used by the image capture
portion of the program included in the DoorLockServer.zip file are as follows:
| AndroidDoorLock/DoorLockServer/src/com/mysampleapp/androiddoorlockserver/CameraSurface.java | |
import
android.content.Context; |
|
import
android.hardware.Camera; |
|
import
android.hardware.Camera.AutoFocusCallback; |
|
import
android.hardware.Camera.PictureCallback; |
|
import
android.hardware.Camera.ShutterCallback; |
|
import
android.util.AttributeSet; |
|
import
android.view.GestureDetector; |
|
import
android.view.MotionEvent; |
|
import
android.view.SurfaceHolder; |
|
import
android.view.SurfaceView; |
|
import
android.view.GestureDetector.OnGestureListener; |
|
In addition to accessing the camera hardware itself, we also need to have the phone display a preview of the image being captured by the camera. To do so, we will first have to initialize the camera frame and surface variables:
private
FrameLayout cameraholder = null; |
|
private
CameraSurface camerasurface = null; |
These are used to allocate the surface and frame objects accordingly:
camerasurface = new CameraSurface(this); |
|
cameraholder.addView(camerasurface,
new |
|
LayoutParams(LayoutParams.FILL_PARENT,
LayoutParams.FILL_PARENT)); |
Krishnaraj uses callbacks to wait for certain operations to finish before proceeding. Examples of this include waiting for autofocus to set, waiting for the shutter to close, and waiting for the validation that image data has been successfully written to the SD card. The use of callbacks ensures that these events happen in serial fashion such that one won’t begin until the other ends.
| AndroidDoorLock/DoorLockServer/src/com/mysampleapp/androiddoorlockserver/CameraSurface.java | |
public
void
startTakePicture(){ |
|
camera.autoFocus(new
AutoFocusCallback() { |
|
@Override |
|
public void onAutoFocus(boolean success, Camera camera) { |
|
takePicture(); |
|
} |
|
}); |
|
} |
|
|
|
public
void takePicture() { |
|
camera.takePicture( |
|
new ShutterCallback()
{ |
|
@Override |
|
public void onShutter(){ |
|
if(null != callback)
callback.onShutter(); |
|
} |
|
}, |
|
new PictureCallback()
{ |
|
@Override |
|
public void onPictureTaken(byte [] data,
Camera camera){ |
|
if(null != callback)
callback.onRawPictureTaken(data, camera); |
|
} |
|
}, |
|
new PictureCallback()
{ |
|
@Override |
|
public void onPictureTaken(byte [] data,
Camera camera){ |
|
if(null != callback)
callback.onJpegPictureTaken(data, camera); |
|
} |
|
}); |
|
} |
|
The act of writing data to the SD card occurs in the
onJpegPictureTaken event. Since this
image file is going to be sent as an email attachment and it’s not
necessary to store successive captures on the SD card, the image
data is saved with the same filename each time a photo is
taken.
FileOutputStream outStream = new FileOutputStream(String.format( |
|
"/sdcard/capture.jpg")); |
|
|
|
outStream.write(data); |
|
outStream.close(); |
Note that if you prefer to store each progressive image capture on the phone’s SD card rather than overwrite it with the same filename, you can append a timestamp to the suffix of the filename using Krishnaraj’s original Camera code:
FileOutputStream outStream = new FileOutputStream(String.format( |
|
"/sdcard/%d.jpg",
System.currentTimeMillis())); |
However, I don’t recommend this approach unless you have plenty of storage capacity on your SD card and don’t mind the duplication of image data on the phone and in your email inbox. If you do opt for this file naming method, you will also need to save the timestamped filename so you can later pass it when calling the email attachment instruction in the program. Now let’s look at how to attach the image data to the email and send it.
Sending a Message
Now that we have captured and stored the camera-captured temporary image on the Android’s SD card, we need to rely on a self-contained email routine that will email the attached photo without any user interface interaction. Fortunately for this project, we can call upon Jon Simon’s JavaMail for Android-enhanced email routine. Download and reference the custom JavaMail for Android jar dependencies for Jon’s email code to work properly.[103] We can then modify the code to account for our image attachment needs. To do so, we first need to import a number of Java libraries used by the JavaMail class:
import
java.util.Date; |
|
import
java.util.Properties; |
|
import
javax.activation.CommandMap; |
|
import
javax.activation.DataHandler; |
|
import
javax.activation.DataSource; |
|
import
javax.activation.FileDataSource; |
|
import
javax.activation.MailcapCommandMap; |
|
import
javax.mail.BodyPart; |
|
import
javax.mail.Multipart; |
|
import
javax.mail.PasswordAuthentication; |
|
import
javax.mail.Session; |
|
import
javax.mail.Transport; |
|
import
javax.mail.internet.InternetAddress; |
|
import
javax.mail.internet.MimeBodyPart; |
|
import
javax.mail.internet.MimeMessage; |
|
import
javax.mail.internet.MimeMultipart; |
Methods for public Mail(String
user, String pass) and public void
addAttachment(String filename) throws Exception allow us to
easily send the captured image file to a designated recipient.
Sending a message is straightforward once the username, password,
recipient, and attachment parameters are defined in onJpegPictureTaken() found in the AndroidDoorLockServerActivity.java file:
try
{ |
|
GMailSender mail = new
GMailSender("[email protected]", |
|
"YOUR_GMAIL_PASSWORD"); |
|
mail.addAttachment(Environment.getExternalStorageDirectory()
+ |
|
"/capture.jpg"); |
|
String [] toArr = {"[email protected]"}; |
|
mail.setTo(toArr); |
|
mail.setFrom("[email protected]"); |
|
mail.setSubject("Image
capture"); |
|
mail.setBody("Image captured - see
attachment"); |
|
if(mail.send()) { |
|
Toast.makeText(AndroidDoorLockServerActivity.this, |
|
"Email was sent
successfully.", |
|
Toast.LENGTH_LONG).show(); |
|
}
else { |
|
Toast.makeText(AndroidDoorLockServerActivity.this, |
|
"Email was not sent.", |
|
Toast.LENGTH_LONG).show(); |
|
} |
|
}
catch (Exception e) { |
|
Log.e("SendMail", e.getMessage(),
e); |
|
} |
Replace [email protected], YOUR_GMAIL_PASSWORD, and [email protected] with your Gmail
account credentials. Note that the recipient does not have to be a
Gmail user, so you can send the message to a non-Gmail account if
you prefer to do so.
There are a few other preparatory instructions that are part of the email transmission process. Examine the downloaded code for a better understanding of all the dependencies and processes that take place to send a message from an Android device without user intervention.
Setting Hardware Permissions
We’re almost done. By combining four separate Android programs into one, we are able to listen for an inbound HTTP request, unlock the electric door latch via the IOIO board, take a picture using the built-in camera on the Android device, and send that image as an email attachment.
With the photo capturing and email transmitting code
in place, all that remains is to allow the program to access the
camera, Wi-Fi radio hardware, and network to complete its task. As
such, the AndroidManifest.xml file
will need to contain permissions to access not only the network and
Wi-Fi stack but also the camera and SD card:
<?xml
version="1.0" encoding="utf-8"?> |
|
<manifest xmlns:android="http://schemas.android.com/apk/res/android" |
|
package="com.mysampleapp.androiddoorlockserver" |
|
android:versionCode="1" |
|
android:versionName="1.0" > |
|
<uses-sdk
android:minSdkVersion="3" /> |
|
<uses-permission
android:name="android.permission."
> </uses-permission> |
|
<uses-permission
android:name="android.permission.ACCESS_WIFI_STATE" > |
|
</uses-permission> |
|
<uses-permission
android:name="android.permission.INTERNET"
> |
|
</uses-permission> |
|
<uses-permission
android:name="android.permission.WAKE_LOCK"
/> |
|
<uses-feature
android:name="android.hardware.camera"
/> |
|
<uses-feature
android:name="android.hardware.camera.autofocus" /> |
|
<uses-permission
android:name="android.permission.CAMERA"
/> |
|
<uses-permission
android:name="android.permission.VIBRATE"
/> |
|
<uses-permission |
|
android:name="android.permission.WRITE_EXTERNAL_STORAGE"
/> |
|
<application
android:icon="@drawable/icon" |
|
android:label="@string/app_name"
> |
|
<activity
android:name=".AndroidDoorLockServerActivity" |
|
android:label="@string/app_name" |
|
android:screenOrientation="landscape"
> |
|
<intent-filter> |
|
<action android:name="android.intent.action.MAIN" /> |
|
<category |
|
android:name="android.intent.category.LAUNCHER" /> |
|
</intent-filter> |
|
</activity> |
|
</application> |
|
</manifest> |
After setting the email account username, password, and recipient values as well as the IP address for your network, you can compile, install, and run the Android Door Lock server application on your Android smartphone.
Testing the Server
Test out the Android door lock server by accessing its base URL from a web browser. Verify that the electric lock releases and that the camera takes a photo and sends the image to the designated email recipient. If everything worked as expected, congratulate yourself on a job well done. Considering how many dependencies are involved with this project, getting everything to work just right the first time out is indeed a cause for celebration. If something went awry, carefully troubleshoot each function separately. Does the web server respond to requests? Does the PowerSwitch Tail electrify? Does the camera shutter snap? Also, depending on your network connection and the speed of Wi-Fi connectivity of your Android phone, it can sometimes take up to a minute to transmit the photo via email.
We have accomplished quite a bit of this project already, and for the most part, we could simply set a bookmark for the door lock URL and call it a day. But let’s invest just a little more effort by creating a custom client for accessing the door lock URL like we did for the Chapter 7, Web-Enabled Light Switch project. That way, we can quickly access the door lock via a one-click button. Indeed, we can begin amassing our home automation features into a über-controller mobile program that accesses our projects in a single collective interface.