In this chapter, we will utilize Azure
Functions to create several serverless applications. Previously, we
looked at AWS and created two functions, one triggered by an S3
bucket upload and one triggered by an HTTP request. We will
recreate these two triggers with different real-world examples
using Azure’s services. This will give us a look into Azure’s
resources and how they differ from AWS. It will also allow us to
explore other ways to create and use serverless applications. For
the following exercises, we will use Azure functions, WebHooks, API
triggers, and Azure Queue Storage. By the end of this chapter, we
will have three serverless applications and experience with several
Azure services as well as a better understanding of picking cloud
providers.
Note
We will be looking at different
services than we did in AWS to provide exposure to different
trigger sources. As further exercise, I recommend going back to
Chapter 3 and trying to implement those same
solutions using Azure. You could also do the reverse and take the
exercises from this chapter and look at them in AWS.
Explore the UI
As we did with AWS, before we begin
writing our applications, we will go over the Azure UI and how to
navigate it, along with the various pricing options, and the
Functions portal. I am someone who started developing in AWS and
became very comfortable with the environment and UI that Amazon
provides. Ultimately, making the jump from AWS to Azure isn’t a
tough one, but the interfaces do vary a bit, and that can be a
little tricky to get used to. To help ease this difference, I’ll
walk through it pointing out various comparisons and differences
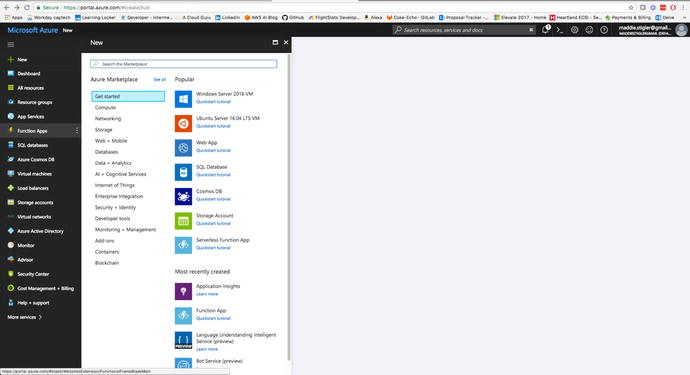
between the two. To get to the Azure portal, go to http://www.portal.azure.com
. After signing in, you will be directed to your dashboard. The
dashboard gives you an overview of your resources, some tips and
tricks, and your running services. Figure 4-1 demonstrates an
example Dashboard.
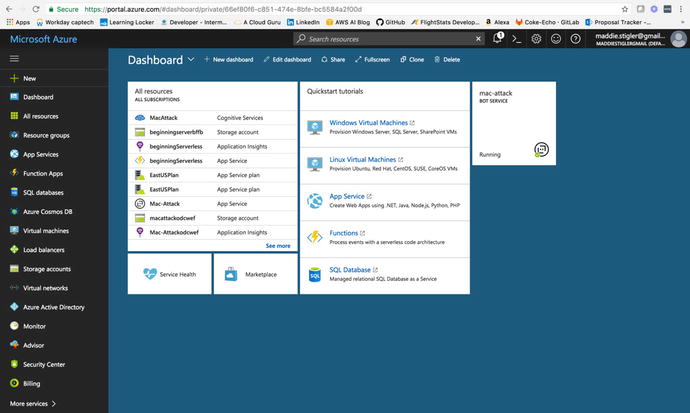
Figure
4-1.
Azure gives you an overview of your
resources and running services . It also
gives you access to creating new resources on the left panel.
Something that I really enjoy about the
Azure dashboard is its ability to be customized. By clicking the
Edit Dashboard option at the top, you can easily add other
resources, move resources, and add tiles. A tile is simply a single block on your
dashboard (examples include All Resources, Service Health, and
Marketplace in Figure 4-1). The Tile Gallery is a tool that allows you
to search for tiles for a particular resource and drag them onto
your current blade (as you’ll see shortly, a UI to specific
resources). Through this, you are able to make management views
spanning resources. You also have the ability to create and view
multiple dashboards. I like to use different dashboards for
different projects so I can keep all of my resources visually
separated. You can give each dashboard a project name to keep
organized.
Note
It is important to keep in mind that
the UI in Azure changes quite often, possibly even more so than
other providers. It would not be uncommon to log in one day and see
a different UI or items with changed names.
Navigation
We’ve explored a lot of the
capabilities of the dashboard, but there are many other points of
interest straight on the portal page that will benefit us to
understand early on. As in AWS, there is a bell icon on the top
black bar that gives us any service updates from Azure. Next to the
bell, we have the Cloud Shell. This is a feature that I really
love, so I will spend some time going over it. Figure 4-2 shows the startup
screen of the Cloud Shell .

Figure
4-2.
When you click the Cloud S hell icon, Azure pulls up a Bash Shell that comes
with the Azure CLI and many other features.
As of now, you can use the Shell to
execute Bash commands or switch it to a PowerShell preview. I
suspect the PowerShell option will be
coming out pretty soon, but for now, the preview will do. By typing
in az, you get the full Azure
CLI. This is an incredible feature. The ability to grab the CLI in
one command straight from the portal makes things so much easier.
To me, this takes a step even further away from relying on anything
locally and further places it in the cloud provider’s location.
This is something you will probably notice with Azure as we move
forward; Microsoft has done a great job of removing as much from
the local workspace as possible. I predict this will continue to be
a trend and will be something that other cloud providers, such as
AWS and Google, catch up on.
Note
Azure shell
sessions aren’t persistent, but your data will be stored between
sessions. In addition, sessions are automatically synced to a
$Home
directory that now allows you to save files and scripts for reuse.
This also means you can now use vi right from the Azure
portal.
Azure provides us a list of some things
to keep in mind when using the Azure Cloud
Shell :
-
Cloud Shell times out after 10 minutes without interactive activity.
-
Cloud Shell can only be accessed with a file share attached.
-
Cloud Shell is assigned one machine per user account.
-
Permissions are set as a regular Linux user.
-
Cloud Shell runs on a temporary machine provided on a per-session, per-user basis.
Ultimately, we get a lot out of the
box from the browser-based shell that allows us to develop quickly
without spending a lot of time on environment setup and
installation. This idea falls in line with a lot of what serverless
computing is. Cloud providers are here to ease the development
process by providing as much off the bat as they can.
Some other notable navigation points
of interest include resource groups, storage accounts, billing, and
function apps. While AWS does give you the ability to create
resource groups, they are much less enforced. By contrast, creating
any resource in Azure requires assigning it to a resource group.
Although sometimes it can be a bit of a pain to have to create a
resource group while you’re really just trying to get your
application up and running, I have to say I think they’re a great
idea. A resource group is essentially a container used to hold all
of your related resources for a solution.
Azure also uses the concept of a
blade to explore different
resources. A blade is essentially a UI for a specific resource.
Figure 4-3
shows the Resource Group blade that the
Azure portal provides.
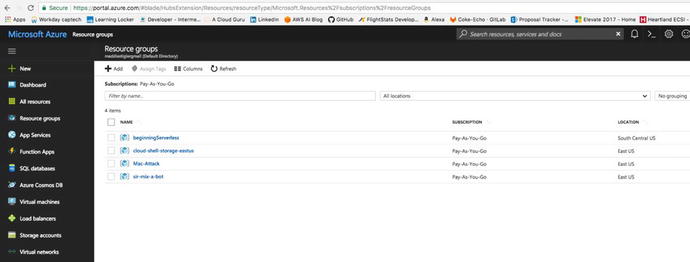
Figure
4-3.
The Resource Groups blade allows you to view all of your resource
groups, create another resource group, and organize your current
groups.
In this portal, I have a resource
group for beginning serverless, which contains all of my resources
for our first serverless example, our cloud shell storage (this is
required to use the Cloud Shell), and then a couple of bot storage
groups. You can also give different resource groups different tags
to sort them even more generally. Some people use this as a way to
keep different development environments separate. An example of
this would be creating resource groups for your different solutions
and tagging them as Dev, QA, Production, or whatever you choose.
You can then filter them in the future by specific development
environment.
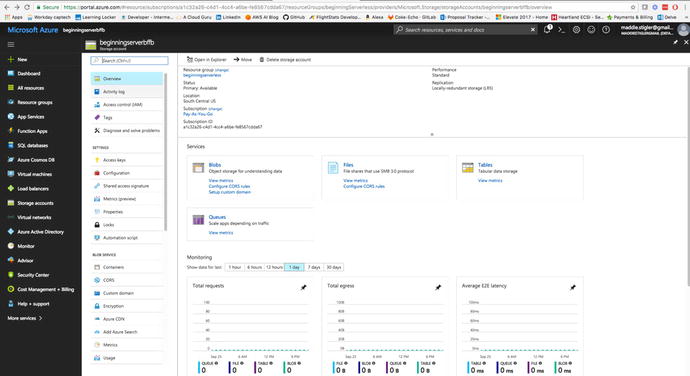
The Storage Account
resource (Figure 4-4) is another Azure service that you will be
accessing frequently while using Azure as your cloud provider.
Similar to resource groups, most Azure services require you to
assign them to a storage group. In my experience, this actually
simplifies things later on because you know exactly where
everything is ending up and how to monitor and configure it. One of
the tricky aspects of AWS is that Amazon handles a lot of this
setup for you, and if you are unfamiliar with the provisioning and
configuration, there could be seemingly random security groups and
settings that aren’t as obvious to find. By creating these elements
specifically for your resource group, you know exactly where to go
to make any configuration changes.

Figure
4-4.
The S torage
Accounts Blade lets you view all of your storage groups and the
resource groups associated with them
As you can see, I have a storage
account associated with each of my resource groups viewed earlier.
All of the objects in a storage account are billed together. Azure
recommends you keep the following in mind when creating storage accounts :
-
Account type refers to whether you are using a general-purpose storage account or a Blob storage account. With a Blob storage account, the access tier also determines the billing model for the account.
-
Storage capacity refers to how much of your storage account allotment you are using to store data.
-
Replication determines how many copies of your data are maintained at one time, and in what locations. It is also important to note that pricing is different for some of these replication options. It is worth looking into before making the decision and getting a bill you aren’t expecting.
-
Transactions refer to all read and write operations to Azure Storage.
-
Data egress refers to data transferred out of an Azure region. When the data in your storage account is accessed by an application that is not running in the same region, you are charged for data egress. (For Azure services, you can take steps to group your data and services in the same data centers to reduce or eliminate data egress charges).
-
The region refers to the geographical region in which your account is based.
Service
Accounts for specific accounts give you options including
viewing the services included in the account, adding access keys,
providing metrics on your resources, and gives you access to
services such as Tables, Queues, Blob Storage, and Azure VMs.
Figure 4-5
gives you an overview of all of these options.
Figure
4-5.
The S torage
Accounts Blade also gives you insight into particular storage
accounts with various actions and metrics on the account
itself
You are also given storage account
endpoints to be able to easily and quickly access the resources in
your storage account. Each URL address is unique to the object
stored in Azure Storage. The account name forms the subdomain of
that address, so the combination of the subdomain and domain name
forms the endpoint for your storage account. For example, my
beginning serverless resource group is under the storage account
beginningserverbffb.
-
Blob service: http://beginningserverbffb.blob.core.windows.net
-
Table Service: http://beginningserverbffb.table.core.windows.net
-
File Service: http://beginningserverbffb.file.core.windows.net
-
Queue Service: http://beginningserverbffb.queue.core.windows.net
In addition to storage and resources,
we will also look at how to access pricing and billing from the
Azure portal.
Pricing
From the Billing blade (Figure
4-6), we have
access to very general billing information such as invoices,
payment methods, and subscriptions.
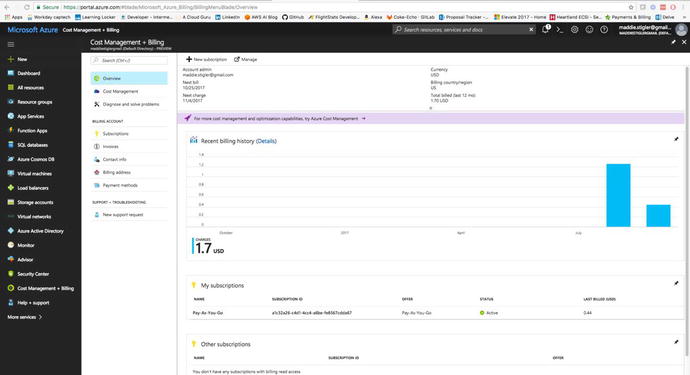
Figure
4-6.
Your Billing blade gives you a very general
overview of your billing information and subscription
information
I personally prefer the Billing portal
in AWS to Azure, mostly because of the accessibility and ease of
use compared to the actual functionality. In AWS, we were able to
do everything in our billing management from the same portal. In
Azure, you are given a very basic overview and are required to go
to the actual Azure account page (in a different portal) to manage
your account billing.
Another difference is that in Azure,
you can set billing limits and have your items stopped if they hit
that limit. This is different than in AWS where you can only set a
billing alarm.
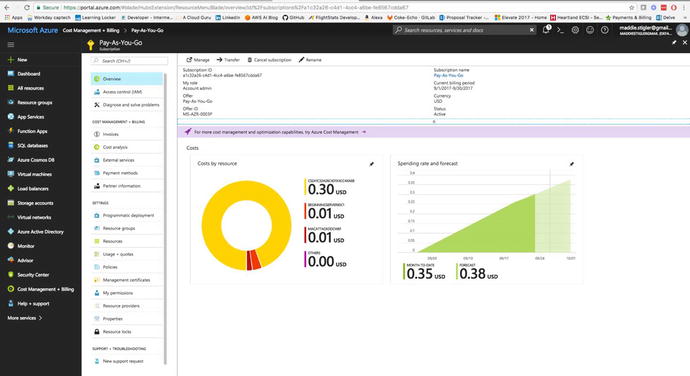
From the actual subscription in your
billing, you can view different metrics such as cost by resource,
cost analysis, and usage. You can also control IAM, transferring of
subscriptions, and the resources associat
ed wit h the particular
subscription.
Azure Functions
The Azure Function Apps are accessible
from the side Resources panel. When you open it, you are directed
to the Functions blade. This blade shows all of your function apps
and the project structures of each. Figure 4-7 demonstrates the
Functions blade .
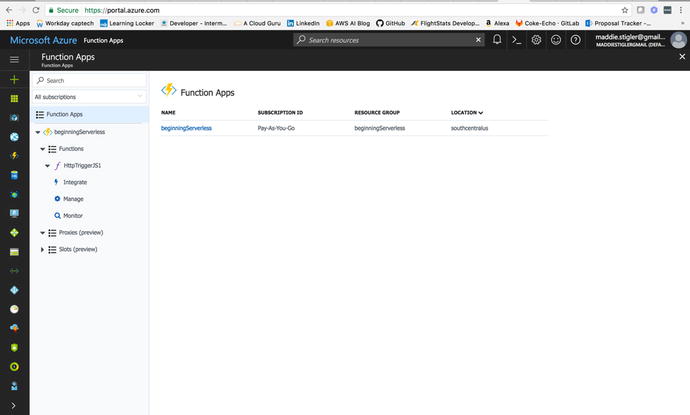
Figure
4-7.
The Function Apps blade with all of your
functions and project structure
I was reluctan t to embrace Azure functions because I
had done so much development with AWS Lambda and cloud development
within the AWS sphere. However, after navigating around Functions
for a little bit, I quickly became a huge fan. One of my qualms
about AWS Lambda was the inability to view and navigate project
structure efficiently. Azure solved this problem by giving you a
way to access your project structure, easily make changes and
configure your serverless applications, and do all of this in one
spot.
I do think this is something that will
be available with AWS as it continues to grow. For now, it is an
incredibly helpful feature within Azure functions and something
that should make rapid development even quicker. Azure also
incorporates the idea of inputs and outputs, which can be configured from
the Integrate blade in your particular function. We discussed
inputs and outputs briefly, but they basically just allow you to
bind additional data to your function (such as retrieving from a
table) as they are triggered. Figure 4-8 shows the project
structure of a simple Hello World function we will be exploring
later.
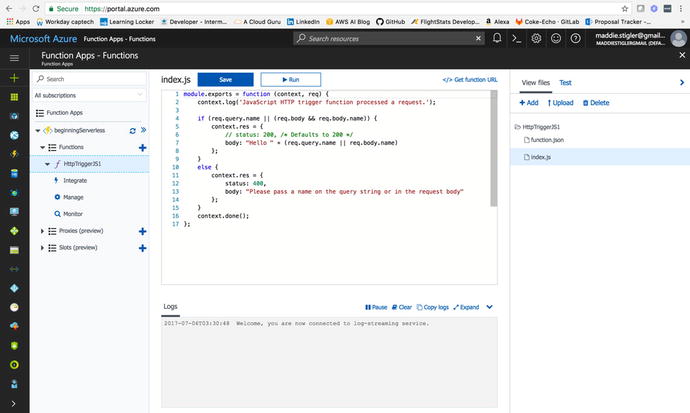
Figure
4-8.
The Azure
Function Apps lets you view your function based on its
configuration, as seen on the left. It also lets you view your
function’s project structure and edit the various files contained
within it.
We will explore the Function Apps and
all of their capabilities in more detail as we begin creating our
solutions. However, before we can get started creating our
functions, we should look at Azure security. We did this with AWS
as well when looking into IAM. It is good practice to have a good
understanding of each provider’s security capabilities so you can
create secure yet accessible applications. Azure helps you out more
than you expect by requiring you to associate all of your resources
with an application. This leads to better organization and less
confusion when configuring permissions. I tend to get a little
confused when I have a lot of roles and different perm issions, so creating it from the start and
knowing it is specific to the exact resource I am creating helps me
out a lot.
Azure Security
We can navigate to Azure Security by
clicking on the Hamburger and going to More Services and Security
Center. The Security Center will look something like the dashboard
in Figure 4-9.

Figure
4-9.
The Azure Security blade gives you access
to an overview, prevention, detection ,
and advanced cloud defense with your
account and services
The Azure Security Center helps you
prevent, detect, and respond to threats with increased visibility
into and control over the security of your Azure resources. It
provides integrated security monitoring and policy management
across your Azure subscriptions, helps detect threats that might
otherwise go unnoticed, and works with a broad ecosystem of
security solutions. Microsoft lists
several key capabilities:
|
Azure Security Stages
|
|
|---|---|
|
Stage
|
Capability
|
|
Prevent
|
Monitors the security state of your Azure
resources.
|
|
Prevent
|
Defines policies for your Azure
subscriptions based on your company’s security requirements, the
types of applications that you use, and the sensitivity of your
data.
|
|
Prevent
|
Uses policy-driven security recommendations
to guide service owners through the process of implementing needed
controls.
|
|
Prevent
|
Rapidly deploys security services and
appliances from Microsoft and partners.
|
|
Detect
|
Automatically collects and analyzes
security data from your Azure resources, the network, and partner
solutions like antimalware programs and firewalls.
|
|
Detect
|
Uses global threat intelligence from
Microsoft products and services, the Microsoft Digital Crimes Unit
(DCU), the Microsoft Security Response Center (MSRC), and external
feeds.
|
|
Detect
|
Applies advanced analytics, including
machine learning and behavioral analysis.
|
|
Respond
|
Provides prioritized security
incidents/alerts.
|
|
Respond
|
Offers insights into the source of the
attack and impacted resources.
|
|
Respond
|
Suggests ways to stop the current attack
and help prevent future attacks.
|
You can access these capabilities from
the Se curity Center in the portal.
Implement Recommendations
Security Center periodically analyzes
the security state of your Azure resources. When Security Center
identifies potential security vulnerabilities, it creates
recommendations that guide you through the process of configuring
the needed controls.
These
recommendations provided by Azure are something you should check
routinely. I went back after creating my applications for this
chapter and implemented the security recommendations from the
Security Center. Figure 4-10 shows what my recommendations were and how
you can easily find them on the blade.
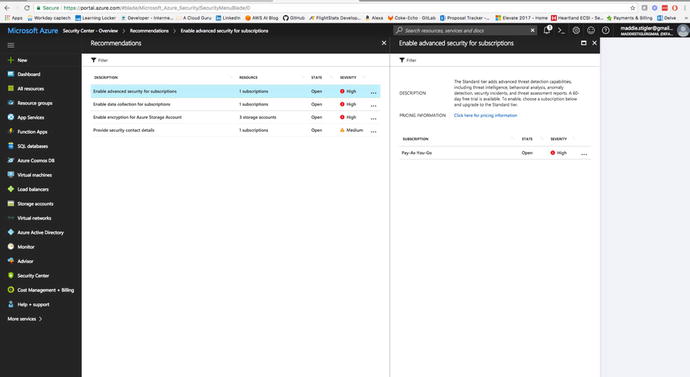
Figure
4-10.
The Azure Security blade gives you access
to an overview, prevention, detection, and advanced cloud defense
with your account and services
The recommendations are shown in a table format where
each line represents one particular recommendation. The columns of
this table are:
-
DESCRIPTION: Explains the recommendation and what needs to be done to address it.
-
RESOURCE: Lists the resources to which this recommendation applies.
-
STATE: Describes the current state of the recommendation:
-
Open: The recommendation hasn't been addressed yet.
-
In Progress: The recommendation is currently being applied to the resources, and no action is required by you.
-
Resolved: The recommendation has already been completed (in this case, the line is grayed out).
-
-
SEVERITY: Describes the severity of that particular recommendation:
-
High: A vulnerability exists with a meaningful resource (such as an application, a VM, or a network security group) and requires attention.
-
Medium: A vulnerability exists and noncritical or additional steps are required to eliminate it or to complete a process.
-
Low: A vulnerability exists that should be addressed but does not require immediate attention. (By default, low recommendations aren't presented, but you can filter on low recommendations if you want to see them.)
-
Some of my recommendations ca me from my Pay-As-You-Go plan.
Azure wants you to use the Standard plan, which is a bit pricier.
For the sake of this project, you can stick to the free tier and
then shift up as you start needing more from your plan.
Set Security Policies
The last thing I want to look at in
the Security Center before jumping into our function is the
security policies. A security policy
defines the set of controls that are
recommended for resources within the specified subscription. In
Security Center, you define policies for your Azure subscriptions
according to your company/personal security needs and the type of
applications or sensitivity of the data in each subscription.
For example, resources that are used
for development or testing might have different security
requirements from resources that are used for production
applications. I am currently developing an application for my
client in AWS and we are also using policies and different accounts
to set up different resources for different development
environments. Likewise, applications that use regulated data like
personally identifiable information might require a higher level of
security. Security policies that are enabled in Azure Security
Center drive security recommendations and monitoring to help you
identify potential vulnerabilities and mitigate threats. If you are
developing for a company based on its security needs, I recommend
reading Azure Security Center Planning and Operations Guide:
https://docs.microsoft.com/en-us/azure/security-center/security-center-planning-and-operations-guide
.
We can configure security policies for
each subscription. Start by clicking the Policy tile in the
Security Center dashboard (Figure 4-11).
Figure
4-11.
The Policies for each subscription are
available in the Security Center dashboard
In this blade, we can edit security
policies by clicking on the subscription we want to edit. The
available options for each subscription include these:
-
Prevention policy: Use this option to configure policies per subscription.
-
Email notification: Use this option to configure an email notification that's sent on the first daily occurrence of an alert and for high severity alerts. Email preferences can be configured only for subscription policies.
-
Pricing tier: Use this option to upgrade the pricing tier selection.
-
Security Policy: In this blade, click Prevention Policy to see the available options. Click On to enable the security recommendations that are relevant for this subscription.
Since we are using functions for our
serverless application, we will not need to edit much in the
Security Policies section. However, is the options here are good to
know moving forward, so when you start incorporating different
services in your application you’ll know where to set the security
policies.
Your First Code
In this section, we are going to cover
the basics to setting up a Hello World function, similar to the one
we created in AWS. It’s important to redo these steps with a small
function first because while you get a lot of the same out of the
box, each provider is very different and the setup can be
different, too.
Hello World
We are going to start b y creating our Hello World function through the
Azure portal. To begin, instead of navigating straight to the
Function Apps blade, click the New button in the upper-left corner
of the Azure portal and navigate to Compute ➤ Function Apps (Figure
4-12) and
click your subscription. My subscription is a “pay as you go,”
which is what I recommend for getting started.
Figure
4-12.
We are going to create a new Azure Function
through the Function App option in the New resource blade
You will need to fill out a couple of
things to create your hello world function including the App Name,
Subscription, Resource Group, Hosting Plan, Location, Storage, and
yes or no to Application Insights. I’ve listed some helpful hints
that Microsoft gives you regarding filling out these various
fields:
-
App Name : Globally unique.
-
Resource Group: Name of the resource group to create your app in.
-
Hosting Plan : Defines how resources are allocated to your app. In the default, resources are added dynamically as required by your functions. You only pay for the time your functions run.
-
Location: Ch oose one near to where your services will run.
-
Storage Account: Als o globally unique, name of the new or existing storage account.
Figure 4-13 shows the final settings for my serverless function app.
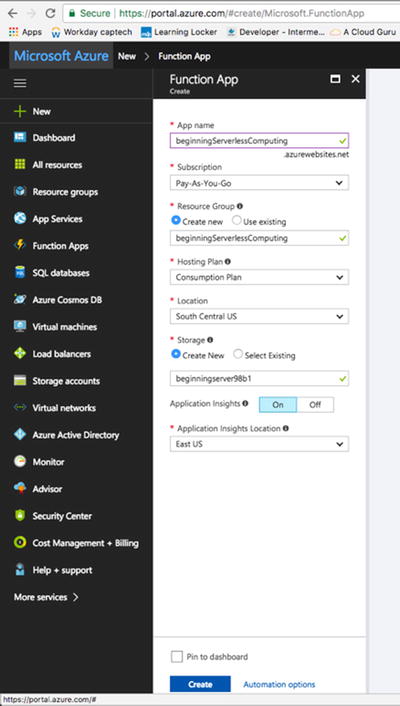
Figure
4-13.
I put my Hello
World function in my region and created a resource group of the
same name
Note
It is important to remember that your
app name and your storage account must be globally unique. You will
not be able to name them the same as mine, so pick something that
still defines what you are building.
I chose to pin the function to my
dashboard to make it easily accessible moving forward. Once you are
ready to go, click Create to create and initialize your Hello World
function. When you click Create, Azure will take you back to the
portal while the function is being created (Figure 4-14). If you chose to save it to your
dashboard, you will see the App’s creation progress directly on
your dashboard. If you didn’t, you can still view the progress by
clicking on the bell in the top-right corner of the portal.
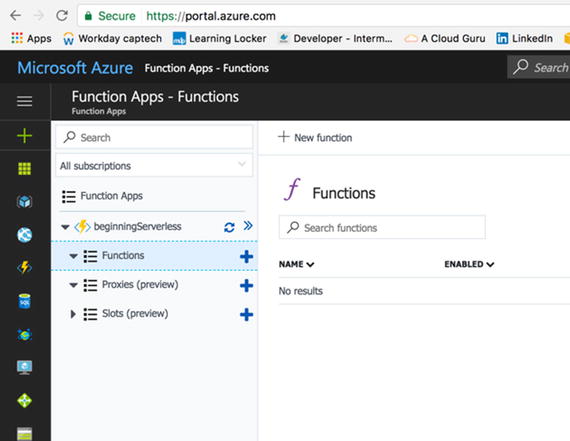
Figure
4-14.
Notice that the pr oject has been created, but there are no
functions listed underneath it
In Azure, we create larger resources
groups before creating the actual resource. In AWS, we created the
function directly. AWS requires fewer steps, but Azure gives you
slightly more organization and allows you to look at it as you are
accustomed to doing as a developer. This method also lets you keep
all of your functions associated with the same project together. In
AWS, it can get a little hectic trying to keep all of a project’s
functions together. It is really up to what you prefer as the
architect.
When we click the plus icon next to
functions, we are taken to the startup page, which gives you three
out-of-the-box templates for creating a function. These options
are:
-
WebHooks and API
-
Timer
-
Data Processing
You are also given three runtime options:
-
FSharp
-
CSharp
-
JavaScript
We are going to select the WebHooks and API template so we can build off
it later for our next function. Azure actually gives you even more
templating options than this if you click on Create Custom
Function. To me, this option name is a little misleading. These
templates all already have triggers configured for each runtime and
each trigger option. In AWS, you are given far more template
options to start out with, as well as other runtimes. This gives
you a little more flexibility as the developer. Azure also lets you
create your own custom function both in PowerShell and from the
console. We are going to select the JavaScript runtime and create
our function. Figure 4-15 shows what your new function in our Hello
World project should look like.
Figure
4-15.
The recently created function using the
W ebhook + API template
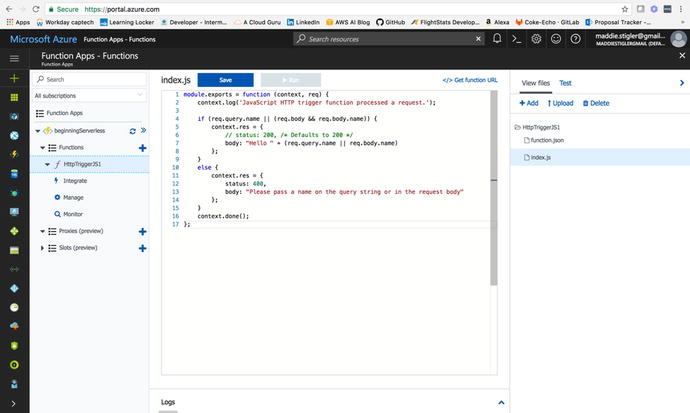
As you can see, we really do get a lot
out of the box with this template. We now have a function under our
Functions option in our project. If we click on the function
itself, we can see and edit the index.js file to do
what we want. Right now, the function takes a POST request with a
name object and returns a string saying “Hello {Name}”. By clicking
Integrate in the function options, we can see the trigger
configuration for the HTTP request (Figure 4-16).
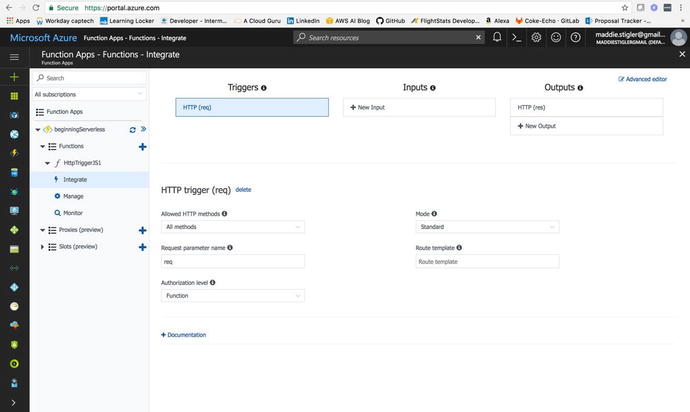
Figure
4-16.
The Integrate blade lets you view the
trigger (a mandatory feature of the Azure function), configure
inputs and outputs, and advanced HTTP features
In the HTTP
Trigger section, we are given the following options:
-
Allowed HTTP Methods: Configurable.
-
Request Parameter Name: The name used to identify this trigger in the code.
-
Authorization Level: Controls whether the function requires an API key and which key to use:
-
Mode: Standard or WebHook.
-
Route Template: Allows you to change the URI that triggers the function.
For those of you
who prefer to configure this manually, you can use the Advanced
Editor in the top right corner to edit the function.json file.
This file determines the bindings and settings of the function
trigger. To begin, I thought it was easier to configure using the
UI, but as I became more comfortable, I enjoyed making these
changes in the Advanced Editor because it became quicker.
In the Manage section under our function, you are given options
to edit Function State, Function Keys, and Host Keys (Figure
4-17).
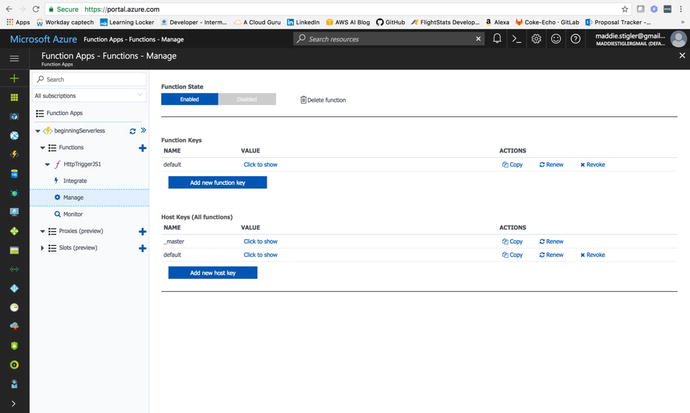
Figure
4-17.
The Manage blade
is where your keys and state can be configured and managed
You can use these keys as a query
parameter in your requests. If your function is a WebHook (as
opposed to a regular HTTP function), when using a key other than
the default you must also specify the clientId as a query parameter
(the client ID is the name of your new key). We will look at this
in more detail later as we build our function out. Now, we are
going to jump into testing our function and seeing what it comes
with right out of the template.
Testing
To test our Hello World HTTP function,
we are simply going to click back on the function name, and open
the Test blade on the right side of the portal. As you can see, the
test options are provided for us to
configure and send through. The test options are already configured
for your specific trigger, so we can see HTTP request options
including method, query, header, and request body.
For our function, all we need to kick
things off is a request body with a name. I’m going to pass my own
name in as the request (Figure 4-18).
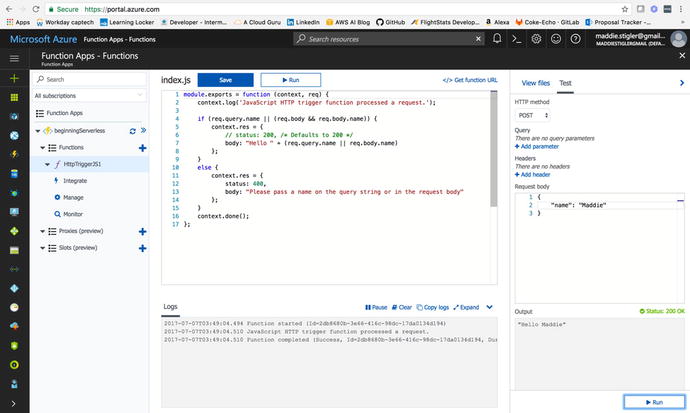
Figure
4-18.
The sample test event wi th my name being passed into the request. Azure
gives you the output and the logs as soon as the request is
complete.
The output and logs resemble AWS and
are pretty easy to follow. Azure gives you a couple of extra
options for the logs including Pause, Clear, Copy, and Expand.
Azure also provides all of the monitoring for the function
execution in the function blade. To monitor these logs closely, we
will navigate to the Monitor blade underneath our function. Here we
are given the success count, error count, and the invocation log
with invocation details (Figure 4-19).
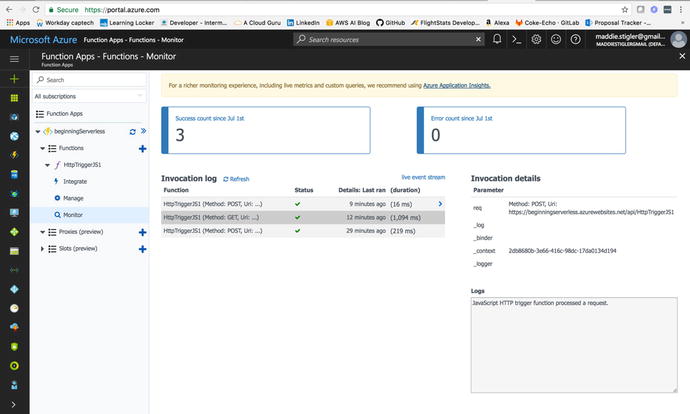
Figure
4-19.
This figure shows the Monitor blade under the function we are testing
and everything you get from that blade
While this does provide us with the
monitoring we need for a Hello World project, we are going to go
ahead and look into Application Insights, setting it up, and what
we can learn from it.
Application Insights
Application Insights (Figure
4-20) is a
powerful metrics tool that takes little effort to set up and
associate with your function. Azure recommends developers utilize
Application Insights with all of their funct ions. To get started, click the New button
on the resources panel and choose Developer Tools ➤ Application
Insights.
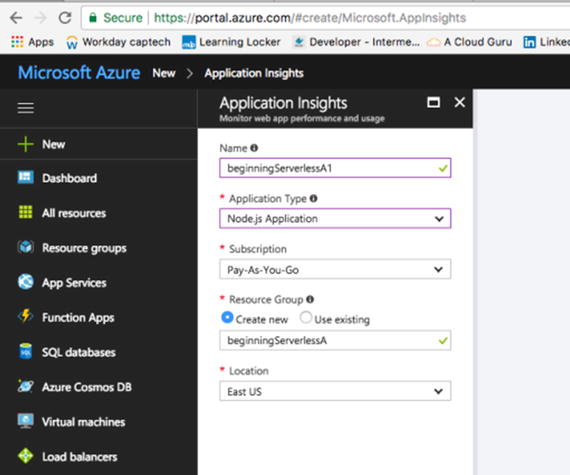
Figure
4-20.
Application Insights configuration for my beginning serverless
function. Note that I put it in the same resource group I had
created earlier.
Once you create your Application
Insights, grab the Instrumentation Key from the Essentials and copy
it. This key will be used to link our function to the Insights
instance. From here, navigate back to your Hello World function.
Click on your project ➤ Settings ➤ Manage Application Settings.
Under App Settings (Figure 4-21), locate APPINSIGHTS_INSTRUMENTATIONKEY
and paste your key into the box next to it. Save these changes.
This will tell App Insights what to watch and monitor. As soon as
the key is associated with your function, your application will
start sending App Insights monitoring information about your
function without any other configuration.
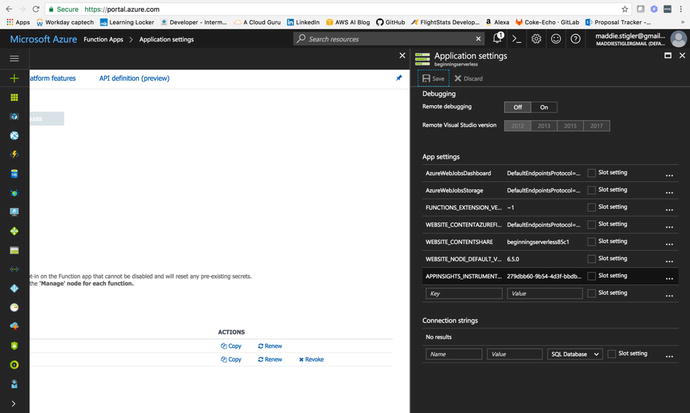
Figure
4-21.
This figure demonstrates how to add your
App Insights Key to your function
Application Insights is a great tool
not only because of its ease of use, but also for its
extensibility. This service spans many platforms including
.NET, Node.js, and J2EE. Azure is
currently the only provider to support .NET Core for application
monitoring. It can also be used on premises or in the cloud. I
recently started using Application Insights at my client site with
an on-premises application, and it is just as simple to use. It
also integrates well with other cloud services and has several
connection points to different development tools , including these:
-
Azure Diagnostics
-
Docker logs
-
PowerBI
-
REST API
-
Continuous Export
These tools can be used to measure
your Application Insights. Within Azure, Application Insights can
be explored much more easily. Azure provides a built-in dashboard
that allows you to explore all of your insights for your function
and export these insights. To experience the full extent of
Application Insights, navigate to the new resource we created in
the dashboard (Figure 4-22).
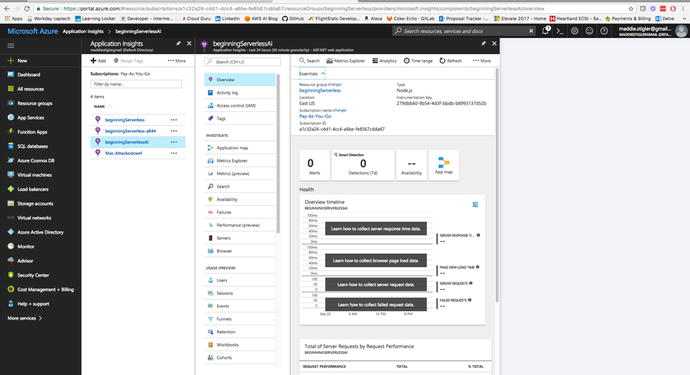
Figure
4-22.
Application Insights Blade for our Hello
World Application
By just clicking on the blade, you
are given a lot up front including alerts, availability, app map,
health, and total requests. These give you a good overview of your
function, but a lot of the power of Application Insights remains to
be seen. By going to the Analytics tab, you are redirected to an
Application Insights page that gives you everything you need to
continue monitoring your application. Microsoft provides these
additional features as well:
-
Request rates, response times, and failure rates: Find out which pages are most popular, at what times of day, and where your users are. See which pages perform best. If your response times and failure rates go high when there are more requests, then perhaps you have a resourcing problem.
-
Dependency rates, response times, and failure rates: Find out whether external services are slowing you down.
-
Exceptions: Analyze the aggregated statistics, or pick specific instances and drill into the stack trace and related requests. Both server and browser exceptions are reported.
-
Page views and load performance: Reported by your users' browsers.
-
AJAX calls from web pages: Rates, response times, and failure rates.
-
Performance counters from your Windows or Linux server machines, such as CPU, memory, and network usage.
-
Host diagnostics from Docker or Azure.
-
Diagnostic trace logs from your app — so that you can correlate trace events with requests.
-
Custom events and metrics that you write yourself in the client or server code, to track business events such as items sold or g ames won.
HTTP Events
We are going to look at HTTP events
in two parts: WebHooks as a trigger and API as a trigger. For our
first built-out Azure function, we will build a simple WebHook
application. In our second one, we will build off our Hello World
function. I wanted to explore WebHooks because this is a feature
Azure provides to users and it departs from AWS resources a bit.
Before beginning, it is important to understand the concept of a
WebHook. I tend to like to jump into projects and get my hands
dirty so I didn’t spend as much time understanding WebHooks as I
should have. After several failed attempts, I finally took the time
to really research WebHooks and how they function.
A WebHook is simply a method of
changing the behavior of a web application or web page with custom
callbacks. Callbacks are a significant concept in most applications
and especially so in Node.js applications. To put it simply,
callbacks are functions passed to
functions that signify the end of a specific task. In Node.js,
callbacks are especially necessary due to the asynchronous nature
of Node. This means functions can execute in parallel. In cases
where order matters, it is important to include a callback to
indicate the end of a function. Figure 4-23 illustrates the idea
of a callback in Node.
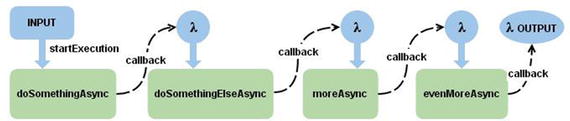
Figure
4-23.
Callbacks signifying the end of a function
and the start of another function
Since callbacks are a pretty significant topic in
event-driven applications and serverless applications tend to be
event-driven, I would recommend researching this topic in further
detail if it is not understood. I really liked this article at
tutorialspoint:
https://www.tutorialspoint.com/nodejs/nodejs_callbacks_concept.htm
. I had a hard time implementing callbacks (I would frequently
leave them out when I first started writing applications in Node),
and this tutorial helped me understand their use.
The custom callbacks we will use for
our WebHook will be maintained, modified, and managed by GitHub.
For the purpose of this exercise, we are going to use a
GitHub-triggered WebHook to gain a better understanding of how we
can utilize WebHooks in our Azure functions and how we can use
third-party sources (GitHub) to configure them.
Create a GitHub WebHook Trigger
In our Azure Functions blade, we are
going to create a new function and pick
the GitHub WebHook – JavaScript template provided by the Azure
library (Figure 4-24). The starter template for this will
provide us with a function URL and a GitHub secret that we will use
to link our GitHub account to our Azure function.
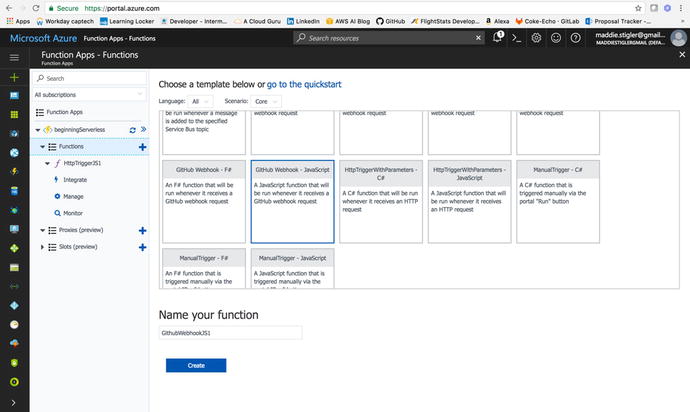
Figure
4-24.
Select the GitHub WebHook Template from the
Azure library
By clicking the function URL and the
GitHub Secret, we can collect the information needed to configure
the WebHook in GitHub. As it is, the function is triggered by an
action, to be decided, that is coming from our GitHub account. I am
usin g my personal GitHub account to
trigger this function (Figure 4-25). If you do not have an account, go ahead
and sign up for a free one at http://www.github.com
. If you do not already have a repository, feel free to fork mine
at
https://github.com/mgstigler/Serverless/tree/master/Azure/azure-service
.
Figure
4-25.
Paste the URL and Secret in your Github
WebHooks settings
If you navigate to the settings of
your repo, you will see a WebHooks tab where you can paste your
Payload URL and Secret. Leave the content type as application/x-www-form-urlencoded.
You can specify which events you wo uld
like to trigger the WebHook, from the following list:
-
Commit comment
-
Create
-
Deployment
-
Fork
-
Gollum
-
Issue comment
-
Issues
-
Label
-
Member
-
Milestone
-
Page build
-
Project
-
Project card
-
Project column
-
Public
-
Pull request
-
Push
-
Release
-
Repository
-
Status
-
Team add
-
Watch
I chose a push event for my WebHook,
bu t feel free to experiment with
anything you wish. After setting up this configuration, I simply
made a change to my repo and pushed it to my master branch. I could
see the effect of the WebHook trigger by looking at the logs for my
function in the Azure portal (Figure 4-26).
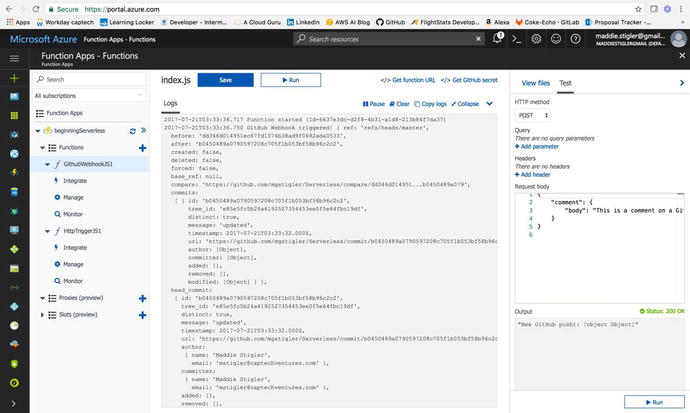
Figure
4-26.
The logs shows the Webhook trigger and
execution
My function’s body simply writes the
request to the logs. You can see everything about the push to my
repo, including the committer, timestamp, and what I changed. This
may not be so helpful right now, but you can see how WebHooks could
be used to set up GitHub apps that subscribe to various events on
GitHub. These applications can be used to update an issue tracker,
trigger continuous integration builds, and even deploy to different
environments. This example wraps up our GitHub
WebHook example . If you are interested in learning more, I
found this to be a good resource:
https://developer.github.com/webhooks/
.
Build Upon Our Hello World API Trigger
To build on our HTTP trigger, we are
going to create a notification service that utilizes Twilio and the
Hello World API trigger, as well as Output bindings. I’m going to
make this service fun and say it will be a food delivery
notification service, but you can make it whatever you like. To
create this, we are going to go back to our Hello World function
and change the HTTP request from “any” to POST. I like to separate
my API calls into different functions. Since the goal of delivering
a serverless solution is fast, event-oriented design, we will stick
to this approach. To begin, we will reconfigure our function so
navigate back to your Hello World. Do the following to reconfigure:
-
In Integrate, navigate to Triggers. Change your allowed methods to Selected Methods and choose the POST method. I set my route template to be orders/. Feel free to do the same.
-
In Outputs , click Add new Output and choose Twilio from the available outputs.
-
For Message Parameter Name, choose to use the function return value (you can also set your own parameter name if you wish
-
I left the Twilio Settings as TwilioAuthToken and TwilioAccountSid.
-
I also left the rest of the parameters blank so I can configure them in my function.
-
We are set up in our Azure portal,
but now we need a Twilio account and the
information associated with that account. To get this information,
go to https://www.twilio.com/try-twilio
and sign up for free. Once you do this, you will reach the Twilio
landing page (Figure 4-27), which gives you your Auth Token and
Account Sid.
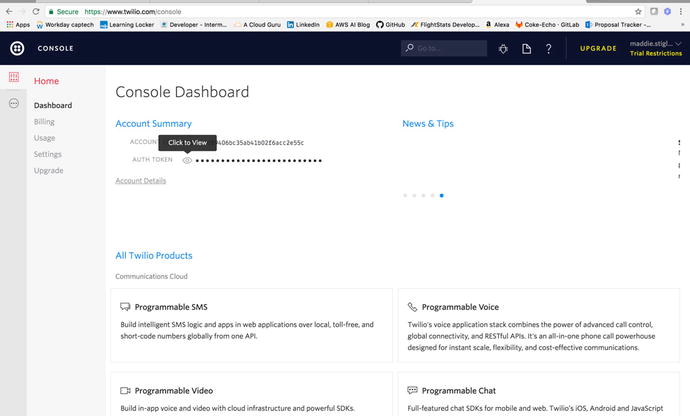
Figure
4-27.
Copy the two tokens from the Twilio Console so we can use them in our
function
I’m going to break here for a Twilio
plug. Twi lio is a unique developer
platform for communication. Developers utilize the Twilio API to
add voice, messaging, and video capabilities to their applications.
By doing this, they are able to provide the right communications
experience to their customers easily and cheaply. Twilio operates
by providing a software layer that connects and optimizes
communication networks around the world. This is how developers can
enable users to reliably call and message anyone anywhere with
little to no cost. Current companies utilizing the Twilio API
include Uber, Lyft, and Netflix.
While I am someone who enjoys
building my own services within cloud environments, I also highly
suggest looking into public APIs such as Twili o when necessary. The AWS equivalent to
using Twilio is SNS, Simple Notification Service. Both tools can
make your life a lot easier and give you a lot more security and
reliability than what you would expect.
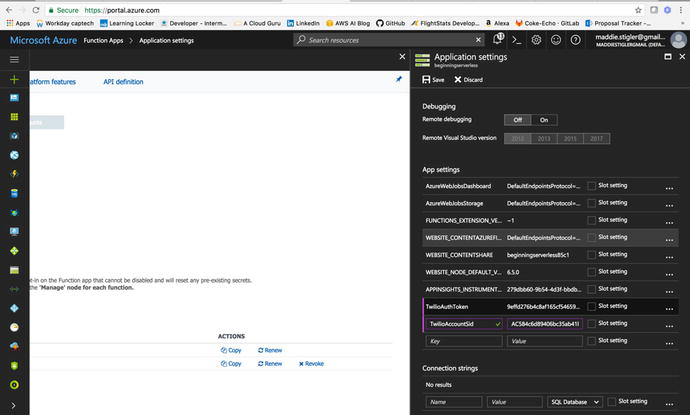
After you grab your tokens from
Twilio, save them in your Application Settings. I saved mine as
TwilioAuthToken and TwilioAccountSid
(Figure 4-28). You can name them whatever you like, but
you will need to configure this in your function outputs.
Figure
4-28.
Save the Twilio Tokens and Sid in your app environment settings
To be able to use the Twilio
integration effectively, we will also need to get an outgoing phone
number from Twilio. They will provide one for free at
https://www.twilio.com/console/phone-numbers/incoming
. This is the number you will use to send texts from your function.
Store this number and remember it for later.
If you navigate back to our function,
we are going to configure the function.json
file for the Twilio output binding. The Twilio output
binding has a specific structure that we will follow to be able to
incorporate it in our function. The function.json will
provide the following properties:
-
name: Variable name used in function code for the Twilio SMS text message.
-
type: Must be set to twilioSms.
-
accountSid: This value must be set to the name of an App Setting that holds your Twilio Account Sid.
-
authToken: This value must be set to the name of an App Setting that holds your Twilio authentication token.
-
to: This value is set to the phone number that the SMS text is sent to.
-
from: This value is set to the phone number that the SMS text is sent from.
-
direction: Must be set to out.
-
body : This value can be used to hard-code the SMS text message if you don’t need to set it dynamically in the code for your function.
My final function.json
file looks like this:
{
"bindings": [
{
"authLevel":
"function",
"type":
"httpTrigger",
"direction": "in",
"name": "req",
"route": "orders/",
"methods": [
"post"
]
},
{
"type": "http",
"direction": "out",
"name": "res"
},
{
"type": "twilioSms",
"name": "$return",
"accountSid":
"TwilioAccountSid",
"authToken":
"TwilioAuthToken",
"direction": "out"
}
],
"disabled": false
}
At this point, we should have all of
the setup done so we can actually write the function. To start, we
will need to require Twilio so we can use the Twilio client to send
the message. From there, we will simply take the data we are
receiving, parse it, and send it in the message. The body of your
index.js file
should look something like Listing 4-1.
var client =
require('twilio')(process.env.TwilioAccountSid,
process.env.TwilioAuthToken);
module.exports = function (context, req)
{
console.log(req.body.name);
if(req.body.name &&
req.body.phoneNumber){
client.messages.create({
from:
'+18178544390',
to:
req.body.phoneNumber,
body:
"Hello " + req.body.name + "! Your order of " + req.body.order + "
is on the way."
}, function(err,
message) {
if(err)
{
console.error(err.message);
}
});
}
else {
console.error("Please include a request
body with a name and a phone number");
}
};
Listing
4-1.
Body of the index.js fil e for our Twilio
function
We will also need a package.json file since we are using Node modules. Once we have
fleshed this out, the trickiest part is actually uploading it to
Azure. This is where Azure gets a little tricky. You can’t directly
upload entire folders from the console. This means you either have
to select all of the files one by one before uploading, or you use
a framework like Serverless to help you upload (my recommendation),
or you use Azure’s online command-line tool. I am going to walk
through option three so we get some exposure to this. In practice,
however, I would definitely use Serverless. I am hoping this is
something that changes in the future. The hardest part should not
be uploading your project, but it actually is a little
exhausting.
Once you have your index, function,
and package.json
files in your project in the console, navigate to
<
functionname
>.scm.azurewebsites.net.
This is your function’s URL with Kudu. To give a bit of background,
Kudu is a deployment framework that can be triggered by Git. It is
actually very similar to Visual Studio Online. I used VSOnline at
my client site and saw a lot of parallels between that and Kudu
when I first started using Kudu. You can check in the code, create
a build definition that will build and run the code and tests, and
then proceed to push the content to Azure websites.
Another benefit to Kudu, which we
will see, is the ability to have more access to and control over
your code online. One of my biggest frustrations when I first
started working with Azure was not having control over my project.
I spent a lot of time looking up solutions to uploading node
modules and trying to physically upload them through the Cloud
Shell to no avail. I even emailed a mentor and asked how he was
able to use node modules with Azure functions; his response was
that he never was able to and switched to an entirely different
runtime just to avoid the headache.
When I finally found the solution
online, it was to use Kudu to interact with your code directly. We
are going to do this now so we have a better understanding of both,
how to navigate and access your code in the cloud and the benefits
of Kudu.
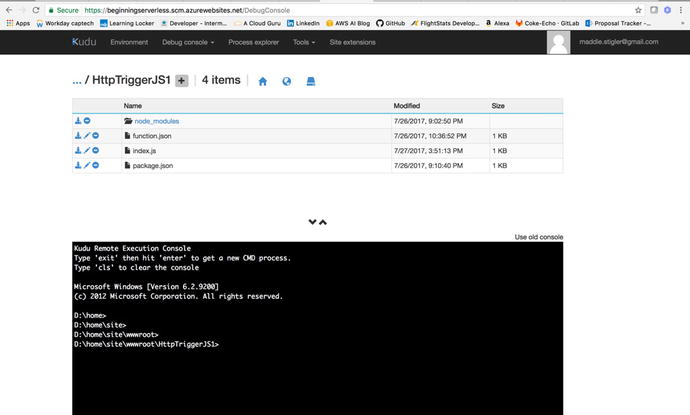
When you first get to your site, you
will just see the dashboard. We will go into the Debug console (Figure 4-30) to be able to
access our code. Navigate to the root of our application with
package.json and in
the console, and use npm install to install
the NPM packages we need.
Figure
4-29.
This is what the Kudu dashboard looks like
when you navi gate to the Debug
console
Note
If the NPM
install doesn’t work, you can directly drag and drop your
npm_modules folder
into the Kudu project structure. I have had issues in the past with
the NPM install from Kudu.
Once your NPM modules are uploaded,
we can navigate back to the dashboard and test our function using a
POST body that we have used before. Mine looks like this:
{
"name": "Maddie",
"order": "Mac 'n Cheese",
"phoneNumber":
"1XXXXXXXXXX"
}
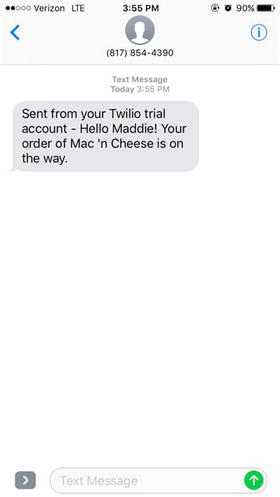
You use the phone number and order to
construct your message. I sent the text to myself to test it out
but feel free to pester a friend with your new application. You
should receive a text with your message shortly after testing it.
To trigger this function outside of the test environment, you can
use Postman or another resource and ping the function URL .
To trigger a function, you send an
HTTP request to a URL that is a combination of the function app URL
and the function name:
https://{function app
name}.azurewebsites.net/api/{function name}
If you specify a method, your URL
doesn’t need to reference the specific function. So our actual
function UR L is
https://beginningserverless.azurewebsites.net/api/orders/
.
And voila! You have a simple
customizable notification application
(Figure 4-30).
Figure
4-30.
Text from Twilio Mes saging Application
In the next exercise, we will build a
storage triggered function that will connect with this
application.
Add to your Function
Exercise: Build off this function to
add more methods and Azure Functions proxies, a preview feature that allows
you to forward requests to other resources. You define an HTTP
endpoint just like with an HTTP trigger, but instead of writing
code to execute when that endpoint is called, you provide a URL to
a remote implementation. This allows you to compose multiple API
sources into a single API surface that is easy for clients to
consume. This is particularly useful if you wish to build your API
as microservices. A proxy can point to any HTTP resource, such as
these:
-
Azure Functions
-
API apps
-
Docker containers
-
Any other hosted API
To learn more, visit
https://docs.microsoft.com/en-us/azure/azure-functions/functions-proxies
.
The Storage Event
For our storage triggered event, we
are going to build an application that is triggered by an addition
to a queue. To continue with our food theme, we will build an Order
queue that will store orders for delivery as they come in. When a
new order is added to the queue, we will update our queue and
create a POST to our previous function’s URL. We are using a queue
in this application because it makes sense in the context of
delivery. However, there are several storage triggers provided by
Azure, including these:
-
Azure Blob Storage
-
Storage Tables
-
SQL Tables
-
No-SQL Database
I recommend looking into these other
options after our queue demonstration. While the Azure storage
options are similar to those in AWS, there are some differences in
the way they are set up and accessed. It might be a good idea to
read back through Chapter 3 and try to implement our
application that we created in AWS in our new Azure environment.
That will give you a good benchmark for differences in setup,
development, and deployment.
Azure Queue Storage
Azure Queue
storage provides cloud messaging
between application components. In designing applications for
scale, application components are often decoupled, so that they can
scale independently. Queue storage delivers asynchronous messaging
for communication between application components, whether they are
running in the cloud, on the desktop, on an on-premises server, or
on a mobile device. Queue storage also supports managing
asynchronous tasks and building process work flows.
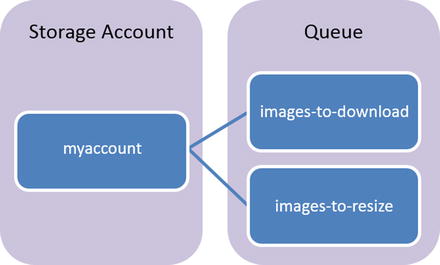
Figure 4-31 is an example
provided by Azure to explain the components of a queue. The example
it uses is an image resizing application that is dependent on
order. The Queue service contains the following components:
-
URL Format: Similar to functions, queues are addressable using the following URL format:
-
http://<storage account>/queue.core.windows.net/queue
-
The following URL addresses the queue in Figure 4-32:
-
Storage Account: All access to Azure Storage is done through a storage account.
-
Queue: A queue contains a set of messages. All messages must be in a queue. Note that the queue name must be all lowercase.
-
Message: A message, in any format, of up to 64 KB. The maximum time that a message can remain in the queue is 7 days.
Figure
4-31.
Illustration of the Queue storage tha t Microsoft Azure
provides
Azure queues are fairly easy to set
up and understand so I enjoy working with them. The drawback to
queues is the lack of control with the columns and rows. Rows will
leave the queue as soon as they are executed (this is how a queue
works anyway), and you only have one message column, which is the
message being sent. The columns you get from Azure are
-
Id
-
Insertion Time (UTC)
-
Expiration Time (UTC)
-
Dequeue count
-
Size (bytes)
For the purpose of this exercise, we
will be able to accomplish all that we need to do using a queue.
However, if you want to add any additional information, you might
want to explore using another storage solut ion.
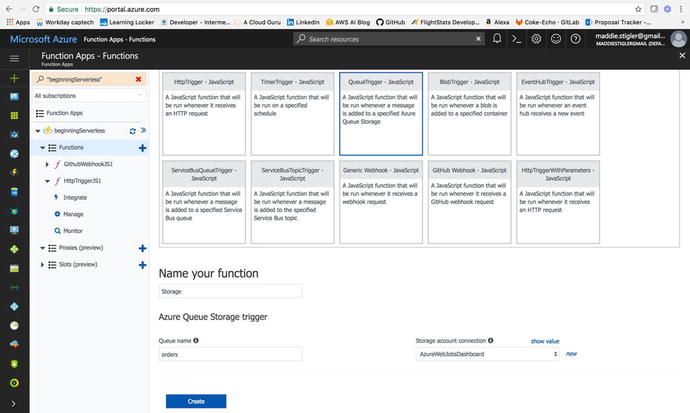
Create the Function
We are going to return to the Azure
portal to create our storage function. To
create our Storage function, navigate back to the new functions
section and select the QueueTrigger – JavaScript template (Figure
4-32). Leave
your storage account connection as is, and change the queue name to
whatever makes sense for your queue. I chose orders because my
queue is going to be a collection of order.
I named my function Storage to separate it
from the other functions we have already created. Creating this
will give you a stubbed-out queue function that you can test using
the test box on the right.
Figure
4-32.
Create a Queue triggered function in
Node.js.
You can create a test message and run
it to see that it works. However, we haven’t set up our queue yet,
so we will need to do this. To get started, click on the
Documentation tab at the bottom of your integrate blade (Figure
4-33).
Hint
This Documentation tab is actually
fairly useful for getting started on any new function. Azure
provides its documentation for the functionality of your trigger
and function within each function. This makes it really accessible
and limits the time you would have spent searching through Stack
Overflow and Google.
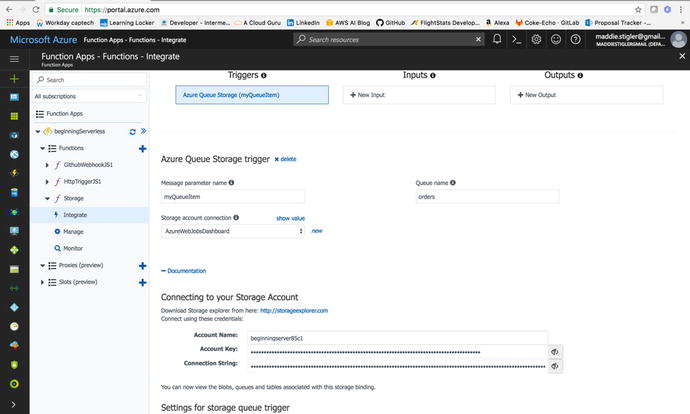
Figure
4-33.
Get the Account Key and the Connection
string from your integration documentation
This Documentation tab contains an
Account name, Account Key, and Connections string for your
function. You will use the Account name and key to set a connection
between the Queue and the function. So copy these values and save
them. We are going to create our queue using Microsoft Azure
Storage Explorer. You will need to download this tool to be able to
use it. We will discuss a little more about Azur e Storage Explorer before jumping into
it.
Microsoft Azure Storage Explorer
We will be using the Microsoft Azure Storage Explorer tool to access and manipulate our data. Microsoft
Azure Storage Explorer (in Preview mode currently) is a standalone
app from Microsoft that allows you to work easily with Azure
Storage data on Windows, macOS, and Linux. To install this tool, go
to http://storageexplorer.com/
and click the appropriate download package for your machine.
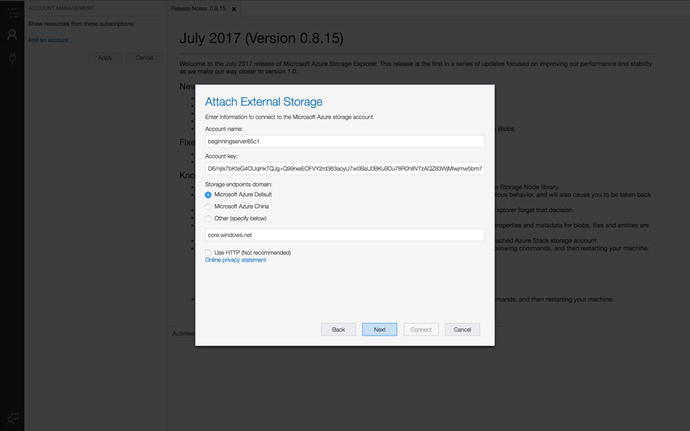
Once Storage Explorer is downloaded,
you will need to connect to Azure storage. Click on the third
option provided (Use a Storage Account Name and Key) and provide
the credentials that we received from the portal earlier. Figure
4-34 shows
what your storage attachment should look like.
Figure
4-34.
Use the account information to form the
connection to our Azure Storage
Click through the rest of the setup,
and this will form the connection to your Azure account and your
various Storage capabilities. When the connection is formed, you
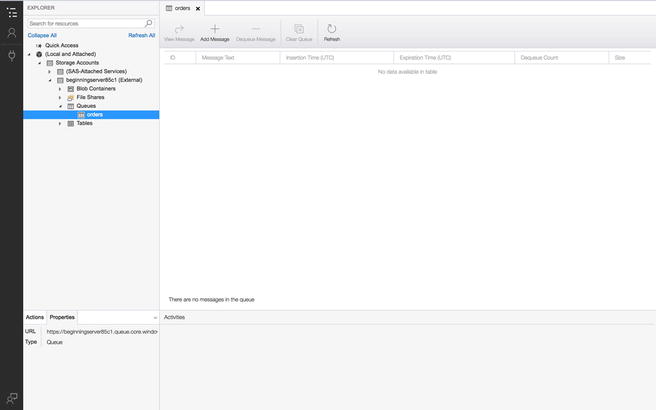
should see your application listed under Storage Accounts and
should see options for Queues, Blob Containers, File Shares, and
Tables.
When I first started work, I was
assigned an Azure Machine Learning project that used data from a
SQL Database. One of my first tasks was to host this data in Azure
and I did this through SQL Server. It was an absolute nightmare.
This tool is actually very powerful and lets you easily manipulate
your data in one spot. The only thing that is a little hard is that
it is an entirely new tool you need locally to access these
capabilities. I would prefer for this tool to be hosted in Azure
but this can be subject to change, seeing as how it is just in
Preview mode now. In the meantime, this is what I recommend using
when you are interacting with Azure storage.
Under Queues, right-click and choose
Create a Queue. Give it the same name you gave it in the settings
of your Azure function (“orders”). We can test the template
function by clicking Add Message and adding a message to our queue.
This should trigger our function; then remove the message from our
queue. Figure 4-35 illustrates what our queue should look
like.
Figure
4-35.
We can test the function by adding an item
to our queue
For my test message, I just provided
the queue with a text and sent it on its way (Figure 4-36).
Figure
4-36.
Add a message to your queue
We can go back to our Azure portal
and check the logs for our function to make sure our message was
sent and received. If it was successful, you should see a message
like the one shown in Figure 4-37.
Figure
4-37.
Success log from our Queue test
If we have
confirmed that our queue is connected to Azure and is triggering
our function, we can move on to complete our index, function, and
package.json
files.
Finish Our Function
To write our function, we are going
to use our HTTP POST endpoint from the previous exercise to post a
request order to it. If you remember, this URL was:
We will use the Node request package to
service this request. To do this, we will have to create another
package.json
file and include it in our dependencies. My package.json looks
like this:
{
"name": "azure-nodejs",
"version": "1.0.0",
"description": "Azure Functions for
Storage Trigger",
"main": "handler.js",
"keywords": [
"azure",
"serverless"
],
"dependencies": {
"request":"^2.81.0"
}
}
We need to upload this file to our
project in our Azure application. Then we will need to return to
our Kudu dashboard and do an NPM install inside our project folder
to make sure the right node modules are included to run our
application. Once this is complete, we can go ahead and finish out
our function.
The Request node
module is designed to be the simplest way possible to make
http calls. It supports HTTPS and follows redirects by default. The
first argument can be either a URL or an options object. The only
required option is uri; all others are
optional.
-
uri || url : Fully qualified URI or a parsed URL object.
-
baseUrl: fully qualified uri string used as the base url. Most useful with request.defaults, for example when you want to do many requests to the same domain. If baseUrl is https://example.com/api/ , then requesting /end/point?test=true will fetch https://example.com/api/end/point?test=true . When baseUrl is given, uri must also be a string.
-
method : HTTP method (default: GET)
-
headers : HTTP headers (default: {})
For more information on the Request module, go to https://www.npmjs.com/package/request
.
Following the described request
parameters, we will create an options JSON with our own values
filled in and we will set the JSON variable to be our incoming
myQueueItem . Listing 4-2 shows a built-out
function for handling Queue requests and sending them to our next
function.
var request=require('request');
module.exports = function (context,
myQueueItem) {
context.log('JavaScript queue
trigger function processed work item', myQueueItem);
if(myQueueItem.name &&
myQueueItem.order && myQueueItem.phoneNumber) {
var options =
{
url:
'https://beginningServerless.azurewebsites.net/api/orders/',
method:
'POST',
headers:
{
'Content-Type':
'application/json'
},
json:
myQueueItem
};
request(options,
function(err, res, body) {
if (res
&& (res.statusCode === 200 || res.statusCode === 201))
{
console.log(body);
}
});
}
else (
console.log("Nothing
to process")
)
context.done();
};
Listing
4-2.
A function that takes in a queue item and submits it to our HTTP
function
Once we deploy
this function, we can test it by once again creating a message in
our queue and submitting it. If all is set up correctly, we should
be able to go into our logs for both the Storage function and
the HTTP function and see our message come through there. You
should also continue receiving texts for each message you
create.
Tip
If you are having trouble seeing your
changes, make sure your endpoint is correct and that your queue
name is the same in Storage Explorer and in Azure. Configuration is
more likely your issue than something in your code, and these are
the two places where the configuration really matters.
Another thing to keep in mind is that
the way we set up our HTTP function was to receive a body in a POST
request with a specific structure. The structure was:
{
"name": "",
"order": "",
"phoneNumber":
"1XXXXXXXXXX"
}
So for our HTTP function to be able
to handle our incoming queue message properly, one of two things
must happen.
- 1.
We must structure all queue messages as if they were JSON objects and make sure each item contains a name, order, and phone number.
- 2.
We must rework our HTTP function to accept a message as a string and send that message directly.
I chose to structure my queue message
as a JSON value to test and make sure the message makes it all the
way through the flow. After adding the initial
message , I first went into my storage function and checked
the logs to make sure it received and sent the message. Figure
4-38 shows my
results.
Figure
4-38.
The storage function has been triggered by
the me ssage in our queue
After confirming that the message
made it to step one, I looked at our HTTP function logs to make
sure it made it through step two as well (Figure 4-39).
Figure
4-39.
HTTP function logs show the messag e received and sent via text
Shortly afterward, I received a text
message with the message I had added to
the queue. As you can see, it is pretty quick and easy to set up a
storage triggered function in Azure, especially using the Storage
explorer. The food delivery notification system is one application
of the storage as a trigger, but there are many more.
Add to your Function
For this exercise, we are going to
restructure our application process flow. The HTTP request will now
be step one and the storage event function will be step two. We
will continue to use POST requests to our HTTP function, but
instead of sending a text, we will update our queue with the parsed
message we want to send. When this message is added to the queue,
it will trigger the second Lambda function that will send the text
to the customer. This will give you exposure to manipulating queue
data in Node in Azure functions. If you wanted to take it a step
further, you could even look into Blob storage and add images to
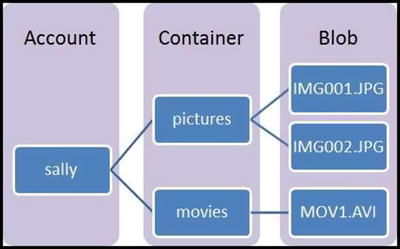
the storage to send those to the user as well. Azure’s blob storage is very similar to AWS S3,
which we used in the last chapter. Common uses of Blob storage include these:
-
Serving images or documents directly to a browser
-
Storing files for distributed access
-
Streaming video and audio
-
Storing data for backup and restore, disaster recovery, and archiving
-
Storing data for analysis by an on-premises or Azure-hosted service
The following diagram should give you
a better understanding for how Blob storage wo rks in Azure.
To learn more, visit
https://docs.microsoft.com/en-us/azure/storage/storage-nodejs-how-to-use-blob-storage
.
Conclusion
In this chapter we explored HTTP
triggers and storage triggers in Azure Functions. We looked at some
differences between developing in Azure and developing in AWS and
discovered a lot of differences in the process of creating
functions. We looked into WebHooks and HTTP requests for API
triggers and saw how we could use either in daily applications. At
this point, you should feel comfortable writing node functions and
deploying them in either AWS or Azure. You should have a better
understanding of the Azure configurations (and locations of these
configurations) in comparison to AWS, and you should have a clearer
idea of why you would prefer one vendor over another. In the next
chapter, we will continue building Serverless applications. We will
look at Google Cloud and build out a couple of Cloud functions,
explore the UI, and continue to analyze differences in
vendors.