In this chapter, we will utilize Amazon
Web Services (AWS) to create several serverless applications. We
will use Lambda to create a Hello World function that is triggered
by a test case that we’ll create. We will also use API Gateway
resources and methods to trigger a Lambda function with RESTful
HTTP requests that will return data from DynamoDB. Finally, we will
explore a triggered storage application, where we are able to
resize images uploaded to Amazon’s S3 service using a Lambda
function. By the end of this chapter, we will have three serverless
applications and experience with several AWS services.
Note
DynamoDB is Amazon’s NoSQL Cloud
Database Service. We will use this and S3 (Simple Storage Service,
Amazon’s blob storage) to get experience with two different storage
options and their place in serverless applications.
Explore the UI
Before we begin writing our
applications, we will go over the AWS UI and how to navigate it,
various pricing options, and the Lambda portal. After signing into
the console at http://www.console.aws.amazon.com
, your home will display a list of AWS Services. Figure
3-1 gives you
an idea of all of the services AWS
provides.

Figure
3-1.
AWS provides several services spanning different topics and abilities,
including compute, storage, database, and application services. We
can access these under the Services tab across the top. We can also
pin favorite services by clicking the pin across the navigation bar
and adding the service to it. I have my most used services pinned
for easy access.
Navigation
Outside of
accessing AWS Services, we also have access to AWS resource groups from the portal. A
resource group is a collection of resources that share one or more
tags. Resource groups are good for keeping project services
separated and organized. A resource group can easily be created
from the Resource Groups tab across the top. You can also create
resource groups from the panel on the right.
The Services tab will allow you to
search and sort services that you see on the home page. AWS also
provides Additional Resources to help you get started using AWS,
and a Service Health check on the right panel that lets you see the
health of your services right on login. The bell in the top banner
provides you with alerts given by AWS. These alerts give you any
open issues, any future scheduled changes, and any other
notifications.
Under your username, you can access
your account, your organization, billing dashboard, organization,
and sign out. Figure 3-2 shows these options and where to access
them. We will look into the billing dashboard more in the Pricing
section of this chapter. AWS Organizations enables you to apply
policy-based controls centrally across multiple accounts in the AWS
Cloud. You can consolidate all your AWS accounts into an
organization, and arrange all AWS accounts into distinct
organizational units.
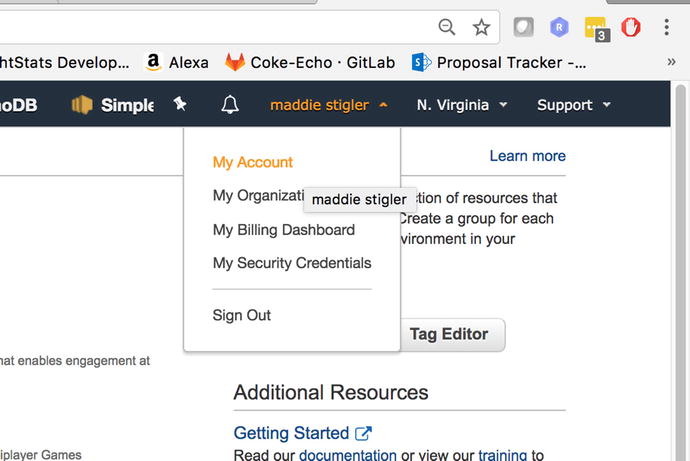
Figure
3-2.
Your username and account information can
all be accessed straight from the home page on the portal. This is
where you can manage all of your account settings and billling
information.
The region to the right of your
username allows you to select the Amazon Region you are working in.
The Region Names are as follows:
-
US East (Ohio)
-
US East (N. Virginia)
-
US West (N. California)
-
US West (Oregon)
-
Canada (Central)
-
Asia Pacific (Mumbai)
-
Asia Pacific (Seoul)
-
Asia Pacific (Singapore)
-
Asia Pacific (Tokyo)
-
EU (Frankfort)
-
EU (Ireland)
-
EU (London)
-
South America (Sao Paulo)
The region that you select becomes your default region in the console.
Some services are available in regions that others aren’t. So if
you are navigating the console and don’t see the resources you are
looking for, try selecting the region the resource was created in.
US-East is the default region, so I would check there first.
AWS also provides a Support service
that offers Support Center, Forums, Documentation, Training, and
Other Resources. These are good for learning new services and
getting hands-on experience with new services. The documentation
provides a Getting Started guide with examples, SDKs and Tools,
resources, and examples for AWS services. It is extremely helpful
when getting started with new services.
Pricing
In Chapter 1, Table 1-1 showed Lambda pricing for AWS in
comparison to Azure and Google Cloud, but now you will see how to
navigate the Billing Management Console under your account to help
manage your costs. Under your username, select Billing and Cost
Management Dashboard. This will take you to a page that looks
similar to the one shown in Figure 3-3.

Figure
3-3.
Your Billing and Cost Management dashboard
gives you an overview of your costs per month, per service, and as
a forecast
AWS gives you a lot of accessibility
with managing costs of services, payment methods, generating
reports, and viewing your bills. All of these capabilities are
available through the Billing dashboard on the left panel. The
Billing option lets you sort through your AWS bills by month. It
provides a history of these bills as well as a CSV export option.
Figure 3-4
demonstrates this capability.
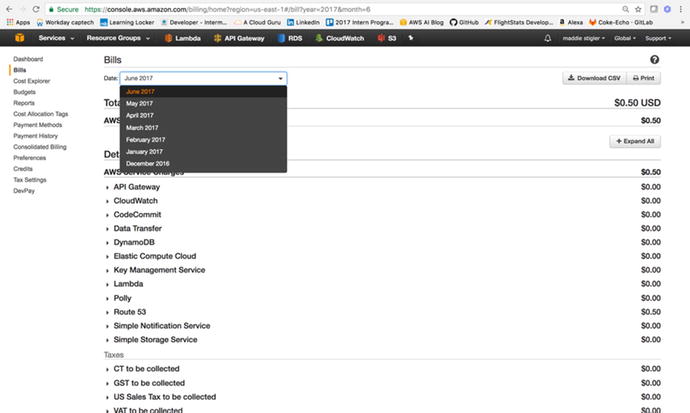
Figure
3-4.
The Bills section allows you to sort
through your bills and view them based on date
Another important billing capability
is Consolidated Billing, which allows you to handle multiple
accounts under one master account. It works with AWS Organizations
to create multiple organizations, organize accounts in these
organizations, and apply policies to these organizations. A good
use case for this is a large company with multiple projects.
Instead of using resource groups and tags, you can keep your AWS
applications and resources completely separated from one another
with Organizations and Consolidated Billing.
Another solution is to set up
billing alerts within the billing console.
Billing alerts will send you email notifications when your account
hits a certain dollar amount or resource amount set by you. I made
the mistake of thinking all services in the free tier were free and
was hit with a pretty hefty bill after spinning up multiple RDS
instances and EC2 instances. Since then, I have set my billing
alerts to notify me when I go over $1.
Lambda
The Lambda console can be accessed
from the Services tab across the top, under Computing. The Lambda
dashboard lets you view the number of functions, the total code
storage, account-level metrics over the past 24 hours, and what’s
new within Lambda. Figure 3-5 gives you an overview of a Lambda dashboard.
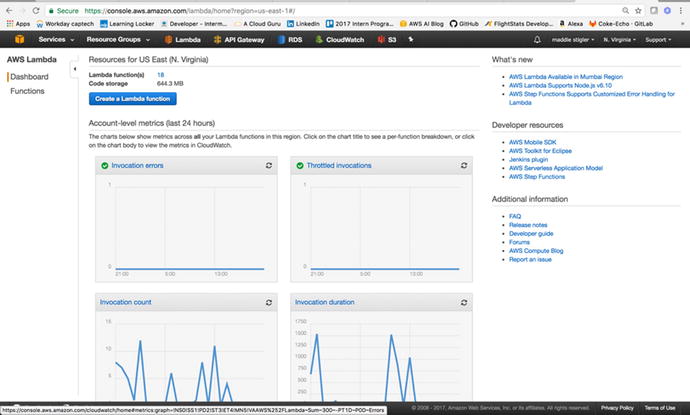
Figure
3-5.
The Lambda dashboard gives you an overview
of all of your functions
The Functions section is where you go
to access and create Lambda functions. Figure 3-6 shows the Functions
UI.

Figure
3-6.
The Lambda Functions screen shows all of
your functions at a high level. You can click on a function to
access the code, test events, and configurations.
We will explore the Lambda portal and all of its capabilities in more
detail as we begin creating our Lambda functions. However, before
we can create our functions we will need to configure our IAM
(Identity and Access Management). It is important to note that
setting up IAM services is not required for using functions, but we
are following best practices and it is in your best interest to go
ahead and follow the next couple of steps. We will dive into more
advanced examples later that will require the use of IAM to use
different services.
Security IAM
The IAM service is an incredibly
important and integrated service within AWS. IAM lets you assign
users, roles, and policies in order to help secure your Amazon
resources.
IAM Console
The IAM console is found under
Services and Security, Identity, and Compliance. The console gives
you a dashboard, groups, users, roles, policies, identity
providers, account settings, a credential report, and encryption
keys. From the dashboard (Figure 3-7), you can access a user’s sign-in link. This
is where users who are not admin users are directed to log in. It
also gives you an overview of your IAM Resources, including the
number of users, groups, customer-managed policies, roles, and
identity providers.

Figure
3-7.
The IAM dashboard gives you an overview of
all of your IAM resources along with five security steps you are
recommended to complete
To begin, it is important to complete the five steps listed in the
Security Status console: deleting your root access keys, activating
MFA (multi-factor authentication) on your root account, creating
individual IAM users, creating groups for permissions, and applying
an IAM password policy. By following these steps, you are ensuring
that your IAM settings are properly secured so you can begin
creating users and roles.
Roles, Policies, and Users
Roles, Policies, and Users are your
means to set permissions to people, services, and resources.
Roles are created under the Roles tab and
allow you to create roles with set policies. These roles can be
assigned to users and services. For instance, if I have a group of
developers who I want to be able to edit and access Lambda and
services, but not root account information, I can create a role
called Developers.
After the role is created, I can
assign certain policies to it. Policies
determine the amount of access a role has to a service. Figure
3-8
demonstrates the Policy console with all of the preconfigured
policies. You also have the option to create your own.
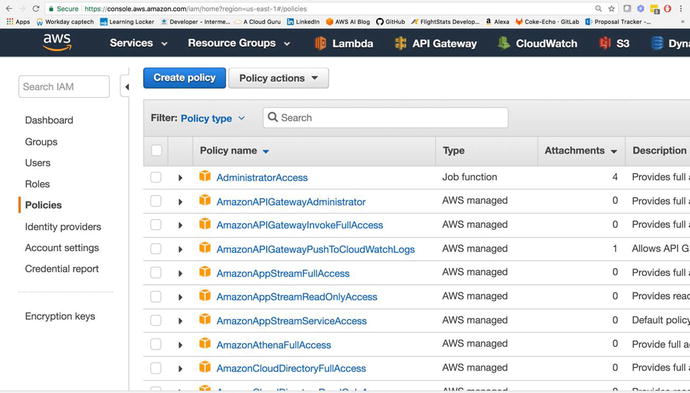
Figure
3-8.
The Policies
section allows you to create and assign policies. The attachments
describe the entities (users and services).associated with a
policy.
Policies describe the amount of access
allowed to a particular service. For instance, the
AdminstratorAccess policy gives you full access to all resources
for all services.
The Users
window lets you add users to AWS. They are given their own login
and whatever roles and policies you attach to them. To access the
console, users are given Access Keys and a password that are
downloaded by CSV or sent directly to them. You determine the
amount of time they have with the default password and all of the
password policies regarding their user login.
You also have the ability to add
users to groups. Groups can be used to
make permissions easier. If you have a group of users you want to
all have admin access, you can add them to a group so all of the
group policies are applied across the board. For the purpose of our
serverless applications, we won’t be assigning users or groups, but
it is good to keep these opportunities in mind as you build bigger
applications with a larger group of people.
Roles for Lambda
AWS requires you to assign a role to
your Lambda functions . These roles can
differ across Lambda functions as they require access to different
AWS services. However, just to get started with our Hello World
function, we are going to create an AWS Lambda role that can be
assigned to our functions.
In the Roles tab, we will click the
Create New Role option. We will name our role
“lambda_basic_execution.” Under permissions, we will attach the
AWSLambdaExecute policy. If you look into this policy, you can see
the exact permissions attached to it. The policy allows full access
to CloudWatch to log our function, and provides read/write access
to AWS S3. Figure 3-9 shows what the role should look like after
creating it.
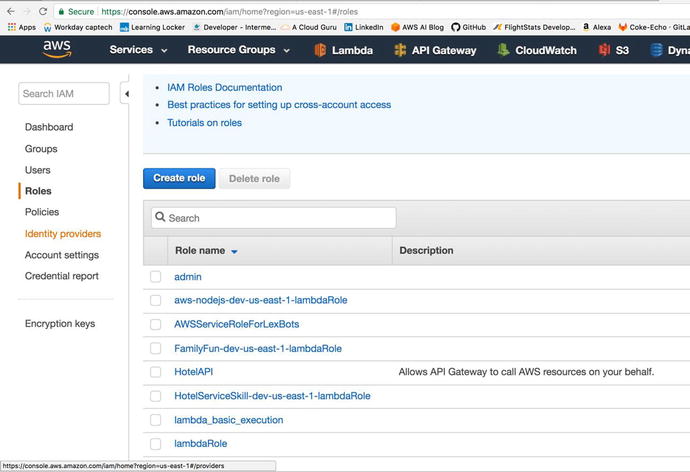
Figure
3-9.
The role has the AWSLambdaExecute policy attached to it. You can
look into the policy to see the permissions attached, and you can
also attach more policies as necessary.
The Role ARN at the top of the
console is the Amazon Resource Name. This
is what uniquely identifies the role we just created. When we
create our first function, we will assign our Lambda to this role,
giving it all the permissions specified within the one attached
policy.
Your First Code
Now that we have our IAM role set and
a good feel for navigating the AWS console, we can begin writing
our first code. This Hello World Lambda function is going to give
us experience creating a Lambda function, assigning a role to it,
creating a test event, executing it, and later viewing the logs in
CloudWatch.
Hello World
We will start by creating a new
function in the Lambda console. After clicking Create a Lambda
Function, you will see a list of blueprint options (Figure
3-10). These
blueprints give you a Lambda skeleton that you can edit to complete
the functionality you are looking for. To start off, we are just
going to select a blank function.
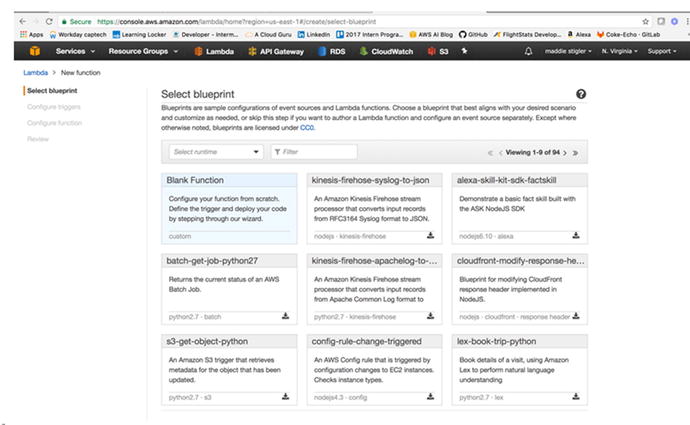
Figure
3-10.
AWS provides many blueprint options for
various runtimes and triggers. These are good to explore if you are
new to a particular runtime or service.
Note
The blueprints will change based on
the language you choose. For instance, what you see for a Node.js
function will be different from what you see for a C#
function.
After selecting a blank function, we
next have to configure our function. This requires assigning it a
name, description, runtime, and a handler and role. Names do not
have to be unique universally, just within your functions. I named
this hello-world and gave
it a description and a runtime of Node.js 6.10. AWS also allows you
to either edit your code inline or upload a zip. Since this
function is going to be simple and small, we can edit it inline.
Figure 3-11
shows what your configuration should look like.
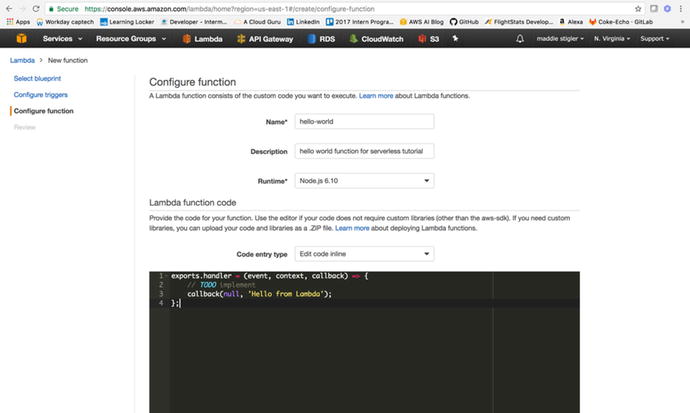
Figure
3-11.
For the purpose of this function, we are
just going to have it respond “Hello from Lambda”
The exports.handler
defines this as the function handler. It takes in an event
(trigger), context, and callback, which is what we will use to
signify that the function is finished executing. Our callback is
currently responding “Hello from Lambda.” Next we need to configure
our handler and role. We will leave Environment Variables, Tags,
and Advanced Settings blank for now, but feel free to look them
over. Our handler is index.handler, and our
role is the lambda_basic_execution
role that we created previously. Once this is configured (Figure
3-12), we can
move on and create our function.
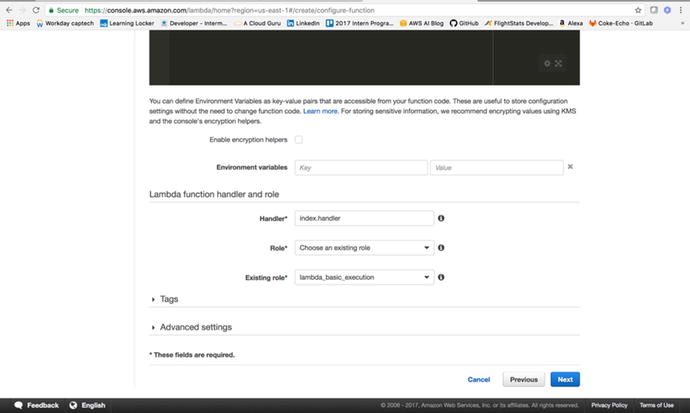
Figure
3-12.
Before moving on, make sure your Lambda
function handler and role look like this
Next, we will look at testing
and executing our function. For now, we
won’t set up a trigger, because that requires trigger
configuration. We just want to see what an executing Lambda looks
like, how we can create one, and how we can access the logs.
Testing
To test our Lambda function in the
console, we can use the Configure Test
Event action. Inside the function, if you click Actions, you
will see a list of actions you can take on your Lambda:
-
Configure Test Event
-
Publish New Version
-
Create Alias
-
Delete Function
-
Export Function
We will configure a test event . In the input test event, AWS provides
several event templates. Feel free to explore these to see what
different incoming events look like. We will use the Hello World
event, as shown in Figure 3-13. This event just offers a JSON of various
keys and variables.
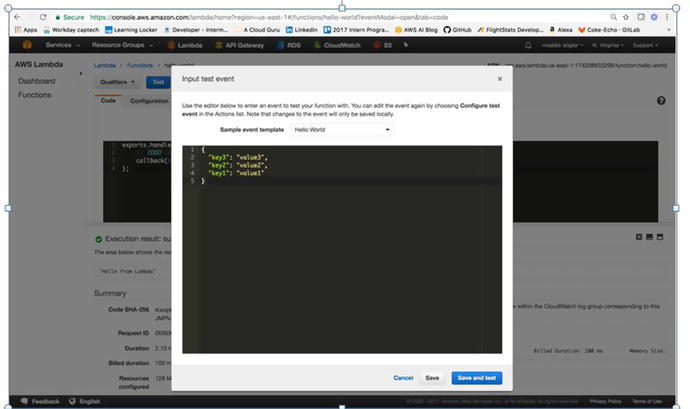
Figure
3-13.
The sample test event template provided by AWS. We will save and test
this event.
Since our Lambda is not configured to
do anything specific with the event, we should be able to get our
Hello World response from our test event just by triggering it. The
test event works the same way a trigger would, causing the Lambda
function to execute and respond to the incoming event. You are
given options to Save and to Save and Test. With the Save button,
the function is not run. Save and Test saves your function and
tests it using the provided test case. This is event-driven
architecture in action. Figure 3-14 shows the Execution
result , Summary, and Log Output.
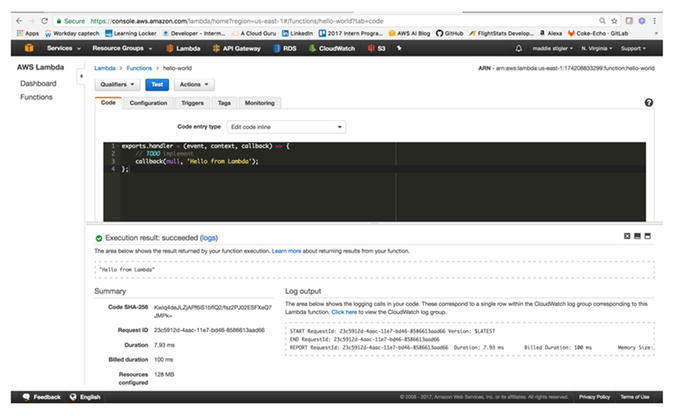
Figure
3-14.
A successful execution with logging
The execution result demonstrates what we specified
our Lambda to do. Since we only specified a callback with a string,
that is what we are receiving. The summary shows you the duration
of the execution, billed duration, and amount of resources
configured. This is important for further configuration of your
function. If your Lambda is using only so much memory , that would be a good thing to adjust in
its configuration to limit unnecessary space and charges.
We also see the output of the log.
Even without explicit logging, we were given the Start of the
execution with the request ID and version
being run, the End of the request, and a final report. The
following demonstrates the code we are running for our Hello World
function:
exports.handler = (event, context,
callback)=>{
callback(null,
JSON.stringify(event));
};
Now that we have shown the function
executing, let’s change it to repeat back the event coming in.
Figure 3-15
shows our updated Lambda function.
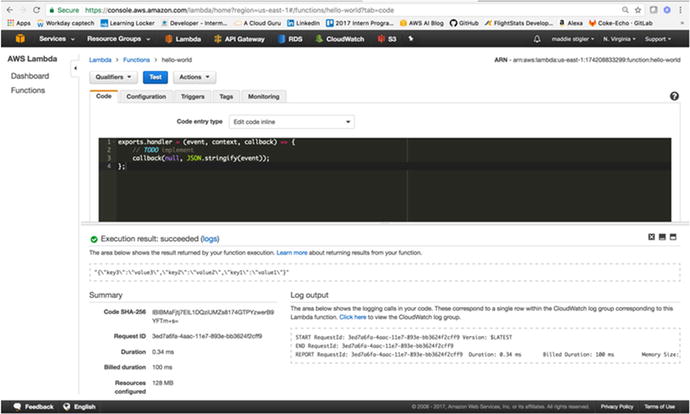
Figure
3-15.
Here the function uses the event coming in
to output
To improve on this Hello World
function, try parsing the event and responding to parts of it. Also
include inline logging that you can look at in the log output and
in CloudWatch .
Tip
Whether or not you’re using the
console, it is extremely helpful to insert many console.log
statements. These let you see what is actually happening within
your code and with the data coming in and out, and their output is
sent straight to CloudWatch.
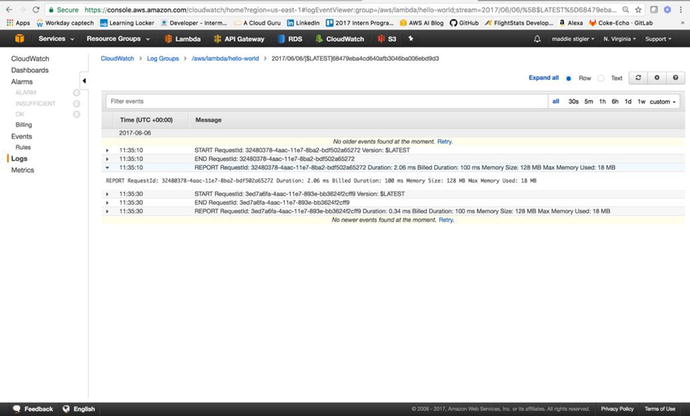
CloudWatch
Now, we will examine CloudWatch and see where our logging happens and
all of the metrics we get out-of-the-box on our function. In the
log output section, navigate to the Click Here option. This will
take us to the CloudWatch portal, where our function’s logs live.
Figure 3-16
shows the two executions I made earlier in this exercise.

Figure
3-16.
The CloudWatch Log Group for your Lambda
keeps your streams for your executions. You can also click on
specific streams and investigate logs within that time frame.
These logs are helpful for analyzing
and monitoring your function’s executions. In addition to
CloudWatch, there is a Monitoring tab in the Lambda function’s
console that gives you a high-level overview of your function’s
executions and outputs. To look deeper into a log, click on its
stream. This will give you a full detailed log for that execution.
Figure 3-17
shows the executions on my Hello World function.
Figure
3-17.
The opened stream gives you detailed UTC
time and messages. You can view logs in a particular stream as far
back as a week.
Now that we have become acclimated to
the Lambda console, test events, and CloudWatch, we will build upon
our Hello World function with environment variables.
The code for the Hello World function
can be found at https://github.com/mgstigler/hello-world.git
.
Environment Variables
To add onto our Hello World function,
we are going to cover environment variables: what they are, how
they’re used, and how they’re configured in AWS.
What Are Environment Variables
Environment variables are those set
globally across your serverless application. They are given a key
and a value . The value is that of the
actual variable, while the key is the name used for that variable
throughout the application. The benefit of environment variables is
both security and ease of use.
Rather than leaving API keys and
various access information scattered throughout your code, you can
assign the actual secure variable to an environment variable to be
used anonymously. In addition, if you know you are going to be
using a variable repeatedly, setting it as an environment variable
allows you to access it across your project without re-declaring
it. It also allows you to make quick changes in one spot.
To see how environment variables are used, we are going to
implement them in our Hello World application.
Using Environment Variables in Hello World
We are going to create an environment
variable with the key provider and value
AWS. This
also demonstrates a best practice of separating provider logic from
your code to prevent vendor lock-in. While for this example we are
just using the value AWS, later it could be used to represent
different services. For instance, if we knew we wanted to access a
database, we could use the key DB_Host and set the
value specific to the AWS database hostname. This makes it easily
configurable if we choose to move to a different cloud provider.
Figure 3-18
shows where and how we have configured our environment variables.
Figure
3-18.
You can configure your environment
variables within the AWS Lambda console
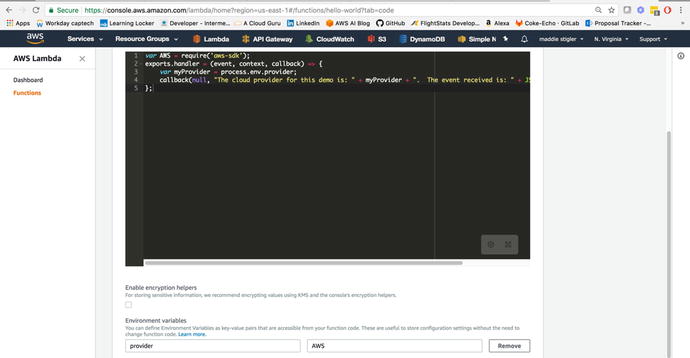
Now we can access this environment
variable within our code. Figure 3-19 demonstrates how we reference environment
variables and the log output for the execution of the Lambda
function.
var AWS = require(‘aws-sdk’);
exports.handler = (event, context, callback)
=> {
var myProvider =
process.env.provider;
callback(null, “The cloud
provider for this demo is: “ + myProvider + “. The event received
is: “ + JSON.stringify(event));
};

Figure
3-19.
The environment variables are accessed
through process.env.variable-key
This shows
how easy it is to create and access variables in your code. Now
that we have completed a Hello World demonstration of Lambda, we
will look at creating a new application that uses an HTTP event and
responds to it by returning data from DynamoDB.
HTTP Event
For our first fleshed-out serverless
application with Lambda, we are going to use AWS API Gateway to
trigger a Lambda function that returns data from a DynamoDB NoSQL
Database. API Gateway allows you to create HTTP
resources and methods and set them to specific
endpoints.
This application
will mimic a virtual recipe book. We will create an API Gateway
with one resource, Recipes, and one method for that resource, GET.
For the endpoint to this GET request, we will set a Lambda function
we create, called GetRecipes. This
function will access a DynamoDB table that we will have
prepopulated with recipes and return a JSON value of these recipes
as the response. Before setting up our API Gateway, we will go
ahead and create our Lambda function, leaving the trigger and code
blank for now. Once you have done this, you can move on to
exploring API Gateway.
Exploring API Gateway
API Gateway is an AWS service that
lets you easily create and access an API all through the API
Gateway console. It gives you a public RESTful API interface to a
wide host of AWS services. This allows you to interact easily with
your databases, messaging services, and Lambda functions through a
secure gateway. In addition, it is incredibly easy to set up and
create endpoints for. This allows the continuation of rapid
development. To begin using API Gateway, navigate to the API
Gateway service under Application Services. The API Gateway console
shows your APIs, usage plans, API Keys, Custom Domain Names, Client
Certificates, and Settings. Figure 3-20 shows an example of the API Gateway Console.
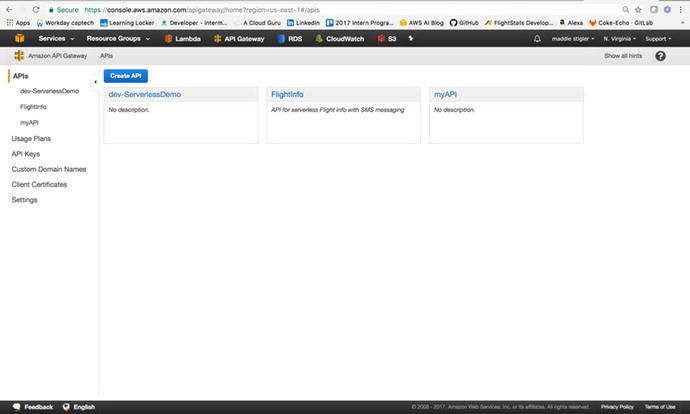
Figure
3-20.
With the API Gateway you can easily access and create APIs and set keys and
usage plans for them
To create an API, simply click Create
API. This will take you through the process of setting up your own
API. We will create a New API and name it Recipe API. After
creating your API, you should be directed to a console that allows
you to configure your API (Figure 3-21) . We want to add a resource to our API called
“recipes.”
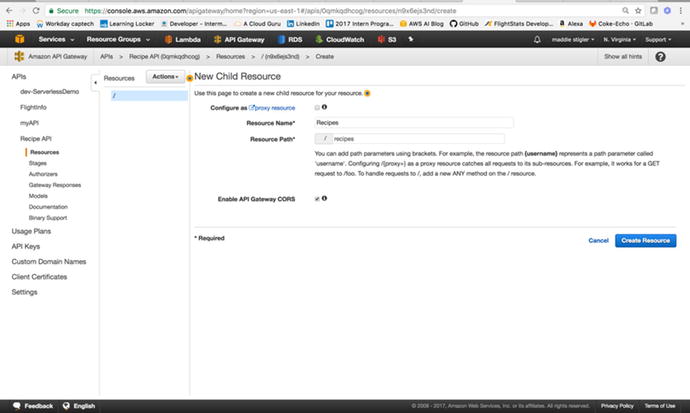
Figure
3-21.
The new child
resource can be added to your API resource and will be used
in the request URL
Resources allow you to have multiple
objects for your methods. We also want a single GET method attached
to our resource. Figure 3-22 shows what your
API console should look like after configuring your endpoint.
Figure
3-22.
The GET method is
attached to the recipes resource in our Recipes API
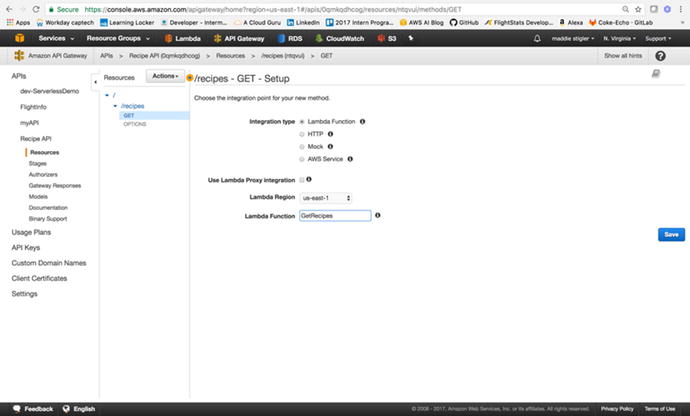
We then need to configure an
integration for our GET method. You can have Lambda create an API
Gateway endpoint for you, but doing it this way gives you control
over what the endpoint looks like and its configuration. For this,
we want to select the Lambda function ,
specify the region, and select our GetRecipes Lambda
function. This tells the API gateway when the GET method is
accessed, to execute the Lambda function. Figure 3-23 shows the complete
integration of the Lambda function.
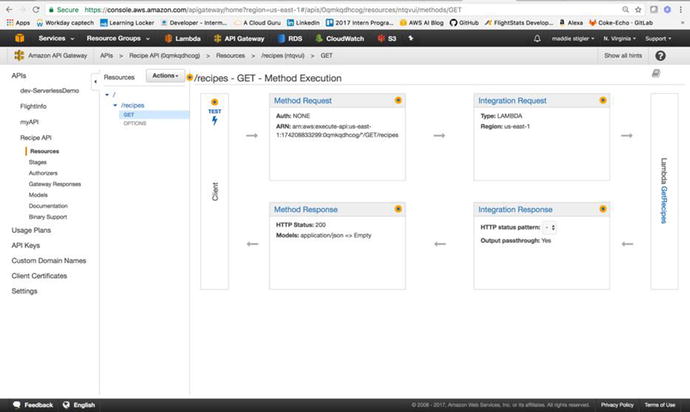
Figure
3-23.
API Gateway
allows you to view each method execution within your
API
Before going back to the Lambda console to set this API as our trigger, we
need to deploy our API to a stage. Staging is important for version
control and deployment. Since we are still in development, we are
going to name our stage “Beta.” Under Actions, next to Resources,
click Deploy. The pop-up shown in Figure 3-24 will ask you to
create a stage if you haven’t already. Go ahead and create a new
stage and name it “beta.” Stages represent a unique identifier for
a version of a deployed REST API that is callable by different
users and services .
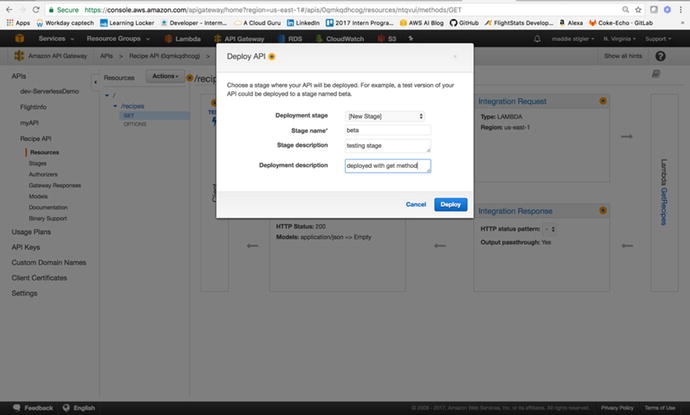
Figure
3-24.
We specify our Stage name when we deploy an API. If we wanted to make changes and
see them, we would want to redeploy our API to this stage.
After deploying, you will be directed
to the Stages tab (Figure 3-25). This is where you
configure settings for your stage, stage variables, SDK Generation,
Swagger exports, Postman extensions, deployment history, and
documentation history. Take a look at each of these tabs to see
everything that is available to you through API Gateway.
Note
Swagger is an API framework that
allows you to easily view and interact with your endpoints. I like
it because it makes it easy to test your services and is also
simple to add to your project.
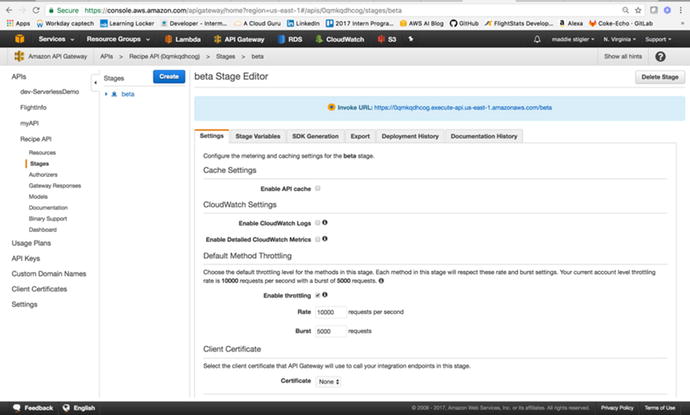
Figure
3-25.
We will use the Invoke URL to test the functionality of our API Gateway
as a trigger for Lambda
At this point, we have an API Gateway
with one resource and one method, deployed to a Beta stage, and
integrated with our Lambda function. We are ready to set this API
as our trigger for our Lambda function and begin responding to
requests.
Note
You might be wondering why we are only
giving our API one method. Earlier in this book, we discussed the
importance of each function having a single task and triggering
event. We can add multiple methods to this API, but we would also
want to create multiple Lambda functions to respond to the
different requests (for example, a Lambda to handle POST requests,
a Lambda to handle DELETE requests…).
Using API Gateway as a Trigger
Back in the Lambda function,
GetRecipes, we can now
configure the API we just created as our trigger. Under Triggers in
our function, click Add Trigger. Here, we select API Gateway from
the drop-down menu and specify the API we just created. This will
tell our Lambda function to wake up to events coming in from this
specific service. Figure 3-26 demonstrates the correct configuration for
our function.
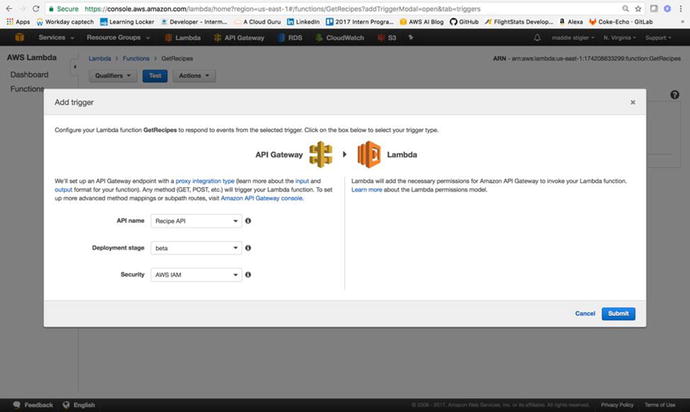
Figure
3-26.
Our Recipe API is configured to trigger our
GetRecipes
Lambda function
Leaving the Lambda code as is, we can
go into API Gateway and test our trigger. By clicking on the GET
resource, we can select Test and test our API (Figure 3-27). Since it is a GET
method, it requires no request body. On the right in API Gateway,
you should see a response, status, and latency. You could also view
this in the browser by just hitting the GET endpoint. The URI for
this example is
https://lambda.us-east-1.amazonaws.com/2015-03-31/functions/arn:aws:lambda:us-east-1:174208833299:function:GetRecipes/incovations
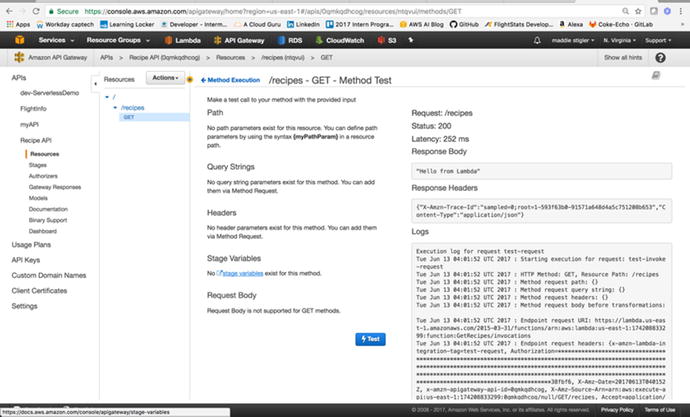
Figure
3-27.
This is where you can test your API methods
and responses. If we had set it as a POST method, we could put a
JSON request in the request body.
Now that our trigger is configured, we
can develop our Lambda function to respond to this request by
returning recipes from a DynamoDB table. To do this, we will first
create a DynamoDB table, Recipes, and prepopulate it with some
recipes. Use the Services tab to navigate to the DynamoDB service.
Here we will click Create Table (Figure 3-28) and name our Table
“Recipes” and assign it a Primary Key of “Id” of type “Number.” The
primary keys should be unique to items. The DynamoDB table consists
of items and attributes. In our table, each item is a recipe which
has attributes of meal, description, and prep-time.
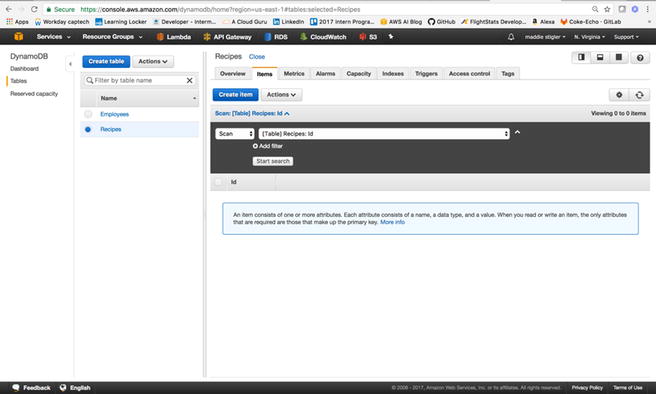
Figure
3-28.
An empty DynamoDB table with a Primary Key
of Id
From here, we will create a couple of
recipe items to populate our table. To do this, click Create Item
and append fields Meal, Description, and PrepTime with various
values (Figure 3-29).
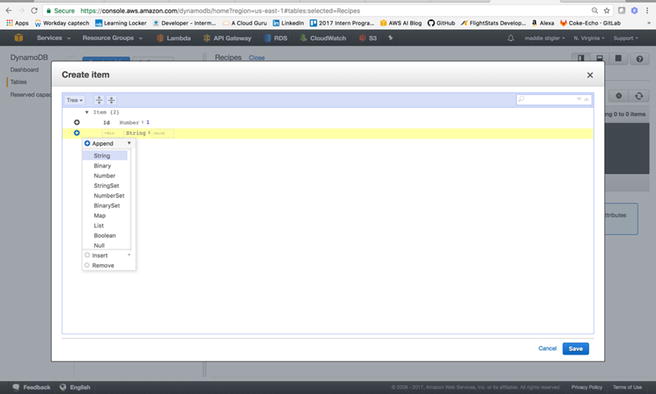
Figure
3-29.
This figure demonstrates how to append
fields to an item
When our table has been populated with
a couple of recipes, we can build our Lambda function to return
these recipes in the response to the API (Figure 3-30).
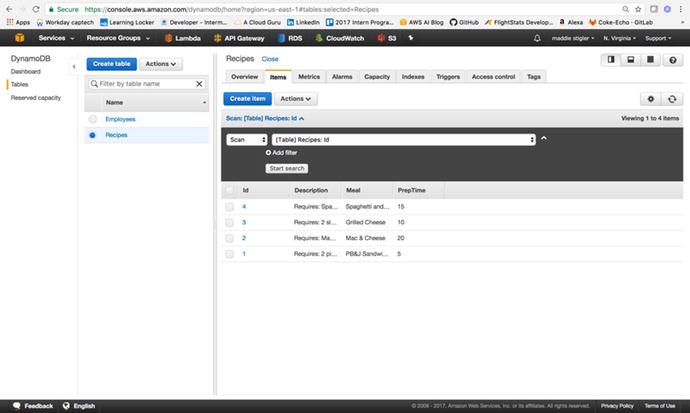
Figure
3-30.
A populated DynamoDB table
To create the Lambda portion of our serverless application, we will be
using TypeScript, Node, and NPM. The next section will go over how
to accomplish this.
Response to Trigger
For our Lambda function, we will be
developing within Visual Studio Code, using TypeScript, Node, NPM,
and the AWS SDK. First, it is important to format our project
structure so we can easily zip and deploy our function. Figure
3-31 shows
the structure I have chosen to create this Lambda function. Within
our AWS project, I created an HTTPTrigger project with a
Shared
folder and a GetRecipes folder. The
GetRecipes
folder will hold our handler.js file, which
will be triggered by the GET request. The Shared folder contains
a Recipes model that defines the structure of the incoming request.
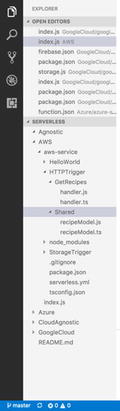
Figure
3-31.
The proposed project
structure for the HTTP event
For now, we will create the function
without using the Serverless Framework, so outside of the
HTTPTrigger project, we will need a package.json file to
specify what NPM installs, and the tsconfig.json file to
configure our TypeScript builds. Your package.json file
should include aws-sdk and
typescript
as dependencies.
{
"name": "aws-nodejs",
"version": "1.0.0",
"description": "AWS Lambda sample for
the Serverless framework",
"main": "handler.js",
"keywords": [
"aws",
"serverless"
],
"dependencies": {
"aws-sdk": "^2.34.0"
},
"devDependencies": {
"@types/aws-lambda": "0.0.9",
"@types/aws-sdk": "0.0.42",
"@types/node": "^7.0.12",
"aws-sdk-typescript": "0.0.3",
"typescript": "2.1.6",
"typings": "^1.3.3"
}
}
Listing
3-1.
A complete package.json
file for this application
The tsconfig.json should
be configured to build on save and to compile on save. This will
compile the JavaScript files for TypeScript files as you save.
Listing 3-2
shows the tsconfig.json
file.
{
"compilerOptions": {
"module": "commonjs",
"target": "es2015",
"noImplicitAny": false,
"sourceMap": true,
"emitDecoratorMetadata": true,
"experimentalDecorators": true,
"declaration": false,
"listFiles": false,
"moduleResolution": "node",
"rootDirs": [
"./"
]
},
"exclude": [
".vscode",
".serverless",
".git",
"node_modules"
],
"compileOnSave": true,
"buildOnSave": true,
"atom": {
"rewriteTsconfig": false
}
}
Listing
3-2.
The TypeScript file excludes the node_modules,
vscode,
git, and
serverless
files in its build.
We can now do an NPM install on our
project to install all of the node modules we will need to create
our Lambda function. This will create a node_modules folder in
your project with all of its dependencies. We will also create a
recipeModel.ts
file (Listing 3-3) in the Shared folder. This
model will define the structure of the recipes we created in our
DynamoDB table. We can then use this in our handler.js file to
format our response to the GET request. In the future, with other
requests, you can use this model to format the request.
export interface RecipeModel {
Id:number,
Description:string,
Meal:string,
PrepTime:number
}
Listing
3-3.
The recipeModel.ts
file is used to format requests and responses so they match
the structure of our DynamoDB table.
In our handler.ts file, we
will create our GetRecipes module that
will take in an event, context, and callback (as we have done in
our Hello World example) and will utilize aws-sdk to communicate
with our DynamoDB Table and respond back to our request with a list
of recipes. Listing 3-4 demonstrates this handler function,
followed by the steps that will let us go into further
detail.
'use strict';
exports.__esModule = true;
var AWS = require("aws-sdk");
module.exports.GetRecipes = function (event,
context, callback) {
console.info("Received event: ",
JSON.stringify(event, null, 2));
var docClient = new
AWS.DynamoDB.DocumentClient();
var table =
process.env.TABLE_NAME;
var response = {
statusCode: 200,
message: []
};
var params = {
TableName: table,
ProjectionExpression: "#id, #m,
#d, #pt",
ExpressionAttributeNames:
{
"#id": "Id",
"#m": "Meal",
"#d": "Description",
"#pt": "PrepTime"
}
};
console.log("Scanning
Recipes.");
docClient.scan(params, onScan);
function onScan(err, data) {
if (err) {
response.statusCode =
500;
console.error("Unable to
scan the table. Error JSON:", JSON.stringify(err, null, 2));
callback(null,
response);
}
else if (data == null) {
response.statusCode =
404;
callback(null,
response);
}
else {
console.log("Scan
succeeded.");
data.Items.forEach(function (recipe) {
response.message.push(recipe);
});
callback(null,
response);
}
}
};
Listing
3-4.
The handler.ts function
takes in the HTTP event and responds to
it by reaching into DynamoDB and grabbing the full list of
recipes.
- 1.
Import the AWS SDK and RecipeModel.
- 2.
Create a DynamoDB client to communicate with the table.
- 3.
Utilize environment variable for the table name (We will set this variable in AWS).
- 4.
Set the response of the message.
- 5.
Create the table connection with parameters (table name, expressions, attributes).
- 6.
Format response to scan.
We can now compile our TypeScript
files into JavaScript files. Once we have created the handler,
model, node modules, and compiled our TypeScript, we can compress
and upload our application. It is important to remember that the
handler.js
file must remain at the root of your compressed files. The
compression must occur at the level shown in Figure 3-32.
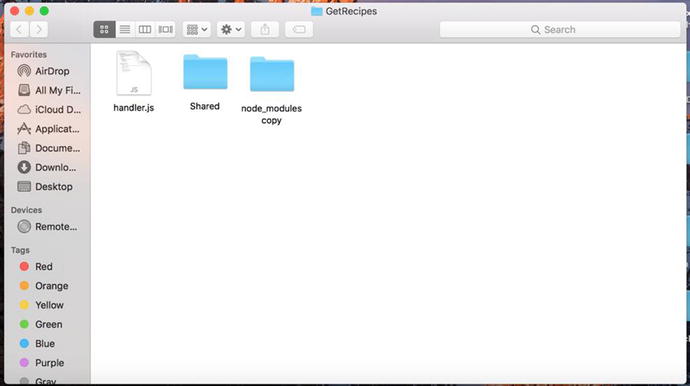
Figure
3-32.
The handler.js
function remains at the root level. We have included only
the Shared
and node_modules folders,
because that is all that is necessary in this compression.
After uploading the zip file to our
GetRecipes
Lambda, there are still a couple of configurations to take care of.
First, we need to update our handler. Our handler should now be
listed as handler.GetRecipes.
This is because the module we are exporting is called GetRecipes and
it is found in the handler.js file. We
should also add our environment variable TABLE_NAME with its
proper value. We also need to add a policy that gives us access to
DynamoDB to our Lambda role. This can be done in AWS IAM under
Roles. Finally, we can test our Lambda function using Postman and
the URL given to us in the API Staging console. Figure 3-33 demonstrates a
Postman request and the response we get
back.
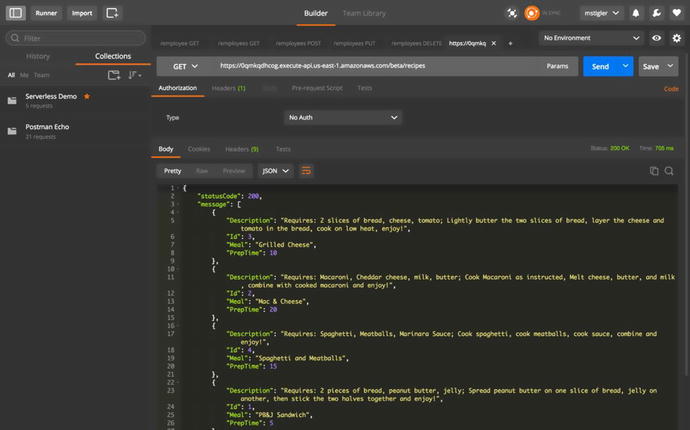
Figure
3-33.
We use the URL
provided in API Gateway to make a GET request. Our response is a
JSON response with all of our recipes listed.
We now have a start-to-finish
serverless application using API Gateway,
Lambda, and DynamoDB.
Improving Our Serverless Function
Improve by separating logic and
utilizing Serverless Framework
Separate AWS logic from handler:
- 1.
Use Environment variables for AWS specific logic or move AWS logic to shared folder
- 2.
Create Services folder that is specific to AWS and serves DynamoDB data
Utilize the Serverless Framework:
- 1.
Follow instructions for AWS setup on Serverless Framework.
- 2.
Develop and deploy function using Serverless instead of manually.
The code for both of these
improvements to the project can be found here:
https://github.com/mgstigler/Serverless/tree/master/AWS/aws-service/HTTPTrigger
In the next section, we will use the
skills and tools we learned with the HTTP Trigger to create a
separate Lambda function triggered by a
storage event.
Storage Event
In this section we will use a storage
event to trigger a Lambda function that responds to the PUT
request. The purpose of this application will build from our
previous recipe example. Now, we would like to provide pictures of
our recipes along with a description, meal, and prep time. To do
this, we will use S3 (Simple Storage Service) as our trigger, and a
Lambda function that appends a recently uploaded image’s URL to the
recipe it is associated with.
Amazon S3
AWS offers many storage options ranging from Relational Databases,
to NoSQL Databases, to Blob storage. In this exercise, we are going
to explore using AWS S3, blob storage, as a trigger for a Lambda
function. Within the S3 service, let’s create a bucket. Your
current S3 console will look something like Figure 3-34.
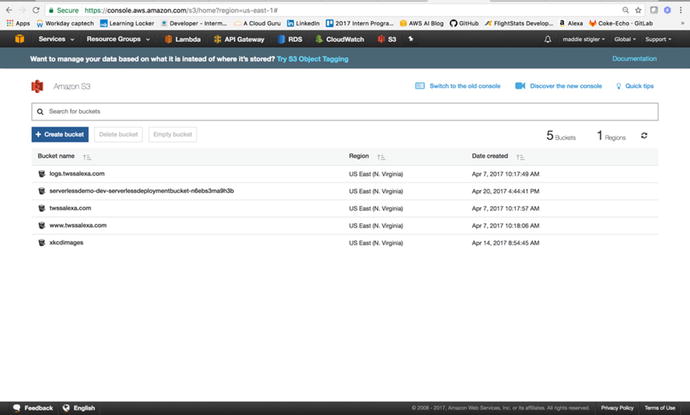
Figure
3-34.
The S3 console lets you view all of your
currently active buckets, create new buckets, and search for
buckets
As shown in Figure 3-35, I’m naming mine
recipe-images-ms.
Bucket names are universally unique so you will have to make sure
your bucket name has not been used before. By “universally,” I mean
across all AWS regions and accounts. Within the S3 settings while
configuring your bucket, you are presented with options such as
Versioning, Logging, and Tags. We will leave the default values for
now. The only thing we will change is the public permissions. We
will make the objects in this bucket open to the public so we can
access these recipe images from the web.
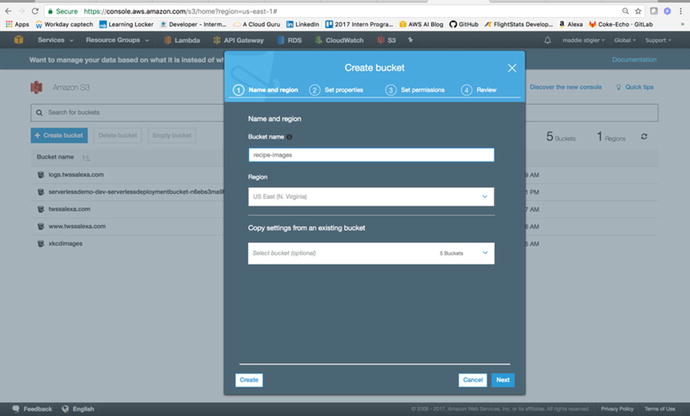
Figure
3-35.
The Create Bucket option lets you configure
your blob storage bucket on the fly. You can also adjust these
settings after creating the bucket.
After our bucket and its respective
images are configured, we can move on to setting S3 as our trigger
and creating our Lambda function.
Using S3 as a Trigger
From the Lambda console, create a
Lambda function called UpdateRecipe .
This Lambda function will receive events from S3 as an object is
uploaded (PUT). It will then update the corresponding object’s
recipe with an image URL. For simplicity, we will name our image
uploads with the key to their corresponding recipe. For example,
the recipe for Mac & Cheese has an Id of 2. To associate an
image URL with that recipe, we will upload a file named
2.
Within the Lambda console, configure
your trigger to be S3, and select the bucket that you created
previously. Your trigger will end up looking like Figure
3-36.
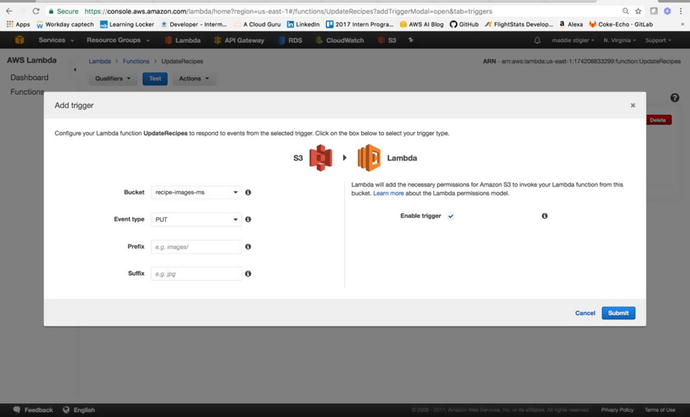
Figure
3-36.
S3 is configured to trigger our Update Lambda on a Put request. This means Lambda
will be triggered any time an object is uploaded to the S3 bucket
we specified.
Now that an S3 event is set to
trigger our Lambda, we can format our function to handle the event
the way we would like it to. The first step is understanding the
event request that is coming in. To simulate this request, I used
the Set Test Event blueprint for the S3 PUT operation. The
following JSON is what it provides:
{
"Records": [
{
"eventVersion": "2.0",
"eventTime":
"1970-01-01T00:00:00.000Z",
"requestParameters": {
"sourceIPAddress":
"127.0.0.1"
},
"s3": {
"configurationId":
"testConfigRule",
"object": {
"eTag":
"0123456789abcdef0123456789abcdef",
"sequencer":
"0A1B2C3D4E5F678901",
"key":
"HappyFace.jpg",
"size": 1024
},
"bucket": {
"arn":
"arn:aws:s3:::mybucket",
"name":
"sourcebucket",
"ownerIdentity": {
"principalId":
"EXAMPLE"
}
},
"s3SchemaVersion": "1.0"
},
"responseElements": {
"x-amz-id-2":
"EXAMPLE123/5678abcdefghijklambdaisawesome/mnopqrstuvwxyzABCDEFGH",
"x-amz-request-id":
"EXAMPLE123456789"
},
"awsRegion": "us-east-1",
"eventName":
"ObjectCreated:Put",
"userIdentity": {
"principalId": "EXAMPLE"
},
"eventSource": "aws:s3"
}
]
}
We can format our Lambda to handle this request by creating a TypeScript model
for the S3 PUT request. We want to specify the object key so we can
parse it and grab the associated DynamoDB item in order to place
the image URL with the correct recipe. The next section will cover
how our Lambda function handles this request.
Response to Trigger
As we did with
the HTTP request, we will also rely on the AWS SDK to update our
DynamoDB table. We want to grab the object key from our incoming
event and specify that as our key to the DynamoDB table. Once we
have the item we want from our table, we can make changes to it,
such as adding an imageUrl attribute and
attaching the public URL to the image of the meal.
'use strict';
exports.__esModule = true;
var AWS = require("aws-sdk");
module.exports.UpdateRecipe = function
(event, context, callback) {
console.info("Received event: ",
JSON.stringify(event, null, 2));
var docClient = new
AWS.DynamoDB.DocumentClient();
var table =
process.env.TABLE_NAME;
var image =
event.Records[0].s3.object.key.split('.');
var id = parseInt(image[0]);
// Update the item,
unconditionally,
var params = {
TableName: table,
Key: {
"Id": id
},
UpdateExpression: "set
ImageURL=:iurl",
ExpressionAttributeValues:
{
":iurl":
"https://s3.amazonaws.com/recipe-images-ms/" +
event.Records[0].s3.object.key
},
ReturnValues:
"UPDATED_NEW"
};
var response = {
statusCode: 200,
message: ""
};
console.log("Updating the
item...");
docClient.update(params, function
(err, data) {
if (err) {
response.statusCode =
500;
console.error("Unable to
update item. Error JSON:", JSON.stringify(err, null, 2));
response.message = "Unable
to update";
callback(null,
response);
}
else {
console.log("UpdateItem
succeeded:", JSON.stringify(data, null, 2));
response.message =
"Updated recipe successfully.";
callback(null,
response);
}
});
};
The following steps summarize this
process:
- 1.
Parse the incoming request to gather the key from the image.
- 2.
Set the Image ID to the Key ID to search DynamoDB and find the correct recipe.
- 3.
Your bucket ARN is the beginning of the S3 object image URL. Use this and the name of the image to set the URL in the DynamoDB table.
- 4.
Finally, return the status of the execution.
To test the success of our function
after zipping it with the Shared folder and the node modules, we
can upload an image to our S3 bucket. I found a picture of mac
& cheese, one of my recipes, and uploaded it to the bucket. To
upload to the bucket, simply go to the bucket location and click Upload. The prompt is
shown in Figure 3-37.
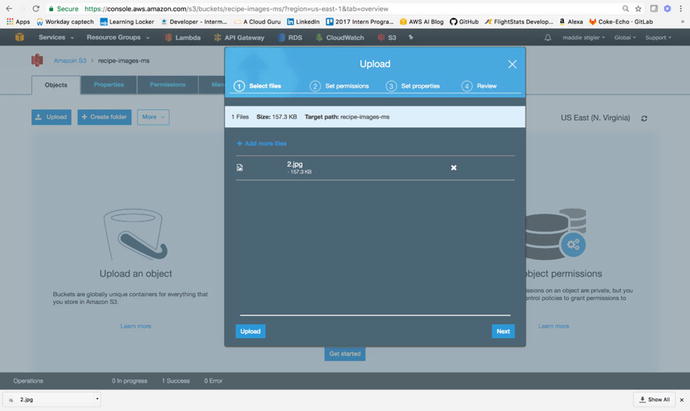
Figure
3-37.
You can upload the file within the S3
console and configure its permissions on the fly
Figure 3-38 shows the log results from the upload.
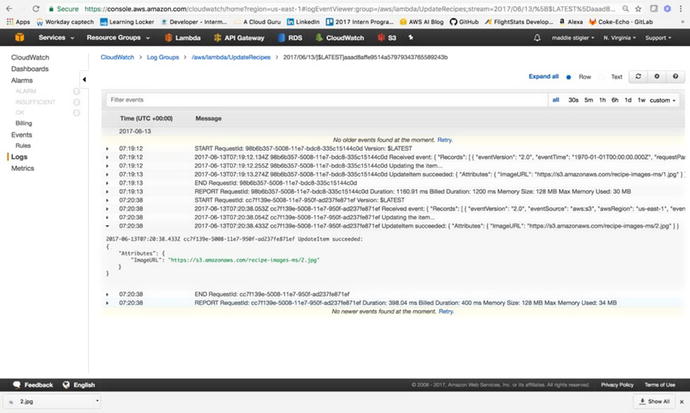
Figure
3-38.
The successful log
results from our upload in CloudWatch
We can also test the upload by
looking directly in the DynamoDB table. As shown in Figure
3-39, the
ImageUrl is now added as an attribute with the provided image URL.

Figure
3-39.
The ImageUrl
attribute has been added to the table along with the
URL
Furthermore, when you open the
provided image URL, you are redirected to an image of the recipe
(Figure 3-40).
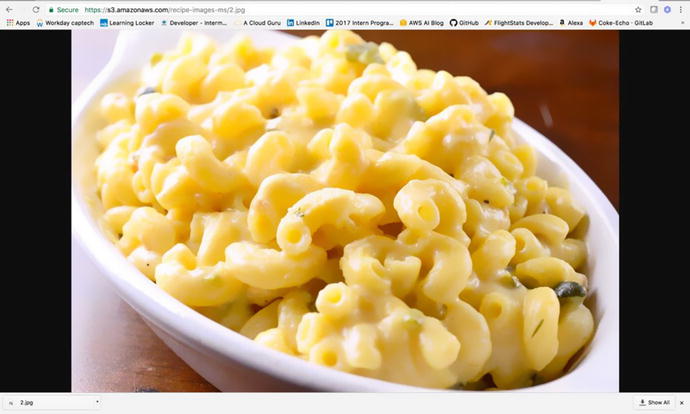
Figure
3-40.
The image is publicly accessible with the S3 URL
As before, there are many ways to
improve on this Lambda function. Separation of provider logic is
strongly encouraged as well as deploying with the Serverless
Framework. The code for this portion of the exercise can be found
at
https://github.com/mgstigler/Serverless/tree/master/AWS/aws-service/StorageTrigger
Conclusion
In this chapter we explored two
serverless applications with AWS Lambda. You learned how to
navigate the console, configure Lambda functions, and assign
triggers, as well as how to build a couple services to both trigger
and respond to Lambda functions. You should now have a good handle
on how Lambda functions operate and the power they have within AWS.
You should also have a more applicable understanding of serverless
functions as a whole and how they can be used. In the next chapter,
we will explore the Azure UI and build serverless functions within
Azure.