In order to get started developing
serverless applications, we need to look at the serverless
offerings and environments for AWS, Azure, and Google, our choices
for development platforms and toolkits, and how to set up our
environment for them. As discussed in the previous chapter,
serverless doesn’t mean that no servers are involved, but rather
the servers are hosted by different third-party providers. Some of
the most prevalent providers for this serverless option include
AWS, Azure, and Google. We will examine how the serverless options
differ from provider to provider. We will also walk through the
environment setup process using Visual Studio Code, Node.js, and
Postman.
Note
There are many different development
tools, environments, and SDKs that can be used to develop
serverless applications. We will go over a couple other options in
this chapter and later discuss why we will be using the ones
specific to this tutorial.
What Each Provider Offers
Amazon Web Services, Microsoft Azure,
and Google Cloud Platform are three of the most prevalent
third-party providers for serverless technology. In this chapter,
we will discuss the serverless options for each and how they are
different from one another. This will give you a better
understanding of each offering to help you choose between cloud
providers when you write your own serverless applications.
AWS Lambda
Amazon’s serverless offering is AWS
Lambda. AWS was the first major cloud provider to offer serverless
computing, in November 2014. Lambda was initially available only
with a Node.js runtime, but now it offers C#, Java 8, and Python.
Lambda functions are built independently from other resources but
are required to be assigned to an IAM
(Identity and Access Management) role. This role includes
permissions for CloudWatch, which is AWS’s cloud monitoring and
logging service. From the Lambda console, you can view various
metrics on your function. These metrics are retained within the
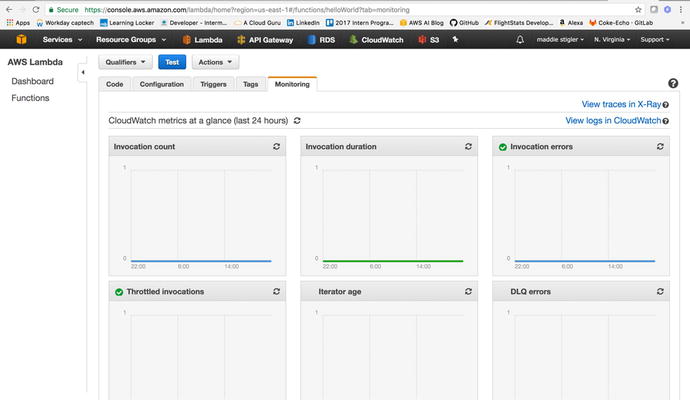
CloudWatch portal for thirty days. Figure 2-1 illustrates the
CloudWatch logging metrics that are available.
Figure
2-1.
Monitoring logs that are available in
CloudWatch. As you can see, for this Hello World function, we don’t
have any invocations in the past 24 hours. There are even more
logging metrics that can be seen from the CloudWatch portal.
AWS Lambda
functions can be written in the AWS console; however, this is not
recommended for larger projects. Currently, you cannot see the
project structure within the console. You can only see the
index.js
file, or the function that is handling the event. This makes it
difficult to develop within the console. While you can still export
the files from the console to view the file structure, you are then
back to being limited by the deployment and testing process.
Lambda has built-in Versioning and
Aliasing tools that can be utilized straight from the console as
well. These tools let you create different versions of your
function and alias those versions to different stages. For
instance, if you’re working with a development, testing, and
production environment, you can alias certain versions of your
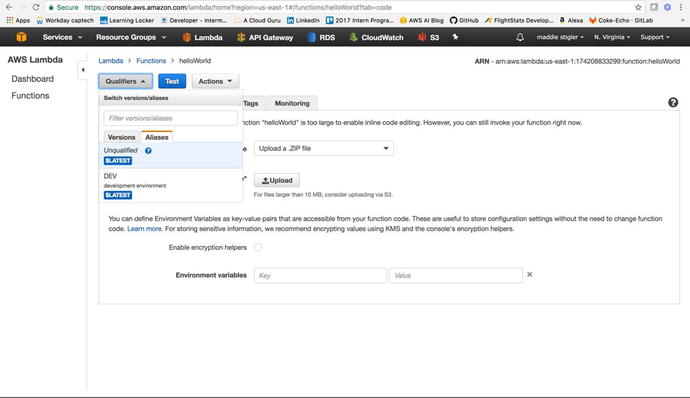
Lambda function to each to keep these environments separate. Figure
2-2
illustrates an example of aliasing a version of your function.
Figure
2-2.
This illustrates a DEV alias that is always
pointing at the $Latest version of the function. $Latest simply
indicates the most up-to-date version of the Lambda function.
AWS Lambda also makes it easy to
incorporate environment variables. These
can be set using a key/value pair, so you can use variables
throughout your function to reference protected information such as
API keys and secrets, as well as database information. They also
give you a better way to pass variables to your function without
having to modify your code in several areas. For example, if a key
changes, you only need to change it in one spot.
Azure Functions
Microsoft released its serverless
offering, Azure Functions, at the Build conference in 2016. Despite
being developed only a year and a half after AWS Lambda, Azure
Functions remains a strong competitor in the serverless world.
Azure Functions supports JavaScript, C#, F#, Python, PHP, Bash,
Batch, and PowerShell.
One of Azure’s strengths is its ability
to integrate Application Insights with your functions. While AWS
also has this capability, integrating X-Ray with Lambda, it is
important to point out the power of Application Insights. This
extensible Application Performance Management tool for developers
can be used across many platforms. It uses powerful monitoring
tools to help you understand potential performance weaknesses in
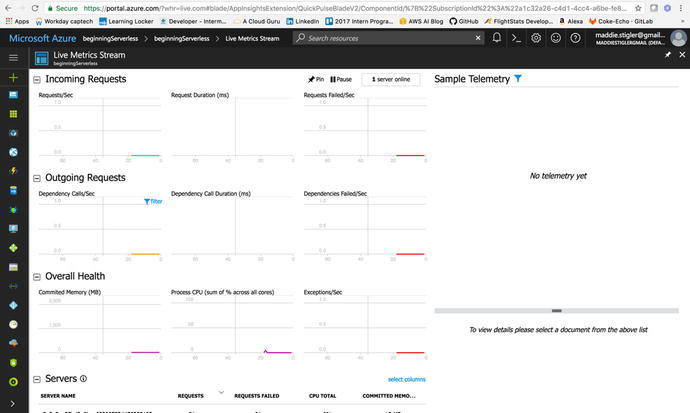
your application. Figure 2-3 illustrates Application Insights being used
for live monitoring of an application.
Figure
2-3.
Live Metrics Streaming monitors incoming
requests, outgoing requests, overall health, and servers used to
handle requests. You can see how long the requests take and how
many requests fail. You can use these statistics to adjust the
memory and response of your function.
Another aspect of
Azure functions is that they are built within resource groups, containers used to
hold all related resources for an Azure solution. It is up to the
developer to determine how the resources are grouped and allocated,
but it generally makes sense to group the resources of an
application that share the same life cycle so they can be deployed,
updated, and deleted together. Lambda functions are organized
independently. They aren’t required to belong to a resource group,
but instead can be developed completely separately from any other
AWS resources.
One of the potential limitations to
serverless functions that we discussed in Chapter 1 was the fear of the “cold start.”
Azure functions run on top of WebJobs, which means the function
files aren’t just sitting in a zip file. They are built on top of
WebJobs to more easily host long or short back-end processes.
Azure
functions are also integrated with several continuous
deployment tools, such as Git, Visual Studio Team Services,
OneDrive, Dropbox, and Azure’s own built-in editor. Visual Studio
Team Services (previously Visual Studio Online) is a powerful tool
for continuous integration of your functions with a team. The tight
integration with Visual Studio Team Services means you can
configure the connection to Azure and deploy very easily. It also
gives you free Azure function templates out of the box to speed up
the development process even further. Currently, this integration
is not something that either AWS or Google Cloud provide. It
includes Git, free private repos, agile development tools, release
management, and continuous integration.
Google Cloud Functions
Google Cloud released its serverless
offering, Google Cloud Functions, in February of 2016. Currently,
Google Cloud supports only a JavaScript runtime with only three
triggers.
Note
It is important to keep in mind that,
at this writing, Google Cloud Functions is still in its Beta
release. A lot of its functionality and environment is subject to
change with more development to its service offering
expected.
Google Cloud Functions has automatic
logging enabled and written to the Stackdriver Logging tool. The
logs remain in Stackdriver for up to thirty days and log real-time
insights as well as custom logs. In addition, performance is
recorded in Stackdriver Monitoring and the Stackdriver Debugger
allows you to debug your code’s behavior in production. With Google
Cloud Functions you can also use Cloud Source repositories to
deploy functions directly from a GitHub or bitbucket repository.
This cuts down on time that would be spent manually zipping and
uploading code through the console. It also allows you to continue
using your form of version control as you would before.
A unique aspect of Google Cloud
Functions is its integration with Firebase. Mobile developers can
seamlessly integrate the Firebase platform with their functions.
Your functions can respond to the following events generated by
Firebase :
-
Real-time database triggers
-
Firebase authentication triggers
-
Google Analytics for Firebase triggers
-
Cloud storage triggers
-
Cloud pub/sub triggers
-
HTTP triggers
Cloud Functions minimizes boilerplate
code, allowing you to easily integrate Firebase and Google Cloud
within your functions. There is also little or no maintenance
associated with Firebase. By deploying your code to functions, the
maintenance associated with credentials, server configuration, and
the provisioning and supply of servers goes away. You can also
utilize the Firebase CLI to deploy your code and the Firebase console to view and sort logs.
To be able to run and test your code
locally, Google Cloud provides a function emulator. This is a Git
repository that allows you to deploy, test, and run your functions
on your local machine before deploying it directly to Google
Cloud.
A difference between the Google Cloud
platform and Azure or AWS is the heavy reliance on APIs for each
service. This is similar to the Software Development Kits used in
AWS and Azure; however, it is more low-level. Google Cloud relies
on API client libraries to obtain service functionality. These APIs
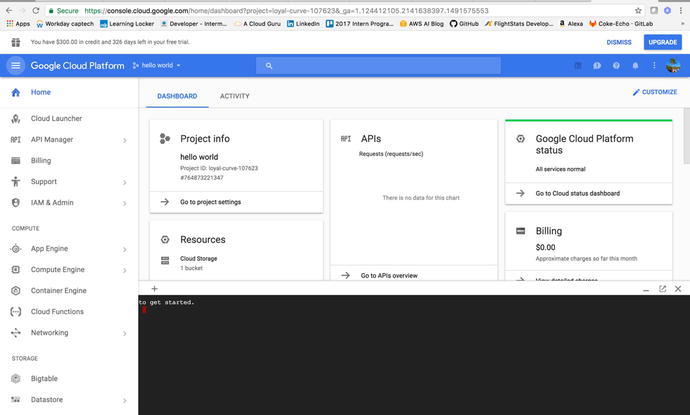
allow you to access Google Cloud platform products from your code
and to automate your workflow. You can access and enable these APIs
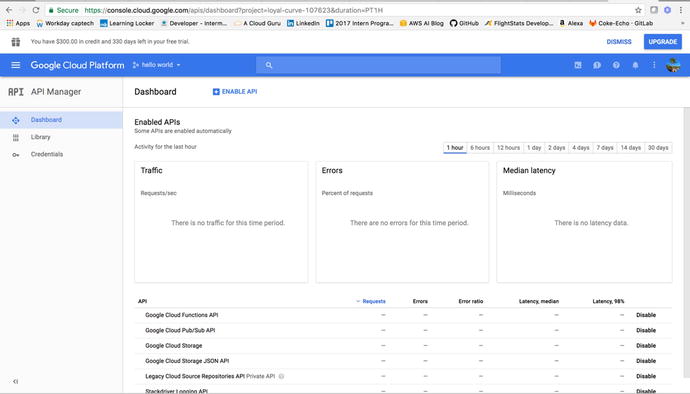
through the API Manager Dashboard, shown in Figure 2-4.
Figure
2-4.
The API Manager Dashboard shows all of your currently enabled APIs, along
with the requests, errors, latency, and traffic associated with
those APIs. The dashboard statistics go back thirty days.
Explore Triggers and Events
Chapter 1 gave an overview of triggers and
events and how they fit into the larger idea of serverless
architecture. In this section we will examine what triggers are,
how they work with different cloud providers and within real-world
examples, and how events drive serverless functions.
What Are Triggers?
Triggers are simply events. They are
services and HTTP requests that create events to wake up the
functions and initiate a response. Triggers are usually set within
the function console or the command-line interface and are
typically created within the same cloud provider’s environment. A
function must have exactly one trigger.
In AWS a trigger can be an HTTP request or an invocation of another AWS
service. Azure functions utilize service triggers as well, but they
also capture the idea of bindings. Input and
output bindings offer a declarative way to connect to data
from within your code. Bindings are not unlike triggers in that
you, as the developer, specify connection strings and other
properties in your function configuration. Unlike triggers,
bindings are optional and a function can have many bindings. Table
2-1
illustrates the input and output bindings that Azure supports for
its functions.
Table
2-1.
Input/Output Bindings for Azure Functions
|
Input
|
Output
|
|---|---|
|
HTTP (REST or Webhook)
|
|
|
Blob Storage
|
Blob Storage
|
|
Events
|
|
|
Queues
|
|
|
Queues and Topics
|
|
|
Storage Tables
|
Storage Tables
|
|
SQL Tables
|
SQL Tables
|
|
NoSQL DB
|
NoSQL DB
|
|
Push Notifications
|
|
|
Twilio SMS
Text
|
|
|
SendGrid Email
|
An example of an application binding a
trigger to a function is writing to a table with an API request.
Let’s say we have a table in Azure storing employee information and
whenever a POST request comes in with new
employee information, we want to add another row to the table. We
can accomplish this using an HTTP trigger, an Azure function, and
Table output binding.
By using the trigger and binding, we
can write more generic code that doesn’t make the function rely on
the details of the services it interacts with. Incoming event data
from services become input values for our function. Outputting data
to another service, such as adding a row to a table in Azure Table
Storage, can be accomplished using the return value of our
function. The HTTP trigger and binding have a name
property that works as an identifier to be used in the
function code to access the trigger and binding.
The triggers and bindings can be
configured in the integrate tab in the Azure Functions portal. This
configuration is reflected in the function.json file in
the function directory. This file can also be configured manually
in the Advanced Editor. Figure 2-5 shows the integration functionality with the
input and output settings that can be
configured.
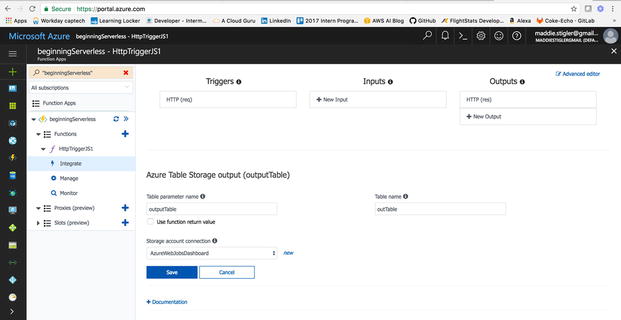
Figure
2-5.
The triggers ,
inputs, and outputs that can be set and configured witin the Azure
portal
The ability to configure outputs using
bindings within Azure is something that isn’t available with every
cloud provider, but having specific outputs based on the reception
of trigger events is a concept that is embraced by other cloud
providers and one that fits the idea of creating serverless
functions to perform single operations.
Triggers within Cloud Providers
Different cloud
providers offer different triggers for their functions.
While many of them are essentially the same service with a
different name based on the provider, some are truly unique. Table
2-2 shows the
triggers for the providers we will be using.
Table
2-2.
Function triggers for AWS, Azure, and
Google
|
AWS Lambda
|
Azure Functions
|
Google Cloud Functions
|
|---|---|---|
|
Amazon S3
|
Azure Storage
|
|
|
Amazon DynamoDB
|
||
|
Amazon Kinesis Stream
|
Azure Event Hubs
|
|
|
Amazon Simple Notification Service
|
Queues and Topics
|
Google Cloud Pub/Sub triggers
|
|
Amazon Simple Email Service
|
||
|
Amazon Cognito
|
||
|
AWS CloudFormation
|
||
|
Amazon CloudWatch Logs
|
||
|
Amazon CloudWatch Events
|
||
|
AWS CodeCommit
|
||
|
Scheduled Events
|
Azure Schedule
|
|
|
AWS Config
|
||
|
Amazon Alexa
|
||
|
Amazon Lex
|
||
|
Amazon API Gateway
|
HTTP (REST or WebHook)
|
HTTP
|
Development Options, Toolkits, SDKs
In this section, we will look at the
various development options, toolkits, and SDKs that can be used to
develop serverless applications. Specifically, we will discuss
Typescript with Node.js, AWS SDKs, Azure SDK, and the Cloud SDK for
Google.
TypeScript with Node.JS
TypeScript
is a superset of JavaScript that was
developed by Microsoft to develop strongly typed language that
compiles to JavaScript. It starts with the same syntax that
developers who work with JavaScript know and use today. TypeScript
compiles directly to JavaScript code that runs on any browser in
many JavaScript engines, including Node.js.
TypeScript
enables developers to build JavaScript applications that will also
include static checking and code refactoring. Figure 2-6 illustrates an example
of compiling TypeScript to JavaScript.
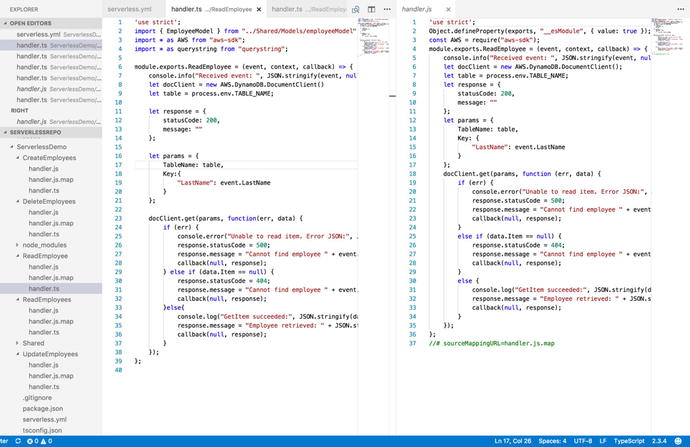
Figure
2-6.
This figure demonstrates the use of
TypeScript to
create a Create
Employee function and how it compiles to JavaScript code
that can be used to build serverless applications.
TypeScript
can be downloaded using NPM or Visual Studio plug-ins. From the
terminal/command prompt, you can install TypeScript with the
command npm
install –g typescript. This gives you access to the
TypeScript tools. In Visual Studio, TypeScript is included by
default; so I recommend installing Visual Studio Code at this point
if needed.
Once TypeScript is installed, you can begin writing
TypeScript files and compiling them either using the command
line:
tsc helloWorld.ts
or by building the project in Visual
Studio . Once the TypeScript files have
compiled, you will see JavaScript files created from the TypeScript
files.
AWS SDK
Software
development kits (SDKs) are powerful tools for developing
serverless applications. AWS, Azure, and Google each have an SDK
with which developers can easily access and create services within
each cloud provider. AWS offers SDKs for all of the following
programming languages and platforms:
-
Android
-
Browser
-
iOS
-
Java
-
.NET
-
Node.js
-
Ruby
-
Python
-
PHP
-
Go
-
C++
-
AWS Mobile
-
AWS IoT
To install the AWS SDK, simply type
this command at your command prompt:
npm install aws-sdk
Before you can do this, you will need
to have NPM installed. Node Package Manager takes care of the
installation for you and makes it accessible in your projects.
Figure 2-7
illustrates how the AWS SDK works with Node.js to deliver
accessible AWS services to your code.
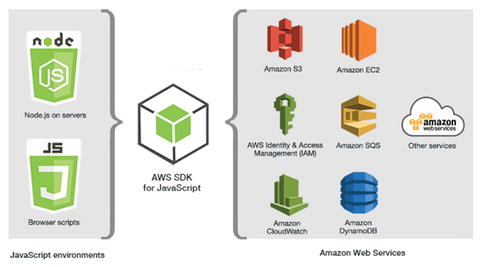
Figure
2-7.
This figure illustrates how the AWS SDK for
JavaScript allows you to build full-scale applications that utilize
the services that AWS has to offer with little effort
After installing
the SDK, you will need to do some configuration within your Node.js
files to load the AWS package into the application. The way to do
this is by using the require statement at
the top of your JavaScript. The code should look like this:
var AWS = require('aws-sdk');
You can then access the various AWS
resources using the AWS variable you created and the API reference
materials that can be found here:
This documentation will show you how
to create and access particular services. The following example
code shows how you can create a table in DynamoDB using the AWS
SDK.
'use strict';
Object.defineProperty(exports, "__esModule",
{ value: true });
var AWS = require("aws-sdk");
module.exports.CreateTable = (event,
context, callback) => {
var dynamodb = new
AWS.DynamoDB();
var docClient = new
AWS.DynamoDB.DocumentClient();
var params = {
TableName:
process.env.TABLE_NAME,
KeySchema: [
{
AttributeName: "LastName", KeyType: "HASH" } //Partition key
],
AttributeDefinitions: [
{
AttributeName: "LastName", AttributeType: "S" }
],
ProvisionedThroughput: {
ReadCapacityUnits: 10,
WriteCapacityUnits: 10
}
};
dynamodb.createTable(params,
function (err, data) {
if (err) {
console.error("Unable to create
table. Error JSON:", JSON.stringify(err, null, 2));
}
else {
console.log("Created table.
Table description JSON:", JSON.stringify(data, null, 2));
}
});
};
The AWS SDK will be used in a similar
way in some of our demos in the next chapter. It would be a good
idea to look over the API documentation to get a better
understanding of how these services are created and how they can be
used throughout your applications.
Azure SDK
Similar to the AWS SDK, Azure also has an SDK that you can use when
creating your Azure functions. The list of available SDKs for
different tools and platforms includes these:
-
.NET
-
Java
-
Node.js
-
PHP
-
Python
-
Ruby
-
Mobile
-
Media
-
Android
-
iOS
-
JavaScript
-
Swift
-
Windows
Since we will be using a Node.js runtime to create our applications
in the following demos, we will continue to look at examples of
using SDKs with JavaScript. You can get the Azure SDK by using the
command npm
install azure. Just as with AWS, Node Package Manager will
install the Azure development kit for you. If you only want to
install individual modules for specific services, you can do this
through NPM as well. The following code shows how to easily create
a database in DocumentDB utilizing the Azure SDK:
var DocumentClient =
require('documentdb').DocumentClient;
var host = 'host';
var key = 'key';
var dbClient = new DocumentClient(host,
{masterKey: key});
var databaseDefinition = { id: 'myDatabase'
};
//Create Database
client.createDatabase(databaseDefinition,
function(err, database) {
if(err) return
console.log(err);
console.log('Database Created');
});
This JavaScript utilizes the DocumentDB client to create and instantiate a new
DocumentDB database in Azure. The require statement
collects the module from Azure and allows you to perform multiple
DocumentDB operations straight from your function. We will be using
this in more detail in the Azure tutorials.
Google Cloud SDK
Google Cloud’s SDK also supports
various tools and platforms:
-
Java
-
Python
-
Node.js
-
Ruby
-
GO
-
.NET
-
PHP
However, since Google Cloud Functions
supports only Node.js at the moment, the Node.js SDK for Google
Cloud is what we will be using to implement serverless
applications. The Cloud SDK has many features that deserve further
explanation.
The gcloud tool manages
authentication, local configuration, developer workflow, and
interactions with the Cloud Platform APIs. The gsutil tool provides
command-line access to manage Cloud Storage buckets and objects.
Kubectl
orchestrates the deployment and management of Kubernetes container
clusters on gcloud. Bq allows you
to run queries, manipulate datasets, tables, and entities in
BigQuery through the command line. You can use these tools to
access Google Compute Engine, Google Cloud Storage, Google
BigQuery, and other services from the command line.
With the
gcloud
tool, you can start and manage different Cloud SDK emulators built
for Google Cloud Pub/Sub and Google Cloud Datastore. This means you
will have the ability to simulate these services in your local
environment for testing and validation.
You also have the ability to install language-specific client libraries through
the Cloud SDK. To install the Cloud SDK for Node.js, enter the
following command into your terminal: npm install –save
google-cloud. Google Cloud also recommends you install the
command-line SDK tools. To do this, you can install the SDK
specific for your machine from this site: https://cloud.google.com/sdk/docs/
. The following code demonstrates how to use the Google Cloud SDK
for Node.js to upload a file to cloud storage.
var googleCloud =
require('google-cloud')({
projectId: 'my-project-id',
keyFilename:
'/path/keyfile.json'
});
var googleStorage =
googleCloud.storage();
var backups =
googleStorage.bucket('backups');
backups.upload('file.zip', function(err,
file) {
});
The JavaScript
requires the google-cloud module,
which enables you to utilize and alter different Google Cloud
services in your code. While this SDK isn’t as integrated as the
AWS and Azure SDKs, it is growing and can be used to create and
deploy functions as well as other services.
Developing Locally vs. Using the Console
How should you start developing your
serverless application? Do you build it locally and then deploy it
to the cloud provider, or do you build it within the cloud
provider’s console? A mixture? This section discusses best
practices and options for developing locally and within the
provider’s environment.
Local Development
Developing locally is often preferable
because it means you get to use the tools, IDEs, and environments
you are used to. However, the tricky part about developing locally
can be knowing how to package and deploy your functions to the
cloud so that you spend less time figuring this out and more time
working on your code logic. Knowing best practices for project
structure and testing can help speed up the development process
while still letting you develop using your own tools.
For AWS Lambda functions, it is
important to remember that the handler function must be in the root
of the zip folder. This is where AWS looks to execute your function
when it’s triggered. Structuring your project in a way that
enforces this execution rule is necessary. For testing locally, the
NPM package lambda-local allows
you to create and store test events that you can execute on your
function locally before taking the time to deploy to AWS. If you
aren’t using a framework that automates this deployment for you,
using a package such as lambda-local is
preferred.
Azure also offers an NPM package that can test your functions locally.
Azure Functions Core Tools is a local version of the Azure
Functions runtime that allows you to create, run, debug, and
publish functions locally.
Note
The Azure NPM package currently works
only on Windows.
Visual Studio offers tools for Azure
functions that provide templates, the ability to run and test
functions, and a way to publish directly to Azure. These tools are
fairly advanced and give you a lot of the function right out of the
box. Some limitations of these tools include limited IntelliSense,
inability to remove additional files at destination, and inability
to add new items outside of the file explorer.
Google Cloud has an Alpha release of
a cloud functions local emulator. The emulator currently allows you
to run, debug, and deploy your functions locally before deploying
them to the cloud directly.
Deployment of Functions and Resources
There are several options for
deployment from a local environment to a cloud environment. Using
the Serverless Framework is a preferred method because it builds
condensed deployment packages that are provider-specific so you can
use them to build the same application in any account. It is also
preferred because it allows you to create dependent services and
security simultaneously.
Another option
for deploying from your local environment to the cloud is using the
provider’s command-line interfaces. AWS, Azure, and Google Cloud
all offer CLIs that can be installed and utilized to create and
deploy various services. The AWS CLI can be installed if you have
Python and pip using this
command:
pip install --upgrade --user awscli.
Once the CLI is installed you can
configure your AWS CLI account using the command:
aws configure
The documentation for this can be
found at
http://docs.aws.amazon.com/cli/latest/userguide/installing.html
This configuration will ask you for
your AWS Access Key ID, AWS Secret Access Key, Default region name,
and default output format. Once these values are configured, you
can use the CLI to create and configure your AWS services. For a
complete list of services and CLI commands, go to https://docs.aws.amazon.com/cli/latest/reference
.
Azure also
offers a command-line interface as well as PowerShell commands to
manage and deploy your Azure resources. To install the Azure CLI
with a bash command,
use:
curl -L https://aka.ms/InstallAzureCli |
bash
Azure has also released a Cloud
Shell, an interactive, browser-accessible shell for managing Azure
resources. Cloud Shell can be launched from the Azure portal and
allows you to have a browser-accessible, shell experience without
having to manage or provision the machine yourself. This enables
you to create and manage Azure scripts for resources easily. To get
started with the Cloud Shell, I recommend following the tutorial
provided by Microsoft at
https://docs.microsoft.com/en-us/azure/cloud-shell/quickstart
.
Google Cloud also takes advantage of a CLI within a Cloud
Shell that allows you to access and deploy local resources. This
allows you to manage projects and resources without having to
install the Cloud SDK or other tools locally. To utilize the Google
Cloud Shell, all you have to do is enable it from the console. To
initiate the Cloud Shell, you simply enable it in the console as
you would do for Azure. Figure 2-8 shows an example of enabling the Cloud
Shell.
Figure
2-8.
The Google Cloud Shell is enabled by
clicking the shell icon in the top right; it then runs in the shell
screen at the bottom
You can use any of these tools to
develop and configure your serverless functions and associated
resources. For consistency, we will use the Serverless Framework,
which is accessible to all three providers we will be
exploring.
Developing and Testing in the Cloud Console
Developing functions in the cloud console tends to be a little trickier than
developing locally. One good thing about developing in the console
is that you don’t have to worry about deploying the functions; all
you have to do is test and save them. Azure allows you to navigate
through your project structure and make changes in the console. AWS
allows you to look at your handler file as long as your deployment
package isn’t too large to enable inline editing. Google Cloud also
allows inline editing for smaller deployment packages.
Each of the cloud providers also lets
you specify test cases that you can store and use to test your
functions as you make changes to them. They also provide monitoring
and logging that you don’t necessarily get locally. This provides
developers with a history of insight into their functions and how
they respond to different events.
Establishing triggers can also be
easier in the cloud provider environment.
AWS, Azure, and Google make it very easy to assign a trigger to a
function within the console. They also provide templated test cases
that can be used to test functions right out of the box. As these
providers’ serverless platforms grow in capabilities and
functionality, I can imagine developing in the console becoming
much more common. For now, the preferred method is to develop
locally using your tools and IDEs and rely on advanced deployment
tools to deploy and test in the cloud. This could also be dictated
by the size of your business. For instance, larger businesses may
prefer you to use in-place development environments, whereas when
developing on your own you can create within the console without
any constraints.
The Tools
This section will cover the various
tools that will be used to develop and deploy our serverless
functions within AWS, Azure, and Google Cloud. These tools include
Visual Studio Code as our IDE, Node.js as our runtime, and Postman
for testing our API and triggering our functions.
Installing VS Code or Choosing Your IDE
Visual Studio Code is my IDE of
choice for its ease of use, built-in insights, and cross-platform
accessibility. You can also install VS
Code on Windows or Mac, which is a great feature. I will be
working within VS Code for the following tutorials; so although you
are more than welcome to use your own IDE, following along might be
easier in the same environment. To download VS Code, go to
https://code.visualstudio.com/
and download for your machine.
Node.js
Node.js is the only runtime supported
by all three cloud providers, so we will also be creating our
functions using Node. Besides being the only runtime that is
completely supported, Node is an event-driven, scalable JavaScript
that fits the need for building lightweight, scalable
functions.
To install Node, navigate to
https://nodejs.org/en/download/
and find the installer that is compatible with your machine. It
takes little time to download the installer and then follow its
steps to complete the node installation. Figure 2-9 shows the Node.js
download options.
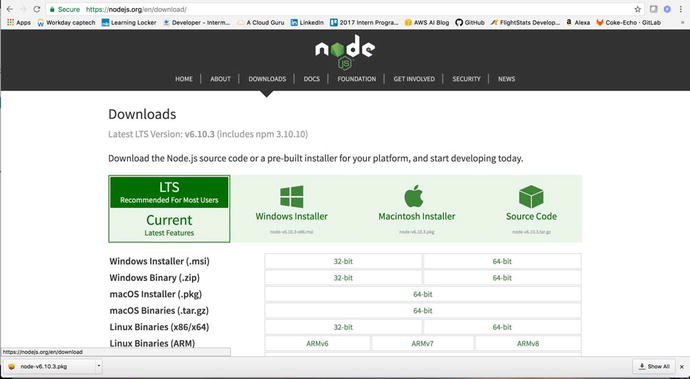
Figure
2-9.
The nodejs download page allows you to
download node for Windows or for Mac platforms. It also allows you
to choose the install method and package.
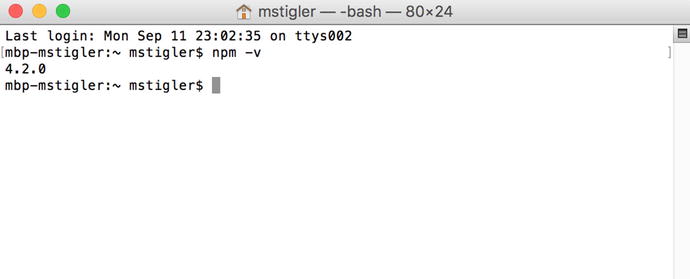
After you have installed Node.js,
navigate to your terminal (for Mac) or command prompt (for Windows)
and check to confirm that the installation worked, by running the
command node
–v. Figure 2-10 shows the result.
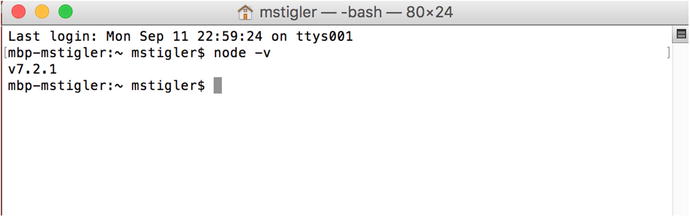
Figure
2-10.
This terminal command confirms that I do
have Node installed. The –v flag signifies
version, so the response that returns is the version of Node I have
installed.
If you have Node installed correctly,
you should get a response showing a version. Make sure your version
is at least v0.10.32. If it isn’t, return to the Node installation
page and grab a more recent version.
Now that we have Node installed, we
can begin to use it in our serverless demos. To expand on what
Node.js is and how it works, Figure 2-11 demonstrates how it
operates under the hood to support thousands of concurrent
connections.
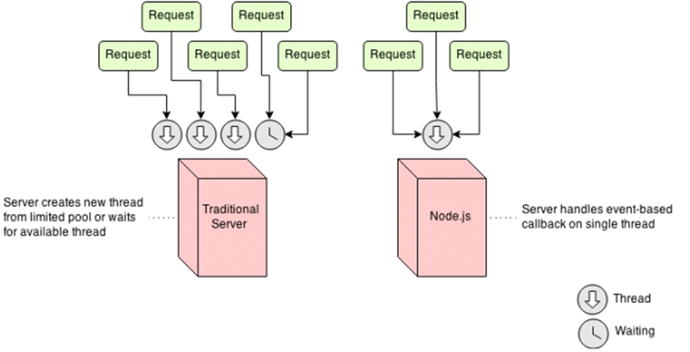
Figure
2-11.
This figure from havlena.net
illustrates the concurrency of Node.js established by its
single-thread approach
Its event-driven structure and
ability to process on the fly make
Node.js an ideal runtime for serverless applications, chat
applications, proxies, and real-time applications. Similar to
serverless functions, Node is not meant to be used for
long-running, CPU-intensive operations.
Postman
Postman is another handy tool we will
be using throughout the tutorials. Postman is a cross-platform GUI
that makes testing your APIs incredibly easy. To download it, go to
https://www.getpostman.com/
and click the installation package that is right for your machine.
Figure 2-12
shows what the Postman application looks like after it has been
installed.
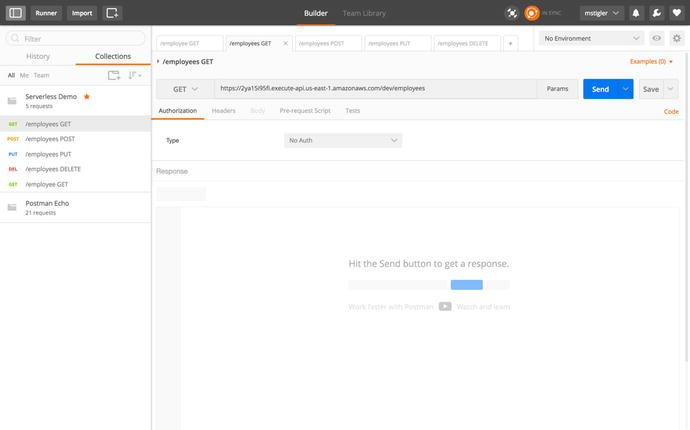
Figure
2-12.
This figure shows the Postman application
and everything you can do within it
Postman allows you to save requests
so you can easily access them the next time you want to test them.
To hit an API, you specify the method, the endpoint, and any
parameters, and click Send. This will call the API and return any
information it gets back to Postman.
We will be using this tool throughout the book to trigger our functions that
are being executed by API requests. Postman will feed us the
results of the requests in the Response section of the
application.
Environment Setup
For the rest of this book, we will be
walking through several function examples using AWS, Azure, and
Google Cloud. To accomplish this, I recommend a set of tools to be
used so that development environments are the same throughout the
tutorials. I will be using Visual Studio Code as an IDE, a Node.js
runtime using Node Package Manager (NPM), and the Serverless
Framework to deploy our functions.
Navigating VS Code
Visual Studio Code is a lightweight
IDE that has built-in Git, Intellisense, Debugging, and Extensions.
Intellisense gives you more than just syntax highlighting and
autocomplete. It also provides smart completion based on variable
types, function definitions, and imported modules. Intellisense can
be accessed while writing your functions. To look at your project
structure and navigate between files, click on the explorer tool in
the top left corner of VS Code. Figure 2-13 shows a basic
project structure within the Explorer tool.
Figure
2-13.
This figure illustrates the Explorer view,
where you can navigate through your project and write functions in
the workspace
The built-in Git makes it easy to
initialize a repo and use all Git commands right from Visual Studio
Code. Figure 2-14 shows the built-in Git component.
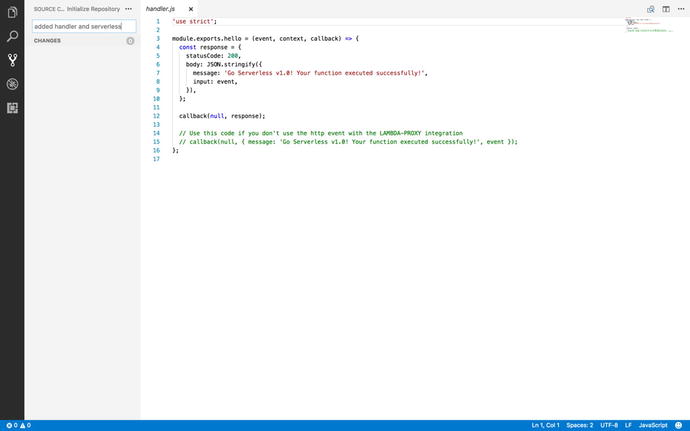
Figure
2-14.
The built-in Git component allows you to
initialize a repo, commit and push changes, and track branches. The
blue bar across the bottom of VSCode tells you what branch you’re
in and displays any warnings or errors for that branch
Visual Studio Code also provides a
debugging component that helps you add configurations to your
project to step through and debug your code. Figure 2-15 shows the debugging
component and a newly created configuration for it.
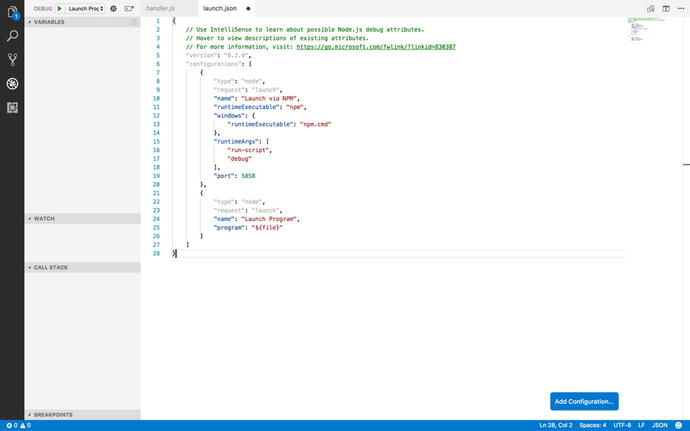
Figure
2-15.
The debugging tool includes breakpoints,
configurations, a variable section that you can track, the call
stack, and a watch log
VSCode also provides an extensions
section that allows you to install and add different extensions to
your project. One extension we will be using is the npm extension for
support for Node Package Manager. We can go ahead and install this
extension now by navigating to the extensions component and
searching for NPM in the marketplace. Figure 2-16 shows how to locate
the NPM extension.
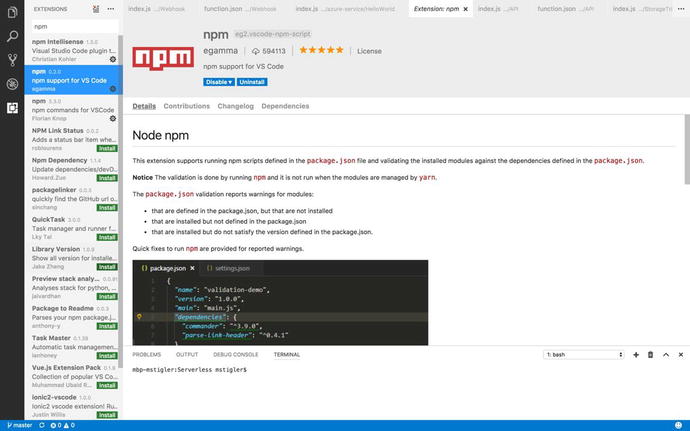
Figure
2-16.
The NPM extension that we would like to
install to set up our environment can be found in the marketplace.
You can install it by clicking the Install option.
The extensions will give you the
details , change log, and dependencies
along with examples of how they will be used. For the purpose of
the following tutorials, we will go ahead and install the NPM
extension that allows you to run commands in code as well as the
extensions that provide support for VS code.
Node Package Manager: What It Does and How to Use It
Node Package Manager is a package
manager for JavaScript so we will be using it with our Node.js
applications to install various packages that are needed to
complete our project. NPM is very collaborative, allowing you to
install, share, and distribute code. NPM includes packages such as
gulp,
grunt,
bower,
async,
lodash,
and request.
NPM is installed along with Node, so
we can go ahead and use our terminal/command prompt to see if we do
indeed have NPM installed. Use the command npm –version to see if
you have npm installed. Figure
2-17 shows a
response from the terminal that indicates the version of
npm I have
installed.
Figure
2-17.
The npm version returned 4.2.0, indicating
that I do have NPM installed
Serverless Framework
As discussed in Chapter 1, the Serverless
Framework is a powerful deployment and development tool.
With its new release of its integration with Google Cloud
Functions, it is becoming an integral piece to cloud functions
development. To install Serverless, we will be using NPM. In your
terminal/command prompt, enter the following command:
npm install –g serverless
This will install Serverless globally
on your machine. So when we create different function projects
later on, we can quickly and easily create new services and deploy
them using Serverless. For more information before then,
https://serverless.com/framework/docs/
provides documentation for Serverless for each of the cloud
providers we cover.
Organizing your Development Environment
There are many ways to organize our
development environment ; however, since
we will be developing serverless applications with three different
cloud providers, it makes the most sense to organize by provider
and then demonstrate how to develop a project that is
provider-agnostic.
To start, I recommend setting up a
Git repository or some sort of version control. You can get a free
account on GitHub to store your code by going to http://www.github.com
. I created a repository called Serverless and then created three
projects within it (AWS, Azure, and Google). For each project, I
initialized a serverless framework project within it. Inside your
AWS project folder, run the command:
serverless create --template aws-nodejs
--path aws-service.
The template defines which cloud
provider you are using along with the
runtime. The path defines the name of the service you are creating.
I chose to name my service aws-service. After
creating the service, we need to install the project dependencies
within the service. Navigate within the service and run the
following command:
npm install
As we have seen before, Node Package
Manager will read the package.json file
provided by Serverless and will install all listed dependencies.
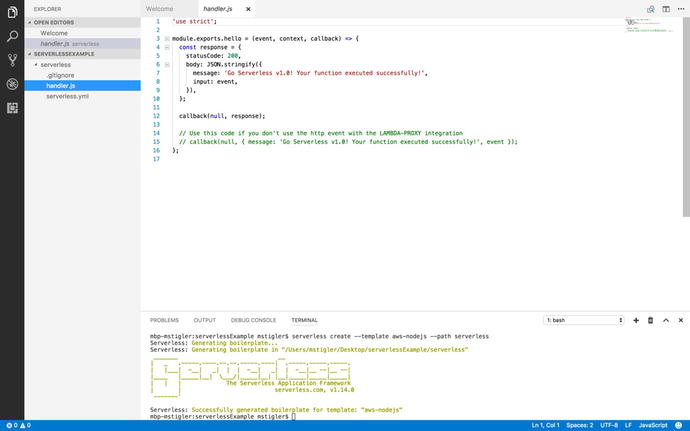
Figure 2-18
shows the project structure the Serverless Framework gives you out
of the box.
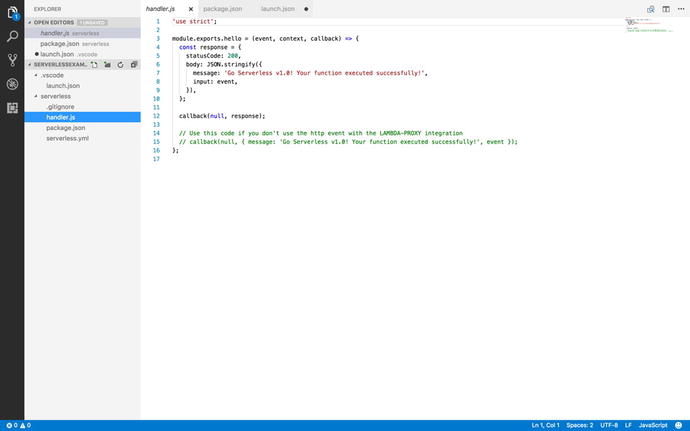
Figure
2-18.
The Serverless Framework creates a
package.json file, a
sample handler.js file, and a
serverless.yml file
when it is installed
Inside the same repository , we are also going to install
Serverless in the Azure and Google projects. For Azure, we enter
the command:
serverless create --template azure-nodejs
--path azure-service.
npm install
This accomplishes the same thing that
we did with AWS. If you open up your Azure project in Visual Studio
Code, you should see the same project structure (handler.js,
serverless.yml,
package.json, and
node_modules). We will
continue to do the same thing with the Google project.
serverless create --template google-nodejs
--path google-service.
npm install
Figure 2-19 shows a finished
project skeleton with each of the three cloud providers. We will be
using the serverless. yml file in the
next three chapters to deploy our serverless functions within each
provider’s environment.
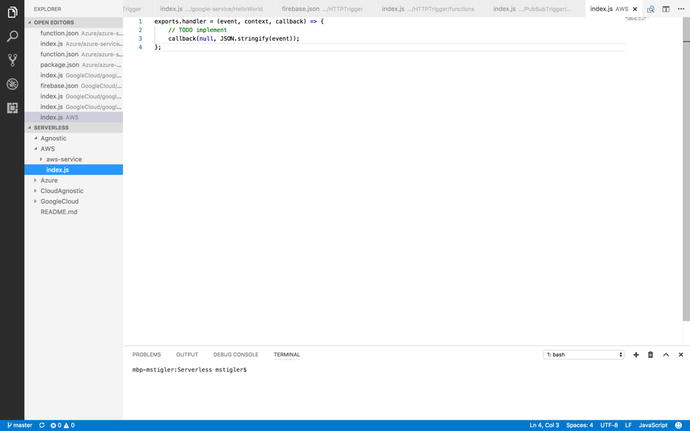
Figure
2-19.
This figure demonstrates a bare-bones
project structure within each of the three providers
This project structure can also be cloned from https://github.com/mgstigler/Serverless.git
.
Conclusion
In this chapter we covered everything
you need to know to begin building serverless functions. We have
the tools and environment set up, as well as the knowledge of how
triggers, events, and functions come together to produce scalable,
event-based applications. In the next chapter, we will go through
some examples of building functions using AWS Lambda.