Chapter 14
More Great Veggies
In This Chapter
• Meet the cabbage family
• Go green with leafy greens
• Perfect peppers and peas
• Expand your eggplant expertise
In this chapter, we look at a few more great vegetables. These could easily have been in the previous chapter on basic vegetables because they’re not that far from “basic,” but there just wasn’t enough room to put them there and do them justice.
In the next few pages, we look at members of the cabbage family, including broccoli, cauliflower, and brussels sprouts, and peas, peppers, eggplants, and leafy greens.
The Cole Family Album
Let me introduce you to the cole family, also known as Brassica oleracea—and just to confuse things, also sometimes known as the Cruciferae family or Crucifers for short. Members of the cole family include cabbage, broccoli, cauliflower, kale, brussels sprouts, Chinese cabbage, and kohlrabi.

Garden Guru Says
Cabbage family plants are prone to quite a few ailments and are a big target for destructive insects, many of which linger in the soil. To avoid using harsh chemicals to control pests and diseases, try to change your cabbage patch location in the garden every couple years. This is called crop rotation.
The Brassicas, which are sometimes referred to generically as the cabbage family, originated as Old World plants, with some, like cabbage, beloved by ancient Egyptians and Romans, Russians, and many others for the past 2,000 years. In this section we talk about all these family members except kale, which is discussed later in this chapter, and Chinese cabbage and kohlrabi, which are covered in the next chapter.
All the Brassicas prefer rich, well-drained soil with lots of organic matter like compost or well-rotted manure worked in thoroughly. With the exception of cauliflower, they’re all cool-weather plants and are pretty tolerant of a fairly broad pH range of 5.5 to 7.0. You can start most Brassicas from seed indoors about 4 to 6 weeks before setting out, or plant them directly in the garden about 1 inch deep … but why bother? Unless you’re planning on growing heirloom or specialty varieties, young plants are readily available.
Give the plants a good feeding when you set them out and then again every 3 weeks or so after that.
Colorful Cabbage
Cabbage (Brassica oleracea capitata) is sort of the mother of all Brassicas. It’s very easy to grow, and I think the big, fat heads look beautiful in rows in the garden, especially if you plant a variety of green, red, Chinese, and Savoy varieties. Be prepared though: if you have a large crop, you might find that cabbage has a certain, well, stink.
Cabbage seedlings should have four complete sets of leaves before they’re transplanted. Set them out, or plant seeds, as early as you can work the soil for a summer harvest, or in early summer for fall harvest. Plant them deep, with the stem buried right up to the first set of leaves to encourage root development along the stem. Plant cabbages 1½ to 2 feet apart, or more if you’re growing any of the giant varieties.
To harvest, use a sharp knife to slice straight across the base of the stem.
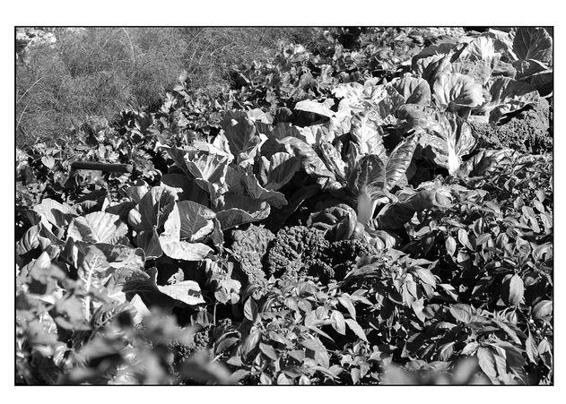
Cabbage and kale grow among peppers and fennel in this diverse and densely planted garden.
©iStockphoto.com/AdrianAssalve

Compost Pile
Insects love cabbages, so it’s difficult to grow them without using some kind of insect intervention. Mother Jones magazine suggests planting dill and chamomile around cabbages (as well as leeks and onions) to deter pests. And the Kentucky State University Organic Agriculture Working Group has had success spraying cabbage plants with the bacterium Bacillus thuringiensis (Bt). It kills cabbage worms and seems to discourage flea beetles.
Blooming Cauliflower
Cauliflower (Brassica oleracea botrytis) used to be the wimp of the cole family. It didn’t like cold weather and couldn’t take the heat either. Plant breeders have taken cauliflower to new levels with weather-tolerant early and late varieties and some that are bred to overwinter in the ground for spring harvest. Cauliflower produces old-fashioned white “curds” (heads) as well as purple and green ones.
Even with the newer varieties, cauliflower isn’t the easiest plant to grow. It prefers a pH of 6.5 to 7 and requires lots of rich organic matter in the soil. Cauliflower has trouble setting its curds if irrigation is irregular.
Set out cauliflower plants about 1½ to 2½ feet apart in rows about 2½ feet apart. Feed them with a high-nitrogen fertilizer when you plant and then again every couple weeks. With overwintering varieties, stop the feeding program at first frost and pick up again when the weather warms.
To harvest, use a sharp knife to slice through the stem at the base.
Bunches of Broccoli
When my older daughter was little, she would eat an entire head of broccoli for dinner. It’s one of our family’s favorite vegetables. (Apparently that’s not the case for former president George H. W. Bush, though!) Broccoli has a delicious flavor to begin with, and the homegrown stuff is fabulous. Although not as fussy as cauliflower, it’s still not the easiest vegetable in the world to grow.
Set out plants with at least one full set of leaves after the last frost, allowing about 1½ feet between plants. If you start from seed, plant them about 1 inch deep. Feed transplants with a high-nitrogen liquid fertilizer and then repeat every 3 weeks or so.
We eat the unopened flower buds of the broccoli plants, so harvest when the buds are still tightly closed. If they start to open or produce little yellow flowers, you’ve waited too long. Cut the buds with a bit of stem using a sharp knife. The broccoli plants will send out new bonus stems with buds a little later.
Brussels Sprouts
How brussels sprouts got their name is a little murky. It seems they were popular in Belgium in the 1700s. There’s surely more to it than that, but no one seems to be able to come up with the final answer. There is pretty good documentation, however, that Thomas Jefferson imported some seeds from Europe to grow at Monticello in 1812. Today, American vegetable farmers produce about 70 million pounds of brussels sprouts each year.
You can add to that poundage by growing them in your garden. It’s not very difficult. Give them a soil pH of about 6.5; lots of organic matter; and a long, cool growing season. Plant seeds indoors about 4 or 5 weeks before setting them out in late spring or early summer. Or plant them directly in the garden.
Brussels sprouts require 70 to 110 days to mature and are best when harvested in cool or even cold weather. Some varieties overwinter for a spring harvest. When the sprouts look like little cabbages, cut the long stems off at the bottom with a sharp knife. You can let the brussels sprouts grow longer and larger if you want. The smaller they are, however, the sweeter.
Leafy Greens
Health experts tell us to eat plenty of leafy green vegetables. If you grow your own, eating them will be easy, not to mention a pleasure.
We discussed salad greens in Chapter 13, so here we look at kale, spinach, and chard.
Cold-Hardy Kale
As mentioned earlier, kale is a member of the Brassica family (Brassica oleracea sabellica). It’s one of the most cold-hardy leafy vegetables grown in North America. Kale does best when grown in very rich, well-drained soil with lots of organic matter and a pH of 7.5 to 8.0. Plant seeds individually about ½ inch deep or broadcast them for intensive planting. Do this as soon as you can work the soil for spring harvest and in early fall for a late fall harvest. In warm areas, kale is a winter crop.
Kale requires regular, thorough irrigation and feeding every 2 weeks or so with a high-nitrogen fertilizer.
Food for Thought
Years ago in my New Jersey garden, I harvested some incredibly delicious kale in February from under at least 6 inches of snow! Kale’s flavor actually improves when it’s harvested after a frost.
This super-nutritious crop is one of those plants that keeps on giving. You can harvest individual leaves as soon as they are 6 or 7 inches long, or allow them to grow larger. The plants will continue to produce leaves for months.
Popeye’s Favorite: Spinach
Popeye scarfed down a can of spinach when he needed to supersize his muscles. I don’t think canned spinach has much of a market share these days, but the popularity of fresh spinach is on the rise because of its amazing nutritional benefits.
Spinach (Spinacea oleracea) is a relatively easy vegetable to grow as long as you keep it cool and well fed and provide it with a rich soil with plenty of organic matter and a pH of 6.4 to 7.0. Sow seeds about ½ inch deep and 2 inches apart as soon as you can work the soil. You can also broadcast seed in a small area for intensive planting, covering them with a light layer of soil. Some gardeners even broadcast spinach seed over frozen ground, leaving the seeds to germinate when the snow thaws.
Prof. Price’s Pointers
Spinach has a tendency to bolt. This is an undesirable early maturity of leafy plants whereby they rush through their life cycle to the flowering and seed-producing stage. This is typical of spinach, lettuce, and radishes and usually happens when the weather gets too warm for them. When the plants have bolted, they are inedible.
Water spinach regularly and thoroughly, and feed it every couple weeks with a high-nitrogen fertilizer. Harvest by thinning the plants to about 4 to 6 inches apart and picking individual leaves of larger plants. You can also harvest whole plants by pulling them, roots and all, from the row.
Spinach is one of the few vegetables that will tolerate some shade.
If you plan to grow spinach to enjoy mostly in salads and as “baby spinach,” choose one of the smooth leaf varieties. The kind of spinach Popeye preferred (boiled and canned) is a curly leaf type. Both can be grown in the home garden.
Chard
One of the prettiest of all vegetables, chard is often overlooked for anything more than a garnish. What a mistake! When picked nice and young, chard leaves are a delicious addition to a salad, and more mature leaves are a tasty alternative to spinach.
Chard has thick, celerylike stems and large, thick leaves. Some varieties, like so-called rainbow chard, are very colorful with red, yellow, burgundy, white, or green stems and veins. Chard, whose Latin name is Beta vulgaris var. cicla, is a relative of the beet. It’s easy to see the resemblance in the red-veined varieties.
Chard prefers a high pH, in the 6.5 to 7.0 range, and rich soil with plenty of organic matter. This is a cool-weather plant, so you can sow seeds outdoors 2 to 4 weeks before the last predicted frost date. Plant the seeds ½ to ¾ inch deep and just a couple inches apart.
As new chard plants appear, you can harvest them for salads by thinning the plants to about 6 to 8 inches apart. Later, harvest outer leaves as they grow. As with kale, chard will continue to produce new leaves as you harvest the older ones.
Chard wilts in really hot summer weather but does well in cool fall temperatures. If you baby it along during the dog days, it will reward you later.
Pick a Peck of Peppers
Christopher Columbus, bless his exploring ways, gave peppers their name when he first bit into a hot chile pepper on arrival in the New World. (Remember, he thought he had found a new route to the Spice Islands, and he believed he had discovered a brand new kind of spice pepper.) Peppers, hot and sweet, originated in South or Central America, found their way to Europe via Columbus, and eventually were exported to Asia, where they caught on big time.
Peppers fall into two general categories: sweet and hot. Dozens of varieties are available, including the following:
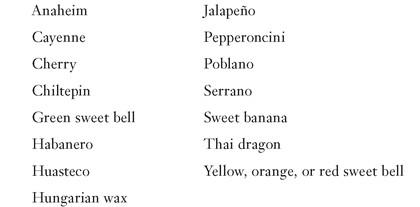
Peppers prefer well-drained and well-cultivated soil that ideally has a pH of 6.0 to 6.8, although you won’t see much difference with more acidic soil. Space pepper plants from 1½ to 2 feet apart. Peppers should be well irrigated but do poorly in soggy conditions.
You can also plant pepper seeds indoors 8 to 10 weeks before the last predicted frost date, but that’s a long time to tend seeds indoors. Most people prefer using seedlings.

Prof. Price’s Pointers
Capsaicin is a substance peculiar to peppers that we taste as pungent (hot). Several genetic factors control the level of capsaicin, which determines the level of hotness of specific pepper varieties.
As soon as the pepper plants begin to set tiny fruits, apply a high-nitrogen fertilizer according to the package directions and then feed every 2 or 3 weeks. Mulching around pepper plants is also a good idea, as it keeps moisture in and weeds out. Peppers take 60 to 80 days from the set-out date to first harvest. Pick the peppers as soon as the fruits are ripe to encourage more production. Do it gently, using garden snips. Most peppers keep producing until frost.
Sweet pepper varieties include green, red, orange, and yellow varieties. The green types stay green even as they mature. The colored varieties, which have high levels of carotenoids (the same ingredient that makes carrots orange), are green in their immature form and then take on the bright color at maturity.
Exotic Eggplants
Eggplants (Solanum melongena) used to be considered a fairly exotic plant, but they’ve become much more commonplace in the last 25 years or so. Old World natives, eggplants are members of the nightshade family (Solanaceae) whose relatives include New World plants like tomatoes, potatoes, and peppers.
Food for Thought
Black plastic mulch isn’t my favorite product, but eggplants seem to do really well with it. The black plastic absorbs the sun’s heat and keeps the soil temperature high, which is right up an eggplant’s alley. The plastic also keeps moisture in and weeds out.
Eggplants are very tender plants and have no tolerance for cold weather, which isn’t surprising, considering they probably originated in India. Eggplants need lots of long, hot days to thrive. They also like a soil with a pH of 6.0 to 6.8.
Most gardeners start with seedlings, setting them out a week or 2 after the last predicted frost. If you have the patience, you can start seeds indoors about 8 to 10 weeks before the set-out date. Be sure to use biodegradable planting pots to avoid disrupting the roots during transplantation. Give eggplants 1 or 2 feet of space between plants.
Eggplants require regular irrigation, particularly when the weather gets very hot. Give them a dose of high-nitrogen fertilizer at planting time, follow up with another feeding when the first fruits appear, and then feed again every 2 or 3 weeks. Use the formula on the packaging.
Begin harvesting your eggplants when they’re
at least their mature
size (these are baby eggplants which cost a fortune in gourmet
stores) up to fully ripe. If you leave them on the vine too long,
they’ll become bitter. Keep up with harvesting to encourage
production, and use garden snips to avoid breaking the stems.
Eggplants have sharp, thorny growths on their stems and calyx (the
little green “cap” at the top of the fruit) that can prick your
fingers, so wear gloves when you harvest.
their mature
size (these are baby eggplants which cost a fortune in gourmet
stores) up to fully ripe. If you leave them on the vine too long,
they’ll become bitter. Keep up with harvesting to encourage
production, and use garden snips to avoid breaking the stems.
Eggplants have sharp, thorny growths on their stems and calyx (the
little green “cap” at the top of the fruit) that can prick your
fingers, so wear gloves when you harvest.
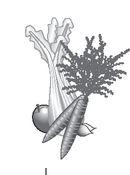
If you like eggplant, you might want to experiment with several different varieties, such as those in the following table.
Peas, Please
Natives of China (or maybe the Middle East), peas have been an important staple for thousands of years. But for most of that time, peas have been dried after harvest for later use. It wasn’t until sometime in the 1600s that a clever European snacked on some raw peas and started a whole new culinary trend.
Peas fall into three categories:
• Snow peas
• Snap or edible-podded peas
• Garden, shelling, or English peas
Each of these types is relatively easy to grow and makes few demands on the home gardener. Peas prefer a well-cultivated, neutral to slightly acidic soil, ideally with a pH of 6.0 to 6.7. If your soil is more acidic than that, the peas won’t mind too much. What’s far more important is that the soil be well drained. Although they must be watered well and regularly, peas hate to have wet feet.
Sow pea seeds outdoors in the early spring. St. Patrick’s Day is the traditional pea-planting time in northern zones. In zones 9, 10, and 11, peas are a winter crop. The seeds, which are tiny, should go in a shallow furrow about 1 inch deep and about 2 or 3 inches apart.
Snow Peas
Snow peas are the delicious edible pods so familiar in Asian stir-fry dishes. They require anywhere from 55 to 70 days from seed to harvest and should be picked when they’re still young, small, and flat.
Snow peas will climb pea netting or a small trellis about 2 to 4 feet tall, depending on the variety. Look for one of the newer stringless varieties when you buy seed.
It’s a Snap
Snap peas are more or less a cross between snow peas and garden peas and are grown for their edible pods. But the big difference between snap peas and snow peas is that the snap peas develop little peas in the pod. They’re usually eaten raw in salads or cooked in stir-fries. Some snap pea varieties are bushy and don’t require a support, whereas others climb a bit up netting or a trellis.
Pick snap peas just as the little peas develop. If the harvesting gets ahead of you, you can shell the snap peas just like garden peas, but they won’t have that sweet, delicate flavor.
A Garden of Pea Delights
There are dozens of varieties of garden peas from which to choose. These peas are also called English or shelling peas. They’ve been bred for early or late season harvest, so you might want to mix several varieties to stretch out the picking time.
Most garden peas grow from 1½ to 3 feet tall and need some support. Most prefer cool weather and rapidly die back when the weather gets hot. Some newer varieties have been bred to be more heat tolerant.
Pea Shoots, Pea Scores
Also called pea greens, pea shoots are delicate little tendrils that are becoming increasingly popular with high-end chefs and in-the-know gourmet cooks. They’re very hard to come by in regular grocery stores, and they’re very expensive in the specialty shops that do carry them. Their delicate flavor is a fresh and welcome addition to salads, and they make a very tasty garnish. Although their season is relatively short, and they won’t thrive in hot climates, you’ll be happy you made the effort to grow some extra peas just for their shoots.
To encourage pea plants to send out lots of shoots, start pinching back leaf buds on the plants when they get about 1 foot tall. Also pinch off the flower buds—but remember, no flowers, no peas.
Food for Thought
Oregon State University Extension (extension. oregonstate.edu—look at ardening Hints in the Gardening section) sells a publication devoted to growing pea shoots and also offers lots of helpful information in an online article.
The Least You Need to Know
• The cabbage family includes cabbages, cauliflower, broccoli, brussels sprouts, kale, and kohlrabi.
• Good-for-you kale can be harvested very late, even after a snowfall.
• Spinach bolts when the weather gets hot, so plant a second crop for fall harvest.
• Add some of the more unusual eggplant varieties to your garden repertoire.
• Grow peas for their delicate shoots as well as for the tasty pods.