Chapter 12
How to Plant
In This Chapter
• Making neat planting rows
• Garden hills and mounds
• Learn how to make furrows
• Tips for sowing seeds and transplanting seedlings
• Get into square-foot gardening
Now we get to the really fun part: planting outside! If you’re like me, you can’t wait to get your hands in the dirt—whoops, I mean soil.
In this chapter, we dig in and get our hands dirty. We look at various planting methods, including creating rows, hills, mounds, and furrows. I tell you how to plant seeds and transplant seedlings. And you learn all about square-foot and intensive gardening.
Planting All in a Row
My favorite vision of a vegetable garden is a tidy rectangle divided into neat rows of plants. Rows are orderly. They keep everything in place. They make sense. When your plants are set up in rows, you know what’s a weed and what’s supposed to be growing there.
It’s not hard to make garden rows, but it helps if you go back to your original garden plan. How many rows are you going to have? Will they run the length or the width of the garden? Or both ways? How wide will each row be? And how much space will you put between each row?
The answers to these questions depend on what plants you intend to grow. When you’ve made your selections, you’ll figure out how much space each plant needs and create rows to accommodate that amount of space.
Now with a little sketch plan, you can lay out the rows. Measure the length of each row, and use stakes and string to mark them. You could also use spray paint, but it doesn’t stick as well to soil as it does to grass. Chalk string that you snap against the soil so it leaves a mark is another approach.
Leave the stake and string in place until you’ve finished planting each row. This helps you keep your rows straight and your spacing the way you want it.
Planting in Hills and Mounds
In addition to planting seeds and seedlings in little holes in nice straight rows, you’ll probably plant some things in hills and mounds.
Hill Country
Crops like beans, sunflowers, and any other large seed can be planted in small hills spaced evenly along a row. A hill might be as small as 6 inches or as high as about 1 foot.
To create a hill, just scoop up a handful of soil in each hand, pull the handfuls together in one pile, and smooth it down. Then it’s ready for planting one big seed right in the center.
When scooping the soil, be sure you pull it evenly from all around the hill. You can even make a tiny moat around the base of the hill to trap water during dry weather.
Mounds and Mounds
A planting mound is a large hill of soil pulled up from the surrounding area to create a raised planting environment. Traditionally, mounds are used for growing big and sprawling vegetable plants like zucchini, cucumber, summer and winter squash, pumpkins, and melons. A mound might be anywhere from about 18 to 24 inches high.
A group of mounds with big vegetables like pumpkins and watermelons can take up a lot of space in a garden. If your space is limited, stagger the mounds in a zigzag pattern so you can fit more in.
To form the mounds, start with a well-prepared garden bed. Determine the spacing for your mounds based on the distances for the plant you’re putting in the mounds. Mark a midpoint for each mound. Then using a garden rake or a hoe, pull soil from the surrounding ground until it forms a pile. Be sure you take soil away evenly so there are no big dips around the mound, although a shallow moat at the base of each mound does help retain water in dry weather.

Prof. Price’s Pointers
An advantage of growing on mounds is that the loose soil they’re formed of allows for very good drainage. Planting on mounds also helps deter insects and protects against disease to some extent.
Flatten the pile a little on top and smooth the sides so the soil is evenly spread all the way around. Then follow the planting directions for each type of vegetable. Seeds or seedlings are generally planted in a circle or a triangle on a mound.
Planting in Furrows
A furrow is a shallow trench—a long, narrow hole with a flat bottom. Using furrows makes sense when you’re planting a lot of one kind of plant that requires a little more depth, like asparagus, rhubarb, turnips, and potatoes.
Make a furrow using a hoe. Mound the soil up on one side of the furrow to make it easier to push back in on top of the seeds or roots you put in the furrow.
Irrigation furrows are another story. These are trenches that are used to move water through the garden.
Planting Seeds One by One
Planting seeds one at a time can either be very satisfying or unbelievably tedious. I guess it has to do with your frame of mind. There’s something really basic and reassuring about making a little hole, dropping in a seed, filling the hole back up with soil, and firming it down with your hand.
Bean seeds are usually planted one by one.
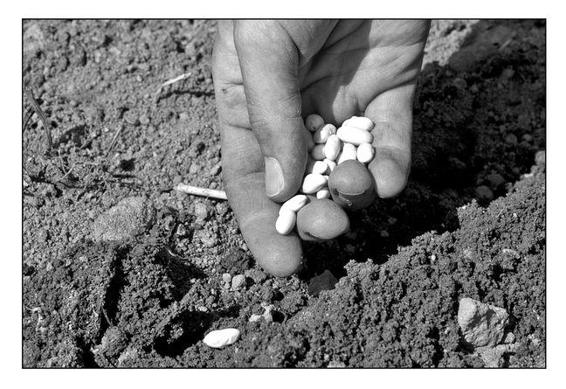
Some seeds—beans, corn, cucumbers, melons, and squash most notably—are quite large so handling them one at a time is easy to do.
When you plant one seed at a time, you have a lot of control over your spacing. But if many of the seeds don’t germinate or fail to grow well, you’ll need to replant in those spaces. This isn’t necessarily a bad thing. It’s just a kind of forced succession planting. (Succession planting is discussed later in this chapter.)
Food for Thought
Some seed sellers prepare seed tapes to make the job of planting easier than it already is. These tapes are long strips of biodegradable material with little seed packets strung out along the tape. To plant, just dig a tiny trench, gently bury the pe, water, and wait. This is a great way for kids to plant.
The Scatter Method
You’ve probably seen old paintings or prints of a charming rural scene with a farmer scattering seed across a field. This is a perfectly good method of sowing or broadcasting seed if you have lots of space and want large quantities of one kind of plant.
Keep in mind that broadcasted seed won’t necessarily space itself evenly in the garden, but you can thin out young seedlings that are too close together.
You can also scatter seeds in very confined spaces like a large pot or planting box. This is a great way to grow mixed lettuce varieties. Just fill your planting box, tray, or pot with soil and scatter a handful of seeds as evenly as possible across the surface of the soil. That’s it. You can thin any plants that are poorly spaced as you harvest young seedlings for your salad bowl.
The scatter method won’t work for seeds that need a soil cover. Be sure to check the information on individual seed packets before you start throwing seeds around your garden.

Garden Guru Says
You can sow some very tiny seeds like carrots and radishes by the scatter method. But because the seeds are so small, it’s difficult to get an even coverage. If you mix the seed with a little bit of dry sand and then scatter the seed, you’ll probably have more success.
Transplanting Seedlings
When transplanting seedlings, give them a little more care than you would seeds or already-established plants you buy in the store, ready to plant.
First, to ensure the health of your plants, transplant seedlings on an overcast day if possible. If you live near Prof. Price in San Diego, where there never seems to be a cloudy day, do your transplanting in the late afternoon or early evening when the sun is low in the sky. The point is to protect tender, new plants from a heavy dose of sunlight when they’re at a very vulnerable stage.
Dig a hole that’s about twice the width of the container you are transplanting, and the same depth. Be sure the sides of the hole are roughed up a bit. (Tender young roots will find it easier to push into than soil that has been made smooth by the blade of a spade or trowel.)
After you’ve placed the seedling in the hole, fill the hole with soil, gently pressing down all the way around. You want to be sure you haven’t left any voids that could fill with water and drown your seedling, and that the soil is evenly distributed around the roots.
Food for Thought
My dear friend Pat McKearn (who is also my former partner in our landscaping business) used to have a nifty way of avoiding working in the garden during the heat of the day. She wore a miner’s helmet that had a battery-powered headlight she could work anywhere in the garden well into the night without having to set she could work anywhere in the garden well into the night without having to set up floodlights. Gardeners may prefer one of the headband-mounted lights sold by L.L. Bean or in hardware stores.
Water all the seedlings well before and after transplanting. Some gardeners dunk the plant, pot and all, in a big bucket of cool water. Just don’t leave them there for too long or the roots won’t have access to air.
While you’re planting seedlings, pick off dead or damaged leaves, flowers, and any tiny fruits. This allows the plants to put all their energy into producing thick, healthy foliage that will, in turn, help the plant make plenty of its own food for later fruit production.
Some for Now Some for Later
Before the advent of railroads and interstate highways, consumers didn’t have access to fresh fruits and vegetables all year long. They could buy what was grown locally and had to accept the fact that strawberries were only available for a couple weeks in June or that once the beets were harvested, that was it. Everything is different now. We can have anything we want just about anytime of year, thanks to the global marketplace.

Compost Pile
The issue of food traveling around the world to wind up on our tables—and the resulting carbon imprint that transportation makes—is one of the reasons so many Americans are turning to growing their own food.
If you want to grow your own food, you’re still limited to the nuances of the growing season where you live and garden. But with some ingenuity, you can stretch the harvest time. With repetitive or relay planting of the same vegetable over the course of several weeks, you can have a staggered and drawn-out harvest.
For example, in early spring, you might plant a row of lettuces. A week later, plant another row, and plant another row a week after that. As one row matures and is harvested, the other two continue to grow. So instead of all your lettuce maturing at once, it’s stretched over many weeks. Some plants, like lettuce and spinach, can also be planted in the spring and then again in the fall.
Some of the plants that work well with repetitive planting include the following:
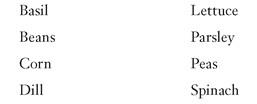
Plants with a long growing season, such as tomatoes, melons, and pumpkins, aren’t good candidates for repetitive planting. To extend your harvest period, plant several varieties of these plants with different growing times, and you’ll be able to pick for weeks instead of days.
Success with Succession Planting
Even with lots of effort and many repetitive plantings, some plants just peter out and are finished early in the growing season, leaving you with empty space in the garden. It’s a shame to waste that space. That’s where succession planting comes into play.
Native Americans were the first to practice this method of planting. They planted “the three sisters”—corn, beans, and squash—together on the same hill. The corn grows up at about the same rate as the beans, and the beans use the corn as a kind of living trellis. The squash grows at the base of both the beans and corn, keeping the soil cool and shading out weeds. The beans mature quickly and the plant dies back as the corn begins to ripen. The squash continues to grow happily below. It’s a beautiful relationship!
Another good example is planting beans with peas. The peas go in very early in the spring. While they’re growing, you can plant beans among them. By the time the beans begin to grow, the peas are finished for the season and the beans climb up over the poles or netting.

Prof. Price’s Pointers
Succession planting is planting different crops with differing rates of maturation in the same spaces at the same time; or the same crop, but different varieties with different maturation rates, at the same time; or two or more types of crops with different maturation rates planted at the same time; or the same crop but planted at timed intervals for successive harvests.
Planting onion sets among larger, slower-growing plants to be harvested young as scallions before they start to interfere with their larger neighbors is a good example of interplanting, which is very similar to succession planting.
For successful succession planting, be sure the plants you use have the same nutrients, pH, and moisture requirements.
Square-Foot Gardening
We looked at square-foot gardening briefly in Chapter 2, so let’s take a closer look now.
Square-foot gardening is frequently done as a raised bed, although that’s not a requirement. The garden is laid out in 4×4-foot sections (or squares of similar dimensions). Each of these sections is then further divided into 1-foot squares. The sections are best marked with string and little stakes. (Popsicle sticks work well.)
Each square is designated for a plant or type of plant. For example, lettuce might go in one square with a mixture of radishes and carrots in another. A third square would provide space for a few onion sets, and the fourth one could be planted with three or four basil plants. Or you could devote four squares for one tomato plant.
Square-foot gardening …
• Provides efficient use of space.
• Requires careful planning.
• Requires loose, fluffy, rich soil.
• Requires regular fertilizing.
• Results in cooler soil due to intensive planting.
• Requires less watering than gardens with exposed soils.
• Has fewer weeds.
This approach to gardening is ideal for gardeners with limited space and time.
Planting in Mulch Cloth
Mulch cloth is a layer of plastic fiber material used to create a planting environment that warms the soil, retains moisture, and deters weeds. The cloth creates a barrier that plants can’t break through, which is how it keeps weeds from growing. But if weeds can’t grow there, how will your vegetable plants?
Here’s how:
1. Using a measuring tape, or your own good estimation, measure your spacing.
2. With stakes, spray paint, chalk, or stones, mark the spots where each planting hole will go.
3. Using a utility knife, cut an X in the cloth, fold back the cloth, dig a planting hole with a trowel or your hand, insert the seedling, and tamp down the soil.
4. Fold the flaps of mulch cloth back down around the seedling, but just away from the stem.

Garden Guru Says
It’s easiest to plant seedlings, as opposed to seeds, in mulch cloth. Small mounds with a couple seeds, like zucchini or melons, work well with mulch cloth, too. But rows of seeds would require a long slit in the cloth, which is not ideal.
Later in the season, when the weather has warmed up considerably, spread mulch on top of the mulch cloth to help keep the soil temperature from rising too high and “cooking” your plants.
The Least You Need to Know
• Neat garden rows help you keep track of what’s a vegetable and what’s a weed.
• Vining and sprawling plants grow well in mounds.
• Make furrows for rows of plants that require a deeper planting hole.
• Transplant seedlings after the sun goes down to help them get a good start.
• You can use square-foot gardening in small spaces to get the most bang for your gardening buck.
• Maximize garden efficiency with succession planting.
• Planting in mulch cloth helps keep down weeds.