Chapter 9
Tilling and Toiling
In This Chapter
• Preparing the soil for your garden
• Tips for removing grass
• A look at Rototillers
• The benefits of double-digging
• The pleasures of plastic mulch
• The advantages of raised beds
Up to this point, getting the garden ready has been a lot more thinking than doing. But now you have the opportunity to really get your hands dirty. Preparing the soil and getting it ready for planting is pretty important—some might even say it’s more important than all the learning and planning you’ve done so far. The quality (and quantity) of the work you do at this point helps determine the quality of your garden and the quantity of the produce you grow in it.
In this chapter, we go over the steps to take for killing and removing sod where you want to start your garden. We also look at various methods of preparing the soil for maximum friability and fertility. And we explore some of the options to consider when it comes to creating planting beds.
Preparation Is Everything
It’s impossible to overemphasize the importance of well-prepared garden beds. The health and fitness of the soil is as important to the future of the plants you grow as is the health and fitness of your body to the way you live. After all, the soil provides the support and the nutrients the plants need to survive and flourish. So be sure to give it your best shot. You’ll have plenty of time to make improvements, but why not start out with the best you can create?
If you do it right, right from the start, you won’t have to make up for mistakes later on. And the beauty of it is, if you do prepare quality beds from the get-go, you won’t have to do all that really difficult work again. Any necessary improvements or adjustments will be comparatively easy.
Unsod It All
If your future garden space is nothing but bare soil, skip to the next section. But if you’re creating a new garden space in an area that’s currently lawn, you need to remove the grass.
Lawn, or sod, covers vast parts of America, and most homes, especially new ones, are surrounded by acres of green grass. But to grow a successful garden, you have to get rid of at least some of it. Lawns, after all, are responsible for all kinds of pollution: noise and air pollution from lawnmowers and water pollution from fertilizer runoff.
The Old Paper Trick
This is the low-energy, low-impact approach to grass killing, and it’s a favorite of many organic gardeners. After you’ve finished all the plotting and planning tasks, and you’ve staked out your garden, you can begin.
You’ll need lots of old newspapers and some big stones or several wood boards. The amount of newspapers and rocks and the length of board depend on how big your garden plot is.
Place sections of the paper, about ⅛ to ¼ inch thick, opened at their midpoint, on the grass, and weight the paper with stones or boards. Cover every inch of the space with papers, and secure the paper thoroughly. Then walk away. For a long time. Eventually the grass will die. It can take many months, but if you’re not in a hurry, nature will do most of the work for you.

Compost Pile
Common wisdom used to suggest that you remove the comics and advertising pages from newspapers prior to using them in the compost or for lawn killing. It was thought that the colored ink could leach out into the soil and might not be the healthiest additive. The U.S. Composting Council now suggests that most inks used in today’s newspapers are nontoxic. If you still have your doubts, call your newspaper.
Alternatively, you can hold the newspapers in place with a thick layer of manure, rinsed seaweed, salt hay, grass clippings, compost, leaves, or soil. When the lawn is dead, you won’t need to remove anything from the area and can simply move on to the next step, which is tilling. The newspapers and the organic material on top will be well on their way to decomposing.
The kill-your-lawn-with-paper trick is a good one to try in late summer or early fall. Leave the papers in place through the winter and by spring, the grass should be nice and dead.
This technique is best for small to medium-size gardens. If you’re planning a very large garden, use another method.
Doing Some Heavy Lifting
As low energy as our first grass-killing option is, this next method is hard on the body. I’ve seen many a burly landscaper get weak in the knees at the thought of some heavy sod busting. Digging up the lawn is tough, physical labor, but if you’re in decent shape and your garden space isn’t overwhelmingly large, it’s an inexpensive method, and one that will get the job done in a matter of hours, or at the most, days.
And speaking of burly landscapers, this is one of those times when a hired hand might make a lot of sense.
Here’s how to dig up the lawn:
1. Use a spade with a sharp blade to cut through the grass, being sure you get down deep to where the roots are. Work across the space with an overlapping pattern so you don’t miss any bits of sod.
2. After cutting through the sod, remove the clump and place it to one side.
3. Dig down one more spade depth, and place that soil back in the hole.
4. Return the clump of sod to the hole, roots side up, exposing the roots to the sun and air. You want the soil that clings to the roots to dry out a bit before the next step.
5. Finally, shake any excess soil from the clumps back onto the soil surface, and throw the clumps on the compost pile.
When you’ve finished digging the entire space, you should have an evenly distributed surface.

Compost Pile
The last time I dug a garden bed myself, I wound up with terrible blisters on the bottom of my right foot—the foot I used to push the spade into the sod. If you’re trying this method, use a spade with a small lip at the top of the blade that spreads out the point of impact on the foot. And wear sturdy boots. Flimsy shoes just don’t cut it.
Hand-digging a garden takes a lot of time. I spent the better part of an entire weekend (and I’m talking 8 hours or more each day) to dig a 6×30-foot bed in rich, loamy soil. And I was in pretty good shape back then. Plan on needing much more time if your soil is hard and rocky, and if your lawn is thick and healthy.
Cut It Out: Sod Cutters
Yet another method for removing unwanted sod is with a contraption called a sod cutter. There are two types of sod cutters: the gasoline-powered machine and the distinctly low-tech kick-type.
The heavy-duty machine looks a little like a power tiller but instead of having tines on rotary blades, it’s fitted with sharp, flat blades. The machines are usually self-propelled. As they move across the sod, the blades penetrate the sod and cut through just below the roots. The grass is cut in long strips which you can roll up and use to make new lawn somewhere else.
A kick-type sod cutter looks like an old-fashioned plow handle with a flat metal blade attached where the plow blade would go. Just above the blade is a metal bar that you step on as you push the cutter forward. Your weight pushes the blade below the grass in a forward-cutting motion.
After you cut the sod, you must still turn the soil, either by hand digging or with a tiller.
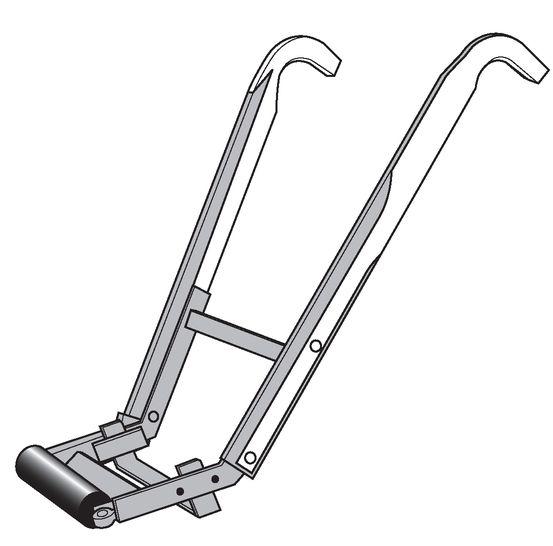
The kick-type sod cutter looks a lot like an old-fashioned plow without a plow blade. This method of sod busting requires heavy physical labor.
(Illustration courtesy of Quail Manufacturing)
Few home gardeners need to actually buy a sod cutter unless they plan on creating lots of new beds over a long period of time. These tools are usually available to rent from equipment rental businesses.
Taking Advantage of Tillers
There are times when machines make so much sense. The preparation of a large garden is one of those times. Rotary tillers, commonly known as Rototillers, are a wonderful invention, and you should definitely take advantage of one if your garden plans run to many hundreds of square feet or more. Even if your garden space is a small one, a Rototiller will cut your preparation time substantially.
Prof. Price’s Pointers
The first rotary tillers were horse-drawn steam engines used by German, French, and Swiss farmers in the late 1850s. In 1910, Konrad von Meyenberg, a Swiss inventor, was granted the first patent for the kind of tiller we use today. In 1932, C. W. Kelsey, an American distributor of Swiss-made tillers, trademarked the name Rototiller.
Tillers are machines with a couple sets of rotary tines or blades attached. The engine turns the blades that dig through sod and deep into the soil, turning it over and breaking it up. Some of the large, gasoline-powered tillers are self-propelled and can be used for cutting through sod and tilling expansive areas of ground.
Some smaller tillers have electric engines and are much easier to handle than their larger counterparts. The Mantis Tiller, for example, advertises its ease of use with photos of a diminutive woman guiding the machine with one hand. These small versions are not meant for really heavy soil preparation. Instead, they’re best used to turn cleared ground or to cultivate an already prepared bed, between rows, for example.
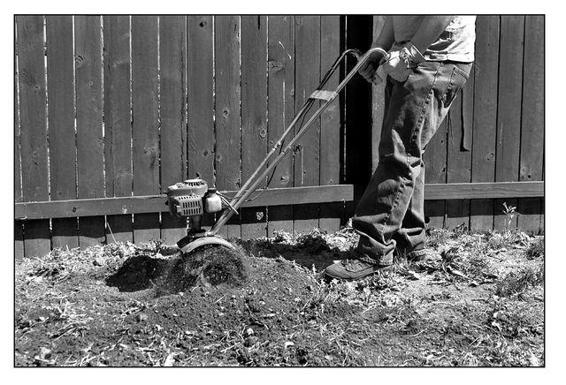
This small tiller is just the right size for turning over the soil in this good-size garden.
©iStockphoto. com/Baxternator
When using a large tiller, exercise caution. It can kick up and back when the blades hit a buried rock, root, or stump. And the blades are very sharp. My husband still has a scar on his leg from a run-in with a tiller more than 20 years ago.
Removing Obstacles
With all the sod cut, it’s time for the next step: removing debris, rocks, roots, and clods of leftover grass. An efficient way to do this is to rake through the dug bed with a sturdy garden rake, pulling all the undesirable material to one spot. At that point you can go through the pile by hand, tossing out rocks and roots and shaking loose any soil that’s clinging to the clumps of sod.
Food for Thought
Back in my obsessive bed-making days, I would sift the soil through a homemade screen made of rat wire attached to a frame of 2×4s. The rat wire was just the right size mesh to allow the soil to pass through without releasing the stones, roots, and so on that I hate to have in garden beds. Although a very time-consuming task, I think it was worth every minute. To this day, the texture and consistency of my soil is nearly perfect.
Double-Digging
This classic soil preparation technique all but guarantees great soil. But be prepared: it’s time-consuming and really hard on the old back.
You’ll need a sturdy, sharp spade; a spading fork; and a wheelbarrow or garden cart. In addition, depending on the quality of your soil, you might need quantities of compost, well-rotted manure, or peat moss.
Here’s how to double-dig a garden:
1. Divide your garden space into sections about the width of your spade blade. Your work will be a bit easier if you make your sections across the shorter length of the garden.
2. Using the spade, dig a 6- to 8-inch-deep (or as deep as the layer of topsoil) trench the length of the first section.
3. Place the soil from the first section in the wheelbarrow.
4. Break up the subsoil with your spading fork, going down as far as you can. About 1 foot deep is ideal, but if your subsoil is very hard, just do the best you can. Remove any loose rock.
5. Add a 2- to 4-inch layer of compost, rotted manure, or peat moss to the bottom of the trench.
6. Repeat the process in the second section. But instead of placing the topsoil in the wheelbarrow, put it in the first trench on top of the peat or compost.
7. Repeat this process in each section, each time placing the topsoil from the current trench in the previous trench. In the last trench, use the topsoil from the wheelbarrow.
8. Finally, dress the top of the entire bed with a couple inches of compost or well-rotted manure.
9. Mix the top dressing with the top few inches of soil and rake smooth.
Double-digging is really hard work, but the payoff is a high-quality garden bed—one that will help plants thrive.

Garden Guru Says
When you’ve completed double-digging and your garden bed is ready for planting, avoid stepping on the soil. You want the soil to remain light and fluffy, and walking on it will compact it, undoing all that hard work you did. When planting seeds or seedlings, lay a wide board along the row you’re working on, and stand or kneel on the board. This spreads out your weight over a wider area, keeping compaction to a minimum.
Using Sheet Mulch in the Garden
If weeding the garden makes you crazy, you might want to consider installing plastic mulch or mulch cloth after you’ve prepared your beds. Although not particularly pretty, this material greatly reduces the need for weeding. This is one of Prof. Price’s favorite planting techniques.
Shiny black plastic sheeting was the standard many years ago. And although it works well enough, it does have its disadvantages. It rips easily, water and air don’t penetrate so the soil underneath is compromised, and it’s really ugly.
Mulch cloth is the next-generation material, and it’s a big improvement. It’s a finely woven mesh fabric, usually black, sold in large rolls. Because it’s mesh, air and water can pass through to the soil beneath, but it’s still dense enough to prevent sprouting weeds from penetrating. The weeds are also robbed of light so they don’t grow.
To install mulch cloth, simply lay it out over your prepared beds. Overlap the edges by several inches to ensure that no soil is exposed. Secure the edges with rocks, boards, or metal U-shape pins. Or bury the edges in a shallow trench around the perimeter of the garden. (Planting in mulch cloth is discussed in Chapter 12.)

A large vegetable plot is easier to maintain with black mulch cloth covering the long planting rows and keeping out weeds.
©iStockphoto.com/Marty Heitner
If the idea of plastic anything in the garden rubs you the wrong way, take heart. Some clever Earth-friendly inventors have figured out a way to make a heavy paper film, manufactured from recycled materials, you can use instead.
Raised Beds (Not for Sleeping)
Raised bed gardening is a time-honored technique ideally suited for gardeners with serious soil problems, drainage issues, space limitations, time constraints, or physical disabilities. Plants grown in raised beds live in soil that’s above the natural level of soil in the garden. Some raised beds are actually large containers, while others are simply beds of soil.
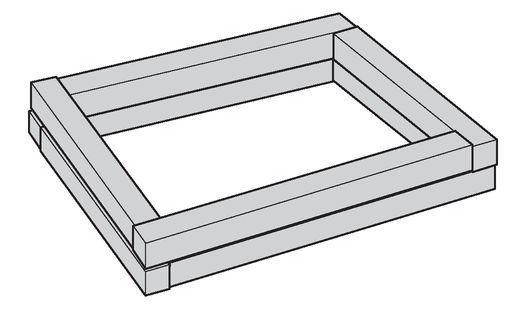
Railroad or landscape ties hold together a raised bed and give it a neat, tidy appearance.
Sick Soil Solution
Your soil might be unacceptable for gardening for any number of reasons: contamination from pollutants, poor drainage, too much rock, too much sand, too compacted, or not enough soil.
Instead of doing a complete overhaul of the soil, which in the case of contamination might not actually be possible, consider installing a raised bed or even a collection of raised beds.
Space- and Time-Saver
If your garden space or the time you have to work in the garden is severely limited, growing vegetables in a raised bed could work for you because you can grow plants intensively (planted very close together) in high-quality soil.
Weed control is easier in the confined space, and watering takes less time than in large gardens.
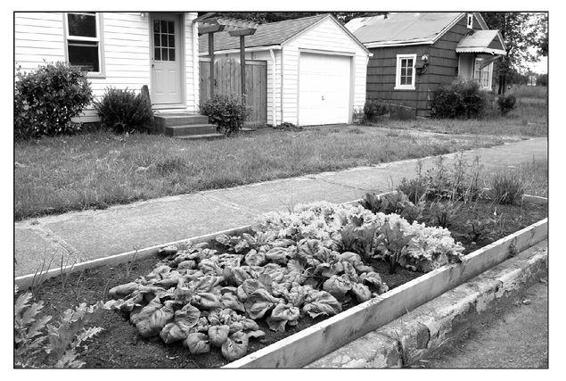
This raised bed along a curb takes advantage of space that’s usually relegated to grass.
Easy Access
Raised garden beds built up to wheelchair or waist height enable the disabled or those with knee or back problems to enjoy the pleasures of gardening. These raised beds are generally constructed of wood like a table with sides. It should be high enough for a wheelchair to fit underneath and should be a bit narrower so reaching the center of the bed is not too much of a reach. For wheelchair access, be sure the surfaces surrounding the beds are smooth enough for the wheelchair to glide across.
Making Your Bed
To build your raised bed, follow the same steps for staking out the garden (see Chapter 6). The bed or beds should be narrow enough for you to reach all the way to the center from one side; 4 or 5 feet is about right. The length is up to you.
Kill any grass in the space. Loosen about 6 to 12 inches of the soil using a spade or spading fork. Then bring in enough soil to create a planting depth of 12 to 14 inches. You can buy good-quality topsoil by the truckload or in bags. Rake out the soil until it’s a smooth, flat mound.
If you’ve determined that your soil is contaminated, dig out about 12 inches of soil and remove it. Replace that 12 inches of soil with new, clean soil and add another 12 to 14 inches worth to create the raised bed.
Enclosing a raised-bed garden with walls helps hold the soil in place and can give it a neat, even architectural appearance. Railroad ties or landscape ties, treated wood boards, or even cinder blocks are frequent choices for raised bed enclosures.
Garden Guru Says
The soil in a raised bed usually warms faster than ground level soil and tends to dry out faster. In the hottest part of the summer, plan on watering raised gardens more frequently than standard garden beds.
Amen to Amending the Soil
There is such a thing as perfect soil, and you have the opportunity to create it now. You’ve tested the soil, examined its texture, and determined the drainage situation. If you’ve discovered any problems, you can fix them. Do it at this stage of the game, after the soil has been tilled but before you’ve planted one seed, and you’ll save yourself a world of trouble.
Now is the time to add the ingredients you need to raise or lower the pH, make the soil lighter, or improve drainage. Now is also when you can add compost, rotted manure, or fertilizer to boost the richness of the soil. Just dump it on top and mix it in thoroughly. For large quantities, you’ll probably want to give it a quick once over with the tiller again to be sure everything is thoroughly combined. But if the amounts are small, spreading it all around evenly with a rake is fine.

Prof. Price’s Pointers
Rotating the kinds of plants you grow each year in your garden beds helps avoid depletion and deterioration of the soil because different plants use more of certain nutrients than others. If you plant the same kind of plants year after year in the same spot, the nutrients are depleted.
The Least You Need to Know
• Before planting your garden, take the time to prepare your soil by removing the sod.
• A mechanical tiller can help you prepare the soil, but always exercise caution when operating a tiller.
• Taking the time to double-dig a garden bed can help create the optimum growing environment.
• Using mulch cloth in your garden helps reduce weeds.
• Raised beds can be a good solution to many gardening woes.
• Whether you plant a raised bed or not, always enrich your soil with compost or well-rotted manure.