Chapter 6
Plotting and Planning
In This Chapter
• Ways to delineate your garden borders
• Plotting your garden with graph paper and a ruler
• Take it to the next level with stakes and string
• Where’s the water?
• Good fences make good gardens
• A walk along the garden path
The plotting and planning stage of gardening is probably the least fun, especially for Type-A personalities who like to get things done, fast. This work can be time-consuming and—well, let’s face it—dull. But it can make a big difference in the quality of your garden. Skip this phase, and you’ll most likely make mistakes that will result in a garden that could have been better. The good news is, you really only have to do this stuff once.
In this chapter, you learn how to lay out the perimeter of your proposed garden in situ (right there on-site). Then you can use graph paper to make a scale drawing of the garden and a plot plan that will serve as your planting guide. After that, you stake out the garden, giving yourself (or your hired hands) a blueprint for digging and making paths. Then you can decide what kind of fences to use, the type of paths you want, and if and how to allow for an irrigation system.
Laying It All Out
Now that you have a general idea of how much space you’ll need for the kind of garden you intend to have, you’ll want to lay it out. This step is helpful because it allows you to see exactly how your garden fits in your overall landscape, how convenient (or inconvenient) it will be, and if, in fact, you’ve allowed enough space—or made it too big!
The easiest way to lay out the garden is with an old hose (or two or three, depending on how big your garden ideas are). Place the hose on the ground where you plan to situate the garden. You can create corners by sinking stakes and shaping the hose at right angles around the stakes.
When you have your garden shape outlined with the hose, make a semi-permanent outline. The best way to mark your space is with landscaper’s spray paint. This neon orange paint is readily available at landscape supply stores or places like The Home Depot or Lowe’s. Spray the paint right along your outline. (Be prepared if you get
Garden Guru Says
Most vegetable gardens are rectangles or squares, although no rule says you can’t make it a parallelogram, a circle, or even a hexagon.
paint on the hose: it is permanent.) Remove the hose, and there you have it—the layout for your future garden. Use the orange line to keep the digging you’ll do within the framework you’ve planned and as a guideline for setting up fencing.
If you find that your first attempt at laying out the guidelines isn’t going to work, simply mow the spray-painted grass and start over again.
Implementing Graph Paper and Ruler
Frankly, this next phase of the design is the part I don’t particularly like. During the years I ran a landscape design business, my partner did most of the drawings, and that made me very happy. But unless you’re very good at visualizing the garden you want to create, don’t skip this basic groundwork.
You’ve already decided where the garden will go and how big it will be (see Chapters 2 and 5). And you’ve created a basic layout using the old garden hose trick. Using graph paper and ruler, now it’s time to design the actual plot plan that describes where the entry will go, where paths and walkways will be placed, the location of any irrigation elements, and the placement of each plant variety.
To draw your garden plan, you need graph paper (any scale will do); a sharp pencil; sharp colored pencils or colored markers; a ruler or straight edge; and a flat surface like a desk, table, or kitchen counter.
Now just follow these steps to make a scale drawing of your proposed garden:
1. Determine your scale. The simplest way is to have one square on the graph paper represent a certain number of square feet in the garden.
2. Plot out the square footage by counting off the squares on the graph paper. For example, if you’re planning a rectangular 20×50-foot garden, and your scale is 1 graph paper square per 1 square foot of garden, count off 20 squares across and 50 down. Mark the beginning and the ending points.
3. Use the pencil and ruler to draw lines connecting the marks.
4. Count off squares within your framework to determine the placement of fence posts, gates, arbors, paths, and any other hardscape elements you want to incorporate.
5. Count off more squares to measure specific planting areas. Use square footage needs based on seed packet information or the estimates you can find in Part 4.
6. Use the colored pencils or markers to indicate different planting areas. Make a key for yourself on the plot plan so you know what plant or group of plants each color represents.
7. Indicate where irrigation system elements will be positioned. (You might want to share your plot plan with the irrigation specialist if you hire one to install a system.)
8. If you’re including an electric fence, note where the source of electricity should be.
Prof. Price’s Pointers
The hardscape is the collection of structural elements in the landscape. Walls, fences, walkways and paths, gates, arbors, and buildings are all part of the hardscape.

Food for Thought
If the old paper-and-pencil style of design isn’t your thing, look for garden design software. Many programs are devoted just for vegetable gardens, and a few are free to help you design your garden spaces.
When you’ve completed your scale drawing, you’re ready to move on to the next step, staking out the garden.
Staking Out Your Garden
With your plot plan in hand, you can stake out your garden more precisely. If you have spray-painted the outline of the garden, you can go right to placing stakes at the corners and running string between the stakes. (If you have a garden with a curved outline, spray paint is your best option.) If you skipped the hose and spray paint option, you need to do some measuring before you put in your stakes. And if you’re a complete fly-by-the-seat-of-your-pants type, just stick the stakes in any old place, or just start digging.
With your corner stakes in and the perimeter outline marked with string, you can stake and string the entry and any paths you plan to create. If you plan to have grass areas between growing rows, stake them out, too. Also use stakes to mark where irrigation system elements will be placed and where the electric current will enter the space in the case of an electric fence.
Be sure to refer to your plot plan as you stake, but be prepared to make alterations as you go along. Even the best garden designs can be changed for the better at this stage. And don’t forget to make the changes on your plan as well as on the ground for future reference.
At this stage of the game, you might want to go ahead and do your heavy digging. This is the critical part of the job where you remove sod, turn the soil, and improve it. We look at this step in depth in Chapter 9. From this point on in this chapter, we assume that you’ve dug the garden.
Advance Planning for Irrigation
It would be wonderful if we could grow edibles without worrying about watering. It never works out that way, though. And because some vegetables and fruits require great quantities of water to produce, some form of irrigation might be the only option.
If you’re going to install an underground irrigation system, or even just piping for a hose bib (the plumbing equipment that allows your hose to attach to the water source) in close proximity to the garden, this is the stage at which you lay the underground piping. It can be done later in the game, but it’s best to do it now, after the garden is dug but before anything is planted. (If you want to skip ahead, turn to Chapter 19 to review the various irrigation options.)
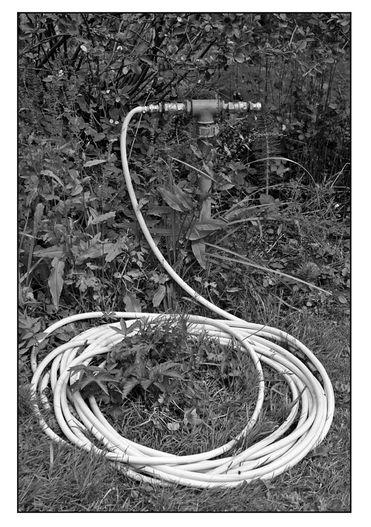
A hose bib close to the garden saves you tiresome wrestling with hoses—or worse, hauling watering cans.
©iStockphoto.com/Pawel Hawrot
Do Fence Me In
Putting fences around your garden is a good idea for a couple reasons. The number one reason is to keep out marauding animals. A fence around the garden plot is also a safety measure to protect children and pets, whether they’re yours or the neighbors’. And an attractive fence is the best way to keep the sometimes-untidy appearance of a productive garden out of sight, especially in a formal or otherwise well-manicured landscape.
To select the right kind of fence for your garden, first determine what you want the fence to do. If deer are a big problem, the height of the fence is an important factor. Digging animals need another solution. To make the vegetable plot an integral part of the backyard, a well-designed decorative fence might be the right choice.

Compost Pile
Many municipalities and homeowners’ associations have strict regulations about fencing, including height restrictions and materials allowed. Be sure to check with the appropriate governing bodies before installing fences on your property.
No matter what kind of fence you use, be sure to devise an entry to the garden. The entry point should be at least 3 feet wide, but you might want more room than that, depending on how you’ll use and maintain the garden. If necessary, make your entry large enough for your garden tractor, cart or wheelbarrow, mower, and any other equipment you might want in the garden.
Simple Fencing Solutions
The most basic garden barrier is nothing more than a roll of wide wire fence material or plastic mesh strung between wooden or metal stakes. The stakes are set into the ground at intervals around the perimeter of the garden. You need to secure the fencing to the stakes somehow, either with twist ties or wire. Or if you’re using wooden stakes, fasten the wire with heavy-duty staples.
These kinds of fencing aren’t pretty, but if the look of the garden isn’t an issue, go for it.
Food for Thought
To keep digging animals like rabbits, moles, voles, and dogs out of your garden, place wire fencing or plastic mesh below ground level. Dig a trench along the perimeter of the garden; you might have to go down as much as 1 foot. Then attach your fence material securely in the soil every couple inches with steel pins or use metal rods, flat metal bars, or strips of wood to hold the fencing in place. Curve the bottom of the fencing outward slightly to make it even more difficult for the pesky critters to tunnel under. Be sure to factor in the underground portion when you measure how much fence material you’ll need to buy. You can add this underground insurance to any style of fence you install.
Another simple option is a chain-link fence. Also not pretty, and certainly not as inexpensive as wire or plastic mesh, chain link is usually less expensive than wood, PVC, or decorative metal fences. And it’s very sturdy and durable.
Attractive Fencing Options
If the look of the garden is important to you, you might want to opt for a more decorative fence. You can choose from a broad range of styles and materials. You can find do-it-yourself fences with elements available at home and garden centers; component fences with mix and match elements; and custom-made fences.
The style of decorative fence you choose is all a matter of taste. If you only want the fence for decorative purposes, you won’t need any modifications. If, however, you want an attractive fence that also serves as a barrier, you might have to modify it with wire fencing or plastic fence tacked on to the inside perimeter.
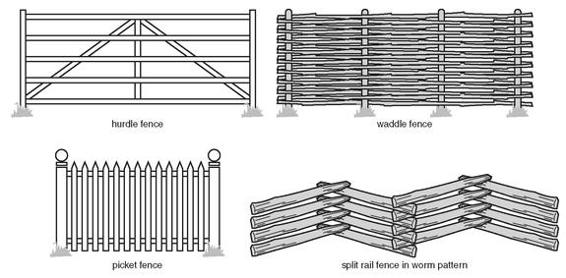
You can use one of a variety of fences to fence in your garden.
Here are a few decorative fence styles you might want to consider:
Hurdle fences, developed in England, were originally movable wood fences. They feature upright end posts, four or five thin rails, an upright center post, and two diagonal posts forming a triangle at the center.
Post and rail fences are generally made of wood but are also available in PVC. Each section consists of two upright posts with two, three, or four cross rails. Cross rails are usually round or squared. The crossbuck variation is similar to the hurdle fence but has two rails forming an X between the top and bottom rails. The rails either fit into notches in the posts or are attached with nails or screws.
Split rail fences are slightly more rustic than the post and rail style, with the split rails more roughly hewn. Generally there are two, three, or four rails, which are chamfered at the ends and fit into slots on the posts.
Stacked split rail fences come in many variations, including worm, snake, Virginia, Vermont, crooked rail, rick rack, and zigzag. All are made of rails stacked on top of each other. Some are supported by sunken posts, others by posts that form Xs. Still others have no posts at all.
A picket fence is the old-fashioned cottage fence. It comes in hundreds, if not thousands, of forms ranging from standard stock pointed pickets to hand-crafted styles. Usually picket fences are made of treated, stained, or painted wood. They’re also available in PVC.
Food for Thought
In the eighteenth century, English landscape architects developed a landscaping style that turned its back on traditional formal gardens and focused on nature. This naturalistic approach included the creation of artificial lakes and woods and grand vistas. But because most English estates were also working farms, keeping animals out of planted areas, including kitchen gardens, became paramount. To avoid having fences ruin the views, the landscapers built ha-has to contain the sheep and cattle. Essentially a ha-ha is a deep ditch with a stone retaining wall or a wire fence set into the ditch. The device is still in use at many of Britain’s great estates.
Stockade fences are narrow, picketlike, and are usually constructed of roughly hewn boards set flush one next to the other. These fences are secured across the back by horizontal boards attached to posts set in the ground. They’re usually available in 4-, 5-, 6-, or 8-feet heights. Tall stockade fences cast shade, so these are best for large gardens where some shade won’t matter.
Thatch fences hail from the days of thatched cottages in England. Thatch fences are made of bundles of twigs and small branches tied together with wire, rope, or vines and formed into panels. The panels are attached to twiggy posts and set in the ground. They’re very decorative.
Wattle fences originated in England and were also used by early American farmers, including George Washington. The wattle fence was made of willow branches woven in a basket weave pattern between upright sticks. In Asia, some are also made of bamboo.
Fences made of PVC are long-lasting and durable. The PVC is made to look like picket, post, and rail fences.
The powder-coated wire fence is an inexpensive barrier fence that’s better looking than plain wire or plastic mesh. It’s also easy to install.
Wooden fences can last up to 20 years if they’re made of treated wood. Cedar and red-wood are the most durable, followed by Douglas fir, spruce, and pine.
An Electrifying Situation
When my parents had their large wooded property, an electric fence around the perimeter of the planted areas was essential. Until the fence was installed, the deer ate themselves silly. If deer are a problem in your area (that would be just about the entire Northeast, as well as other large areas of the country), you might want to consider an electric fence.
Be prepared: electric fences are not pretty, and they don’t come cheap. But if you’ve devoted a lot of time and energy into growing vegetables, you don’t want to be providing fancy feasts for Bambi and his friends.
Most homeowners will call specialists to install an electric fence on their properties. If you elect to do it yourself, be sure you know what you’re doing.
Prof. Price’s Pointers
There’s a science to spacing and setting fence posts. For excellent step-by-step instructions, go to hometime. com/Howto/projects/fence/fnc.
Contact with an electric fence is, by design, uncomfortable. The recommended voltage is 4,000 or higher. If young children have access to your fenced area, this could be a dangerous situation. To protect them, and yourself, you might want to consider other fencing options or be sure to have an adult on hand when children are playing on property that has an electric fence installed on it.
Down the Garden Path
Unless your garden space is really tiny, you’ll probably need to have some kind of paths or walkways in it, even if they’re nothing more than the spaces between rows or planting beds. A path inside a garden should be at least 2 feet wide; 3 feet is even better.
People have written whole books about garden paths and walkways (including me!—Paths and Walkways [Friedman/Fairfax, 1997]), so if you’re really interested in this topic, check out a couple. In the meantime, consider the options discussed in the following sections.
Packed-Earth Paths
The packed-earth path is the path of least resistance. After you’ve stripped the sod from your garden space (see Chapter 19), simply leave the spaces you’ve designated for paths as is. Over time, the soil will become compacted from being walked on, which helps keep weeds from sprouting.

Compost Pile
The growing and maintaining of grass lawns, including paths, is a big contributor to air, water, and noise pollution. So you might want to give very careful thought to how much grass you allow to grow in your vegetable garden.
Grass Paths
Very large gardens often have grass paths and walkways, just because it’s a lot less work to leave some of the sod in place than to strip it all. Grass paths are an attractive foil to planting beds.
But grass paths do have to be mowed and watered. Be sure the path is wide enough to accommodate your mower. You don’t want to wind up mowing vegetables by accident.
Mulch Paths
A thick layer of some form of mulch on top of a bare, packed-earth path is easy to maintain and has a neat, clean appearance. Use wood chips, pine bark, salt hay, seaweed, or even grass clippings.
This type of path does take some maintenance, though. Over time, as the mulch gets worn down, you have to replenish the mulch.
Fancier Path Solutions
If you’re hoping to create a more formal garden space, you’ll most likely want to design paths with a decorative touch. Grass paths work in a formal situation, but other materials such as these can be quite nice, too:
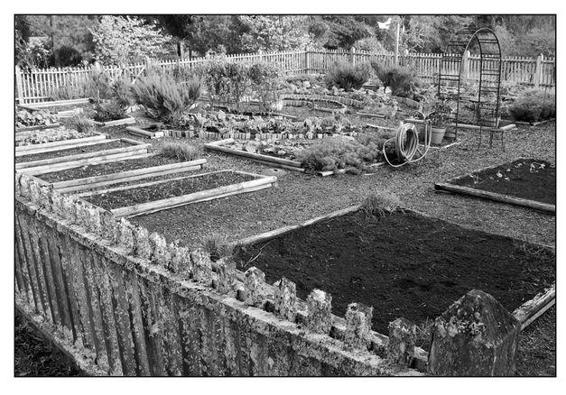
This well-organized garden features gravel paths that keep it neat and tidy.
©iStockphoto.com/James Camp
In the next chapter, we look more closely at how the garden path works in the overall design of a garden.
The Least You Need to Know
• To plot your garden space, you can use spray paint and a garden hose to determine the borders of your garden.
• Drawing a plot plan on graph paper before you start digging helps keep you on track.
• Use stakes and string to determine planting areas, entry points, and paths.
• Plan an irrigation system before planting.
• Select a fence style that meets the needs of your garden.
• If you want garden paths, build them with materials that suit your style of gardening.