Chapter 24
Harvest Time
In This Chapter
• When and how to harvest
• Tips for extending your harvesting season
• The basics of putting up foods
• What to do with 100 zucchini
It’s finally here, what you’ve been waiting for all season: the harvest! It’s the gardener’s big reward.
In this chapter, we look at some of the ways you can determine ripeness and some techniques for harvesting. We also talk about how to preserve and store the fruits and vegetables you’ve grown so you can enjoy the bounty for weeks and even months after the harvest. And finally, we explore some of the ways you can spread the wealth by sharing the food you’ve grown yourself.
The Ripeness Test
Many factors contribute to the process of ripening. Plant varieties, soil and air temperature, day length, rainfall or irrigation amounts, stress, even insect infestation or disease can all make a difference on the rate of growth and ultimately ripeness.
Prof. Price’s Pointers
The ripening of fruit involves many metabolic changes including the conversion of starch to sugars; the breakdown of cell walls and of chlorophyll; and the synthesis of other pigments, such as anthocyanins (red) and carotenoids (yellow and orange). Ripening in many (but not all) fruits is associated with a spectacular rise in the rate of respiration, or cliacteric. These metabolic and respiratory changes very strongly depend on temperature, which is why refrigerated fruits ripen very slowly.
Usually, we talk about ripeness with regard to fruiting plants such as tomatoes, eggplants, and peppers and for fruits like melons. It’s actually pretty easy to figure out whether or not they’re ripe. Common sense helps. But there are a few rules of thumb to consider before deciding whether something is ready to be picked.
Fruiting Vegetables
Tomatoes, unless they’re one of the heirloom or exotic varieties, should be evenly red, with maybe just a little green or yellow at the top where the fruit meets the stem.
Eggplants and peppers should be shiny and firm, but not hard, with well-developed color. You can pick red, orange, or yellow peppers when they’re still green. Green peppers won’t change color but will eventually rot if you leave them on the vine too long. If you’re growing several varieties of peppers, be sure to place markers so you’ll know which plants are which.

Garden Guru Says
You can pick tomatoes before they’re fully ripe. And if the weather turns very hot, you might want to do a thorough harvesting of unripe good-size tomatoes and let them finish ripening on a sunny windowsill. Or you can fry or pickle green tomatoes.
To harvest fruiting vegetables, use a pair of clean, sharp garden snips or kitchen scissors. Cut just a bit of stem with the fruit. Avoid sawing or hacking at the stem (which happens when using a dull tool) because that can cause damage, making it easier for insects or disease to enter the wound. Clean your snips with alcohol between each cut, or at least between each plant to minimize the risk of introducing disease.
Strawberries and Melons
Strawberries should be all red with little or no white at the stem end. Most people pick strawberries with a little thumbnail action. Take the entire berry stem, cutting it off where it meets the main stem. This helps the berries stay fresher longer.
Did you ever thump a watermelon in the supermarket to determine whether it’s ripe? You chose one that “sounded” right only to find it was still hard as a rock inside? Even the experts recommend the thump test, but you’ll have a better idea if you know more or less how many days the melon is supposed to take from seed to harvest and how large it’s supposed to be at maturity. Add that information to the fact that ripe watermelons have a little patch of yellow on the skin where the fruit meets the ground and have that slightly hollow sound when you give them a thump.

Food for Thought
For more specific harvesting information on many of the plants we have covered in this book, go to www.urbanext.uiuc.edu/tog/harvest.html or aggie-horticulture. tamu.edu/extension/harvest/harvest.html.
Bigger Isn’t Always Better
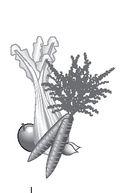
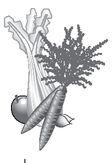
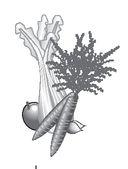
When I go to our local Grange and 4-H Fairs, I always visit the vegetable exhibits where area gardeners and 4-H kids get prizes for the biggest tomatoes and pumpkins. Sometimes bigger is better. But often, the smaller veggies have superior flavor. Of course, you can grow dwarf varieties or small versions of all kinds of vegetables, including cherry and grape tomatoes, carrots, patty pan squash, watermelons, and others.
Some standard-size vegetables can be harvested when they’re still very tiny, yet fully formed, as mentioned earlier in the book. These tasty “baby” vegetables can command high prices in the produce department, but they won’t cost you a penny more to grow in your garden. The following table lists some of the best vegetables for harvesting young and the best time and size to harvest them.

If you plan to harvest lots of “baby” vegetables, you might want to add extra plants. It takes many more tiny beets or eggplants to fill your dinner plate than normal-size ones.
Late Harvests
As you might have figured out after reading the chapters devoted to how to grow various edibles, some plants have a drawn-out harvest period.
If you’ve planted in relays (that is, made additional sowings of the same plant over a period of several weeks), or if you’ve made spring, summer, and fall plantings, you can probably count on a longer harvest period.
There are additional methods for giving the home gardener extended and late harvests of some of their favorite edibles, including the following:
• Use floating row covers, after the fruit has set, to hold in heat and protect plants from early frosts.
• Make mini-greenhouses over your garden rows with wire or wooden frames and plastic sheeting.
• Plant a crop of smaller things like lettuce, arugula, tender herbs, mini carrots, and radishes in a cold frame.
• Cover individual plants with cloches or bell jars when the temperatures dip. Remove them when it gets warmer.
• Bring a few things inside (especially herbs).
• Build a greenhouse.
Food for Thought
Garden writers Eliot Coleman and Barbara Damrosch grow organic vegetables year round in their tunnel-style greenhouse using only heat generated by the sun. And they do this in Maine! Coleman has written a book, Four Season Harvest (Chelsea Green Publishing Co., 1992) with details on how they have accomplished this amazing feat.
If you expect an unusually early frost and don’t have the time or inclination to build shelters for your garden, you can improvise. I’ve covered the plants I wasn’t willing to sacrifice to early frosts with sheets, blankets, beach towels, tablecloths, drop cloths, shower curtains, and even newspapers. On many occasions, I was able to add several weeks to my gardening season with my eclectic plant covers.
You can also extend your harvest by planting things that don’t mind spending a little time in the cold. You might recall that some vegetables like brussels sprouts, kale, spinach, and chard can be harvested after the first frost, and some, like rutabagas, turnips, winter squash, and pumpkins actually have a richer flavor after they’ve been exposed to some cold.
Handle with Care
Some plants—cabbage, cauliflower, carrots, turnips and parsnips, radishes, leeks, onions in particular—are harvested whole. You either cut or pull them right out of the garden and discard (or, preferably, compost) the parts you don’t want.
But many plants—beans, peas, tomatoes, peppers, eggplants, lettuce, zucchinis, and strawberries, to name a few—are harvested in stages. Many of these plants produce fruit over the course of several weeks, so the attentive gardener might have the opportunity for (or the chore of) daily harvesting.

Compost Pile
Always wash your hands before entering the garden to harvest, or any time for that matter. It’s not a bad idea to wash again between visits to different types of plants. This might seem hypercautious, but it can help avoid spreading disease in your garden.
With this kind of extended harvest period, you must take great care not to damage the plants you pick from. Never yank or tug on a fruit to remove it from the stem. If the fruit doesn’t release after a slight twist of the wrist, use your garden snips or kitchen scissors to cut it off. With peas and beans, use your thumbnail to cut through the tiny stem that attaches the fruit to the vine.
While you’re harvesting, be on the lookout for signs of disease or infestation. Examine the undersides of leaves, pick off insects, and remove damaged leaves and fruits. In addition to carrying a basket for your harvest, take along a plastic bag, like the ones your newspaper is delivered in, to collect anything yucky. Then dump it in the trash after you’ve finished your picking.
Try to harvest on dry days and late enough in the day that the dew is gone. Harvesting in the early evening is a good time, too, especially right before you start making dinner. You’ll have the very freshest produce that way.
Food for Thought
One way to harvest lettuces and other greens such as spinach, kale, chard, beets, and collards is by thinning young seedlings to the desired distances between plants in a row. You can use these tender young thinnings for salad. Later, you can continue to harvest individual leaves from plants without disrupting their growth. Just be sure to only take a few from each plant so it’s left with enough foliage. You should never take more than about ⅛ or so of the leaves of an individual plant until it’s time to harvest the whole thing.
Canning, Freezing, and Drying
There’s something extraordinarily satisfying about having a pantry full of jams, jellies, relishes, and pickles you’ve prepared yourself from the bounty of your garden. In the summer of 1977, back when I had my really big garden in New Jersey, I took a course on canning at the Rutgers University Cooperative Extension. It was a half-day affair during which I learned how to “put up” foods.
That summer I made strawberry and cherry jams, mint and apple jellies, bread and butter pickles, and dill pickles, and I put up dozens of jars of tomatoes. It was glorious. I later learned from my mother, who had never in her life made jelly or pickles, that her mother had taken the very same kind of course from the cooperative extension in Connecticut back in the 1920s. I felt an incredible sense of connectedness to my roots.
In this section, we look at some of the options you have for putting up food. Keep in mind that whatever method you try, use only the best and fully ripe fruits and vegetables and those that are free of blemishes and signs of insect damage or disease.
Can It!
Canning fresh produce is a great way to preserve the bounty from your garden. And it’s not all that difficult. The key is safety. You need to know what you’re doing or you could wind up poisoning your family and friends. If you can’t take a class at your local county extension office or adult education school, or if you don’t have a friend or relative who is willing to teach you, go online for excellent step-by-step instructions. There’s been an enormous renewed interest in this subject recently, so you should be able to find thousands of websites. The university county extensions are among the best bets.
There are several basic canning methods. With cold pack, you put uncooked food into canning jars and then process them. Hot pack involves putting cooked food into canning jars and then processing. If you’re pickling, you combine cooked or uncooked food with a vinegar solution, then process. For conserving, you combine fruit products with sugar (and sometimes pectin) and then process.
The pickling process raises the acid level in the preserving jar to a level that’s inconsistent with the growth of bacteria, yeasts, molds, and fungi that cause spoiling—and possibly illness. Because of their naturally high acid content, most tomatoes can be canned without adding anything to them, although some people add a little lemon juice or citric acid. They are usually processed in boiling water for a specific amount of time.
Food for Thought
Eating produce you’ve canned from your organic garden is about as green as you can get. Your food hasn’t been trucked in from miles away, you haven’t driven to the store to buy it, you’ve conscientiously avoided Earth-damaging products and practices, and you’ve packaged it in reusable containers. Good for you!
Some varieties of tomatoes have been bred to have reduced acid levels, which might be kinder on some people’s stomachs. However, lower acid levels make these varieties poor candidates for canning. Know your tomato varieties before you can.
Canning vegetables other than tomatoes requires a different process—one that’s done in a pressure canner. And even if you add as little as a garlic clove or a sprig of basil to your tomatoes, you’ll need to do those in a pressure canner as well.
Freeze!
If you plan your garden well, you can freeze enough food to last all year in the freezer. And for those who are just a little afraid of the canning thing, freezing is the way to go.
Just about anything you grow can be frozen. Some things need to be cooked first, whereas other vegetables can be frozen after a quick blanching (which is basically a short boil in water, followed by a quick bath in ice water to stop the cooking process).
The following table tells you what you need to do before freezing some of the vegetables we’ve covered in this book.
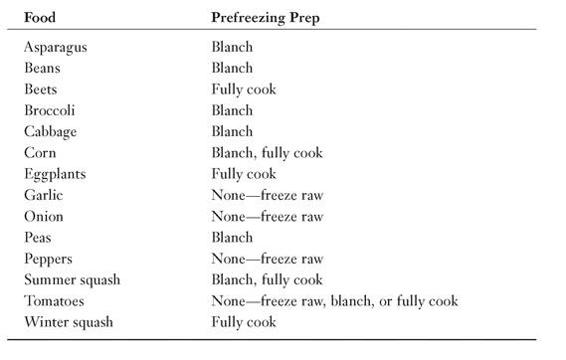
Most vegetables only need to be blanched for 1 to 3 minutes. To stop the cooking process, put the blanched vegetable in a bowl of ice water, drain, and dry before freezing. For a complete list with detailed instructions, visit www.ochef.com/617.htm.
All Dried Up
Humans learned to dry food very early in our collective history. For thousands of years, it was the only method we had to preserve food. You probably learned in grade school how Native Americans dried berries, corn, fish, and thin strips of meat to help them survive during difficult times.
Drying food became a lost art until the back-to-nature movement of the late 1960s. Since then, more people have been trying it. My old neighbor Frank Pinello made sun-dried tomatoes on racks on his terrace one summer. They were quite delicious.
Tomatoes and various fruits are among the easiest things to dry, but enthusiasts try drying just about any vegetable. It takes a lot of effort, and failure is common. The important elements to success are high heat, low humidity, and adequate air circulation. Open-air drying is the most difficult method and the most prone to failure. Simple solar dryers have more success, while electric dehydrators are probably the best way to go. If you’re really interested in trying this method of food preservation, go online to find one of the many websites with details on how to do it.
Garden Guru Says
Root cellaring and cold storage are two more options for preserving food. To learn more, visit www.extension. umn.edu/distribution/horticulture/DG1424.html. Check out the chart on vegetable storage requirements.
Sharing Your Bounty
There are lots of jokes about gardeners searching for ingenious ways to dispose of an overabundance of zucchinis or eggplants. That’s a success problem we’d all like to enjoy. But sometimes we’re blessed with more produce than we can manage to eat, can, freeze, or give to our neighbors and coworkers. So what do we do with it?
If you’ve given away fresh vegetables and fruits from your garden to everyone you know and you still have too much, think about donating some to a local food bank or homeless shelter. These places are often delighted to be able to offer fresh food to their clients, who usually subsist on canned or packaged items. Some food banks also accept fresh food that you’ve frozen yourself, especially if they know you and you’ve labeled the item with the contents and the date it was frozen.
Plant a Row for the Hungry, a national public service campaign started in 1995 by the Garden Writers Association of America, encourages gardeners to grow a little extra each year to share with needy neighbors. To find out more about this organization go to www.gwaa.org. Many organizations, communities, and states have their own version of this type of program. Look online to find such an organization near you, or your county extension office might know of a program in your community.

Compost Pile
No matter how much people like to receive a gift of fresh produce from a gardening friend, no one wants an overweight zucchini. Those huge green hulks that look like caveman clubs are best thrown on the compost pile. Then take a look at them as they rot to remind yourself to harvest early and often.
If you still have way too much harvest to handle, think about setting up a little roadside stand. Bill and Jane MacDowell, who have an extraordinary organic garden in my community, put their excess produce on a stand at the end of their driveway with an honor box for people to pay for what they take. Then Bill and Jane donate the proceeds to a local wildflower preserve.
And if your garden produces prolific amounts of gourmet-style vegetables and herbs, you could let some of your local restaurants, caterers, or specialty markets know about it. They might want to give you all kinds of money for your fancy fresh stuff.
The Least You Need to Know
• Know your varieties and their approximate maturity times so you can estimate a harvest date.
• Use clean, sharp garden snips or kitchen scissors to harvest stem fruits.
• Harvest when the garden is dry to avoid spreading diseases.
• By canning and freezing foods, you can enjoy your harvest for months.
• Think about sharing your harvest with friends, neighbors, and those who might not have enough to eat.