Chapter19
Weeding and Watering
In This Chapter
• Identifying and eliminating weeds
• Why plants need water
• Strategies for conserving water
• Irrigating your garden
This is the decidedly dreary part of gardening. Weeding and watering are time-consuming, boring, and tedious tasks. Weeding is particularly onerous, especially when it’s hot and buggy. It’s a lot like housework (which I loathe) because it never ends. Just as there are always dirty dishes and laundry, unmade beds, and dust and dirt in the house, there are always weeds in the garden. These are dirty jobs, but someone has to do them.
In this chapter, we analyze this essential garden work and look at ways to make it easier. Along the way, we identify the worst weeds, talk about mulch and herbicides, and explore various irrigation systems. We also look at some practices that will make your efforts more Earth-friendly.
What’s Wrong with a Few Weeds?
You’ve probably heard the expression “one man’s trash is another man’s treasure.” That’s sort of the case with weeds. One gardener’s weed is another’s wildflower. Many of the worst noxious weeds were introduced at some point by gardeners who thought they were pretty.
Native wildflowers can be beautiful in a meadow but a royal pain in the neck in the vegetable patch. Some really invasive plants like kudzu and purple loosestrife were initially planted because someone liked the way they look. But then they ran amok, with sometimes devastating results.
Prof. Price’s Pointers
A weed is a plant that grows in a place where it isn’t wanted or a plant with unacceptable qualities. A noxious weed is one that grows rampant in places where it’s not wanted and is resistant to efforts to remove it.
Although a few weeds in the garden are inevitable, gardeners should strive to eliminate as many of them as possible. Weeds compete with your edibles for water, nutrients, growing space, and sunlight. They also provide hiding places for insects and can be a contributing factor in the spread of disease. Weeds can and will reduce the quality and quantity of your harvest.
Even though we hate weeds, they can serve an interesting purpose for the home gardener. Some are known as indicator weeds because they start to appear with certain soil conditions. If you begin to see a big crop of chickweed, for example, it might indicate that your garden has a problem with poor drainage. The following table lists some indicator weeds that show up with certain soil conditions.

Weed ID
Far too many weed plants plague American gardens to allow us to profile all of them in this limited space. Fortunately, a number of excellent websites with well-designed weed identification formats show you photos of the plants and identify them by name, type, and growth habit. Some of the sites also provide eradication advice.
Check out these websites:
njaes.rutgers.edu
www.weeds.iastate.edu
www.garden.org/weedlibrary
www.css.cornell.edu/WeedEco/WeedDatabase
www.ppws.vt.edu/scott/weed_id/cropweeds.htm
www.ipm.ucdavis.edu/PMG/weeds_common.html
Some of these sites are specific to regions or states, but many of the weeds profiled are found all over the country, so you should be able to identify the culprits in your garden with only a few site visits.
Here are a few of the most common weeds:


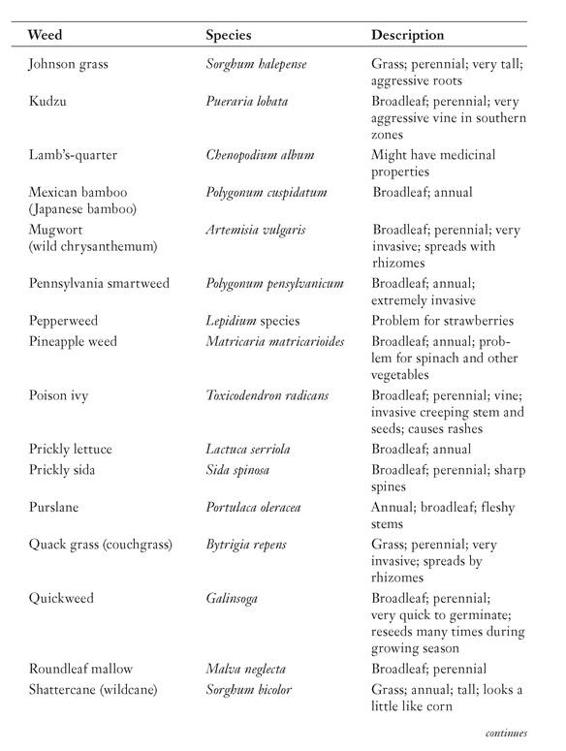

Not every one of these weeds will appear in your garden, but some inevitably will. Be prepared.
Saying Good-Bye to Weeds
The best defense against weeds is a good offense. You can gain the upper hand by starting out with a well-prepared bed. If the bed is thoroughly and deeply tilled, with all the old vegetation removed, you have fewer seeds to start with.
Food for Thought
Weeds aren’t a huge problem in my small Pennsylvania garden because the beds were established a long time ago, and I spent a lot of time early on preparing the beds and keeping them weed free. I removed unwanted plants (weeds) before they had a chance to go to seed so new crops never became established. A few weed seeds do blow in on the wind or are deposited by a visiting bird, but these are incidental and don’t require much effort to keep under control. The only time I have real weed problems is when I reclaim a bit more lawn for a new bed.
Weed Between the Lines
Even with a strong weed-free start, you still have to deal with any weeds that crop up. Weeding is an age-old chore that doesn’t take a lot of skill. Just effort. In a small garden, you can probably manage by hand-pulling weeds. This isn’t such an awful task if you do it in the cool of the early morning or in the evening. Wear your gloves and pull out the invaders. Or scratch lightly along the surface of the soil with a hand cultivator. But be wary of tap-rooted weeds. Get out your weeder tool for them. (This is the one that has the V-shape point on the end.)
If the weeds you’ve pulled have gone to seed, dispose of them in the trash or in a place far from your garden rather than on your compost pile. There’s a good chance the seeds will survive in the compost, so when you add the compost to your garden soil, you’ll simply reintroduce the weeds, only more of them.
In a larger garden, weeding by hand isn’t a practical option, unless you don’t do anything but garden all day and night. Instead, use some kind of cultivating tool like one of the hoes described in Chapter 4.
You need to attack weeds between rows as well as in the rows, but use different techniques for each space. Between rows you can be pretty aggressive and just whack away at the weeds. But when you’re working around plants, you have to be really careful. Overzealous weeding with a cultivating tool can damage vulnerable roots and stems. Just scratch the surface lightly to loosen the weed and pull it away from the planted row. For good garden hygiene, remove the uprooted weeds.
The Beauty of Mulch
Mulch goes a long way toward reducing weeding chores. It provides a barrier over the surface of the soil that prevents seeds from working their way into the soil, and it also keeps out light, which is essential for any seeds that have somehow managed to germinate. Mulch has the added benefits of keeping moisture in the soil (so you may be able to use less water) and preventing soil from overheating.
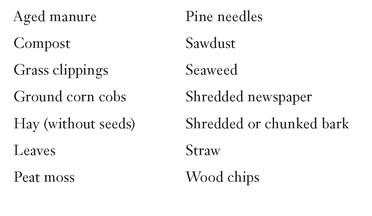
Generally mulches are inorganic or organic. Organic mulches are those that are made of plant material. Here are some examples:
When applying organic mulch, lay it on thick, but don’t let it touch stems or leaves. Always leave a little space around the stem, and be sure to lift any leaves laying on the ground so you put the mulch on top of the soil, not on top of the leaf.
When using organic mulches, you might risk lowering the nitrogen levels in your soil because the soil uses existing nitrogen in the decomposition process. You might have to add more nitrogen to compensate.
Using rich compost as mulch not only helps retain moisture and keeps weeds down, but also adds important nutrients to the soil as it breaks down.
©iStockphoto.com/SebastianCote

The most common inorganic mulches are plastic sheeting and mulch cloth. Thousands, if not millions, of gardeners, including Prof. Price, have used black plastic mulch successfully.
Garden Guru Says
Some vegetables work in the garden as a sort of living mulch. These are the plants that sprawl across the ground and wind up shading and crowding out weeds. Melons, squash, potatoes, sweet potatoes, pumpkins, and large tomatoes do this.
Clear plastic sheeting helps retain moisture but won’t inhibit weed growth—in fact, just the opposite. Weeds thrive in the moist, warm environment created by the plastic and get plenty of sunlight, much like in a greenhouse. Black mulch cloth keeps weeds in the dark so they can’t photosynthesize and, thus, cannot thrive.
A 2002 study done by scientists at Pennsylvania State University Plasticulture Center showed that the use of different colors of plastic mulch resulted in increased yields for some plants. For example, tomatoes and eggplants prefer red mulch, peppers like silver, cantaloupes responded better to green or dark blue, as did cucumbers and summer squash, while potatoes did well with red, silver, or black. Although not available everywhere, some gardeners are beginning to use these new colored plastic mulches to boost production and hasten ripening. Virginia’s Cooperative Extension office offers a list of sources for colored plastic mulch at www.ext.vt.edu.
Killing Weeds with Chemicals
Some gardeners won’t touch herbicides with a 10-foot pole, and I tend to stay away from most of these chemicals. But I do admit that if it weren’t for Brush-B-Gon Poison Ivy Killer, I’d be an itchy wreck all summer.
Herbicides may have their place. When used properly, some may not have a negative impact on the environment, and they can greatly reduce the time you need to remove unwanted vegetation. The most important role herbicides play is in the development of new beds. You can use an herbicide to kill a large section of grass before you till it. And spot applications on really difficult-to-remove weeds, especially those with tap-roots, is sometimes the only way to be sure you really kill the blasted things.
Three basic kinds of herbicides are used by home gardeners:
• All-purpose herbicides kill any plant they touch
• Selective herbicides kill specific plants
• Preemergents prevent germination
Roundup, Kleenup, and Kleeraway are three of the better-known all-purpose herbicides. The active ingredient in many of the all-purpose herbicides is glyphosate. According to a water conservation bulletin from the Arizona Cooperative Extension, glyphosate decomposes quickly, so you can use it in an area where you plan to put a new bed and plant a week later.
Dacthal is one of the best-known selective herbicides, with clorthal-dimethyl (DCPA) as its active ingredient. This one is a preemergent designed to kill annual grasses and broadleaf weeds. It’s used on planted beds, whether they’re seeded or if seedlings have been planted. Very specific usage instructions spell out when to use, how much to use, where it can be used, and how far from vines, stems, and leaves it can be used. Follow the directions exactly.
Treflan is another popular preemergent. It’s used on prepared beds before planting. According to the label, it’s a selective herbicide that prevents the germination of specific broadleaf and grass weed seeds, including such pests as Johnson grass, crabgrass, carpetweed, chickweed, lamb’s-quarters, and pigweed. It also kills purslane, so if you plan to grow that particular type of fancy lettuce, don’t use Treflan in your garden.
If you plan to use commercial herbicides, do so with extreme caution. Keep children and pets away from treated areas, and store the containers in a secure place.

Food for Thought
A number of organic herbicides have begun to appear in garden centers in the past few years. Most are made with a combination of ingredients such as vinegar, acetic acid, yucca extracts, citric acid, mineral oil, and clove and garlic oils. A study done by the University of Minnesota Extension found that, after doing initial damage to the weed plants, the products tested had little to no lasting effect and most of the plants recovered. So it appears that the greenest method of dealing with weeds is the old-fashioned one—weeding.
Why Plants Wilt
Why do plants wilt? The simple answer is that they don’t have enough water. But the scientific answer is that they lose turgor. Prof. Price gives us a complete explanation:
Think of a tomato plant as a balloon filled with a salty solution and attached to a tube (the roots) that’s sitting in a bucket (the soil). A filter (the osmotic membranes) in the tube allows water but not salts to pass through.
The activity of the water is decreased by the presence of salts. Because the activity of the water in the bucket (the soil) is greater than that in the balloon (the plant), water will try to move from the bucket into the balloon. The result is an increase in water pressure (osmotic pressure) within the balloon (the plant), causing it to fill up and stiffen (become turgid).
So if the balloon (the plant) develops holes and leaks, the balloon collapses. This collapse would also happen if salt were to build up in the water in the bucket. The collapse is the loss of turgor, or wilting.
Now you know why plants wilt, but why it is so devastating to a plant? It’s not really that complicated. Remember in Chapter 10, you learned that to photosynthesize, plants had to be able to pull carbon dioxide from the atmosphere. And they did that through the tiny holes in the leaves called stomata. But these thousands of holes also lose water. It’s like a catch-22 for plants. They need those holes to make chlorophyll (photosynthesize), which is essential for their growth. But they lose a lot of their precious moisture through those same holes. To survive, plants must have a continuous supply of water.
Irrigation 101
Plants can’t survive without a continuous supply of water. In a perfect world, we would have enough rainfall during the growing season to provide just the right amount of water to meet the needs of all our garden plants.
But it almost never works out that way. Here in Pennsylvania, we have had a series of severe droughts for several summers in a row. Our droughts have been so bad that local and state governments have instituted emergency water restrictions on several occasions. Conscientious gardeners have had to develop strategies for irrigating their gardens while honoring the restrictions. This means careful attention to water conservation techniques.

Compost Pile
Avoid watering your planted garden with a light sprinkling. The water does nothing more than moisten the surface of the soil. None penetrates to the roots, and the plants will die of thirst.
The University of Georgia Cooperative Extension Office has prepared some very useful water conservation tips. These recommendations, along with suggestions from other experts, include the following:
• Use mulch to hold in moisture.
• Add organic matter to the soil to aid in moisture retention.
• Make individual plant waterers to direct water directly to plant roots using milk jugs or soda bottles. (Find directions for making these online.)
• Remove weeds thoroughly.
• Use a drip irrigation system to avoid loss of water through evaporation of surface moisture.
• Settle newly tilled soil with a light application of water so future waterings will conduct the moisture properly.
• Water before 8 A.M.
• Keep hoses, hose bibs, and nozzles in good repair.
• Pay attention to weather reports, and turn off automatic timers if rain is predicted.
• Don’t irrigate areas of the garden that have been harvested.
Drip or Trickle Systems
Drip or trickle irrigation systems are a relatively new technology that helps conserve water while providing garden plants with just the amount of moisture they need to thrive. Essentially, the system is a set of hoses with emitters (holes that allow a spray of water out) or a set of soaker hoses, that you snake through the garden, The emitters are set intervals that match the spaces between plants. Usually drip systems are connected to timers. The initial investment is relatively high, and there is a fair amount of effort needed to install a system.

Prof. Price’s Pointers
Prof. Price uses soaker hoses in both his California and his Massachusetts gardens. Soaker hoses look more or less like regular hoses except they’re usually black and are made of a squishy porous material that allows water to seep out slowly, rather than drip irrigation hoses with emitters that release water at intervals. One end of the hose is attached to the hose bib, and the other is capped. Soaker hoses are best used where plants are relatively close together, such as in a row of vegetables.
Look for excellent instructions for installing a drip irrigation system in your garden from the Colorado State University Cooperative Extension at www.ext.colostate.edu/mg/files/gardennotes/714-irrigating. Cornell also has a very useful article at www.nysaes.cornell.edu/pubs/ask/irrigation.html.
Overhead Sprayers
Many gardeners rely on overhead sprayers. Some are as simple as a sprinkler head set up on a pole with a hose attached to it. Others are more elaborate systems with heads that pop up out of the ground. All can be attached to timers. You can use rotary heads, which require high water pressure, or spray heads that require less pressure.
This may be the easiest way to irrigate your garden, but it has its issues—mostly, but not exclusively, waste. Sprinklers are difficult to target so they wind up watering everything, including paths, fallow areas, and even the lawn along side your garden bed. With rising concerns over water conservation, this practice is coming under increasing scrutiny.
Another serious problem with spray irrigation is that the water lands on leaves, flowers, and fruits, which can promote rot, attract insects, and invite disease.
Important considerations include the size and shape of the area you want to irrigate, your water pressure, and the patterns of irrigation you want to use. The University of Rhode Island offers a wealth of information, including a helpful schematic and advice on spacing formulas, system designs, and more, at www.uri.edu/ce/healthylandscapes/dripirrigation.
Prof. Price’s Pointers
In warm weather, most edible plants require 1 to ½ inches of water per week. In very hot weather, plants might need as much as 2 inches of water per week. A good rule of thumb is that 1 inch of water equals about 60 gallons per 100 square feet. Use this to help you plan your irrigation schedule.
Watering by Hand
A very small garden or a container garden of edibles can be effectively watered by hand using a hose with a wand or with watering cans. The wand helps you reach farther in the garden and is usually fitted with a nozzle that allows you to adjust flow and choose from multiple spray options. Look for one with an on/off latch so you can have complete control of the flow.
If you like watering cans, be sure to use one with a good rose on it. The rose is the part of the spout that has little holes in it to form a fine spray of water. You don’t want to water tender little plants with a blast of water from the can.
When watering by hand, be sure to target the root zone and avoid splashing leaves, stems, and fruit as best you can.
Turn Off the Tap
Even without drought conditions, environmentally concerned gardeners make an effort to use as little water as possible. There’s no getting around the fact that plants need water and the gardener must provide it if Mother Nature is being stingy, but drawing water from a private well or community source must be done with the knowledge that there isn’t an endless supply. Savvy, conscientious gardeners look for ways to use water that might otherwise go down the drain or run off into uncultivated areas.
A growing number of people, particularly those in drought-prone areas, are using rain barrels placed at downspouts to collect water for irrigation. Many rain barrels available now come equipped with filters and spigots and are very efficient. According to an article on HarvestH2O.com, the U.S. Environmental Protection Agency says that a rain barrel has the potential to save 1,300 gallons of water during peak summer months. The barrels are commercially available, or you can find plans for making your own at HarvestH2O.com or www.cityof bremerton.com/content/sw_makeyourownrainbarrel.html.
Collecting water runoff from your roof and gutters for use in the garden is an Earth-friendly way to conserve water.
©iStockphoto.com/SuzanneCarter-Jackson

If you decide to use a rain barrel, be sure to use a childproof lid. Also, if you live in a high-traffic area, have a copper or asphalt roof, or have treated your roof with chemicals to deter moss or algae growth, you may want to have the runoff water tested to be sure it doesn’t have a dangerous level of contaminants. In addition, the University of Rhode Island website suggests that rain barrel water not be used for overhead spray watering, not be used just before harvest, and that all fruits and vegetables watered with rain barrel water be washed with potable water prior to eating.
Look for opportunities to collect water in other places as well. What about the shower water that usually runs down the drain while you wait for it to heat up? The dehumidifier collection container? Water from flower vases? The water you use to clean vegetables and fruit prior to cooking or serving? Pot water from cooked vegetables and pasta? Even the condensation lines from your air conditioner. Don’t, however, use the gray water from the washing machine or from bathing.
The Least You Need to Know
• Keep garden beds well weeded to ensure healthy plants and a good harvest.
• Use mulch to conserve water and keep weeds at bay.
• Provide your plants with plenty of water.
• You have many options when it comes to irrigation.
• Look for ways to save and store water so you can conserve this valuable resource while meeting your plants’ needs.