Chapter 11
Seeds and Seedlings
In This Chapter
• Jump-start the growing season indoors
• A look at cold frames
• Starting seeds outside
• Selecting seedlings
• Establish seedling time frames and support systems
In this chapter, we finally arrive at what many consider the best part of gardening—planting seeds. Here we focus on starting seeds indoors and the steps to follow to take them from seed to healthy young plants.
We learn about starting plants from sets, crowns, and plant divisions, and we also talk about what you should look for when you buy young vegetable seedlings. We also look at cold frames that help extend the growing season. This chapter finishes with information on when to plant your seedlings outdoors and how to create support systems for your new plants.
Sowing Seeds Indoors
Gardeners who live in Florida, Southern California, and other warm spots won’t need to spend much time with this part of the chapter. But if you live where it gets cold, pay attention.
One of the reasons gardeners start seeds indoors is to get a jump on the growing season. It’s also a great way to save money because seeds are a lot less expensive than plants, even young seedlings.
Some seeds take many weeks to germinate and then many more weeks to produce ripe fruit. Consider, for example, a growing season (that is, when it’s warm enough to plant tender plants without risk of frost) that doesn’t start until May 15. So if the seeds require 10 days to germinate and about 80 growing days until the fruit is ready to harvest, you’ll be waiting until the middle of August before you get those juicy Beefsteak tomatoes. But if you start the seeds indoors and have nice, hearty seedlings ready for that set-out date of May 15, you might have tomatoes for your salad by the end of July.
Here are a few other good reasons to start seeds indoors:
• You can ensure the quality of the plants you grow.
• You know exactly what your plants have been exposed to. This is especially important if you plan to garden organically, or just take a more chemical-free approach.
• Seed catalogs and specialty vendors offer far more variety than garden centers’ and nurseries’ seedlings.
• There’s less chance of introducing disease to your garden than when you bring in seedlings or plants from other places.
• Starting seeds indoors has a very low cost.
Where to Start Seeds
Finding containers to start seeds in is an area where ingenuity counts. You can start seeds indoors in all kinds of containers. I’ve seen it done in cardboard milk cartons, wooden fruit crates, aluminum pie plates, and olive oil cans. More traditional methods are plastic cell packs and trays, peat pots, fiber packs, and flowerpots. And in more than one catalog I’ve seen a clever device that forms cute little pots from old newspapers.
The key things that a container must do are hold soil and allow for drainage. If you use unconventional containers like pie plates and milk cartons, be sure to punch holes in the bottom so water can drain out. The peat pots, fiber packs, and little newspaper pots are all biodegradable, so you can plant the container and the seedling together directly in the soil, without the risk of disturbing tender new roots. Keep in mind that some newspaper ink is made with toxic chemicals. You may want to call your newspaper to find out if it’s printed with soy-based or other nontoxic inks.
If you reuse old containers, be sure they’re scrupulously clean. Wash them with disinfectant or a diluted bleach solution. Or if your approach is nonchemical, use an Earth-friendly soap.
Garden Guru Says
Some of the easiest and most Earth-friendly seed-starter containers are eggshells. Collect carefully opened eggshells, with about ¾ of the shell intact. Clean them thoroughly, fill them ½ full of potting mix, place one or a few seeds in each shell, and water. Place each shell back in the egg carton, and put cardboard cartons on a tray to avoid a wet mess. (Styrofoam cartons don’t tend to leak.) When it’s time to transplant the seedlings outdoors, plant them shell and all. The little roots won’t be disturbed, and eventually the shell will break down.
When you’re ready to start seeds indoors, fill the container with potting soil or seed-starting mix, plant the seeds the recommended distance apart, and water.
Mixed Media
The quality of the planting mixture you use to start your seeds indoors is a crucial element to the ultimate success of your plants. After all, it’s the first home to the tiny, emerging plant, so it has to be a safe and nutritious environment.
Any number of potting media work well for starting seeds, including the following:
• Commercial potting mixes
• Commercial seed-starting mixes
Prof. Price’s Pointers
Vermiculite is a micalike mineral that’s added to soils, especially in container gardening, to increase the soil’s water-holding capacity. Perlite is a volcanic lava that’s been crushed and heated at very high temperatures to create a lightweight material used in potting mixes.
• Horticultural vermiculite
• Half perlite and half horticultural vermiculite
• One part each vermiculite, perlite, and peat moss
• One part each peat moss, compost, coarse sand, and vermiculite
• One part each commercial potting soil, compost, and vermiculite
• One part worm castings, coarse sand, and vermiculite
The key to a good-quality planting medium is that it be light and fluffy so the tiny roots and shoots have an easy time pushing their way through the mix. It also should drain easily.
It’s also very important that the mix be disease and pest free. To ensure this, you can sterilize your previously used potting mix. Heat it on a baking sheet in a 250 degrees Fahrenheit oven for about 30 minutes, being careful to not overheat or overcook it. Although it won’t smell very good, the process will kill off bacteria and fungus that could damage or kill young plants. You won’t have to go through this process if it’s a new, commercial mix.
Perlite and vermiculite are natural mineral products available at home, farm, and garden centers. The easiest way to measure these products and the peat and compost is with a coffee can, children’s sand pail, or large measuring cup. Mix your potting soil in a large bucket or trash can for handy access.
How to Plant Seeds
When you plant your seeds indoors depends on when you want to set out your seedlings. And that date depends on the weather. (You’ll learn a little more about that later in this chapter.)
When you’ve established your set-out date, you simply consult the information on the seed packet. It should tell you how many days before the set-out date to plant the seeds. This ranges from a couple weeks to as many as 12 weeks.
To plant the seeds, follow these steps:
1. Fill your containers to about ½ inch or so from the top with your chosen planting medium.
2. Sprinkle the mix gently with water. A mister is helpful for this task.
3. Press the planting mix gently with your palm or with a flat surface. You don’t want to create any dips or impressions.
4. Sow the seeds according to the directions on the seed packet. (We’ll talk more about this in later chapters.)
5. Mist with a fine spray of water.
6. Place the container in a warm spot, preferably about 70 degrees Fahrenheit.
Off to a Good Start
Keep your germinating seeds warm and moist until they pop through the surface of the soil. After they appear, the tiny seedlings need a little less warmth but a lot more sun.
The best temperature for most seedlings is about 65 degrees Fahrenheit during the day and 5 or 10 degrees cooler at night. Some plants might have different requirements, so consult the seed packet.
Ideally, you should place the seedlings in a southern window where they’ll get as much sunlight as possible. Turn the pots or trays every day so all the seedlings get an equal exposure to the sun.
If you don’t have adequate window space, you can install a special grow light for the plants. You can even rig one up in the basement. When the seedlings are very small, put the plants about 6 to 8 inches from the light. As they grow, move the lighting fixture up so it doesn’t burn them. Keep the light on at least 12 hours a day and up to 16 hours. Install a timer for convenience.
The Next Step
When the plants have grown their first set of true leaves, you can begin transplanting them to larger containers. Don’t do this if you’ve planted individual seeds in peat pots, eggshells, or cell packs. If they’re in their own containers, you can allow the seedlings to mature.
At this stage, you should also start a feeding regimen. Use a liquid fertilizer about every 2 weeks according to the directions on the package. Or use a nice, light manure

Compost Pile
Many seedlings succumb to a condition known as damping off, in which the seedlings die from excessive moisture. But it’s a fungus that comes with the overwatering that actually causes the plants to die.
tea (visit gardengrapevine.com/ManureTea.htmlfor a recipe) or fish or kelp emulsion (recipe at faq. gardenweb.com/faq/lists/organic/2002080041031). If in doubt, err on the side of a weaker solution.
Keep the seedlings moist but not wet. A fine mist is better than direct watering. Overfertilizing and overwatering young seedlings are two mistakes people make most frequently when starting seeds indoors.
Hardening Off
About 2 weeks before your set-out date, you need to get the seedlings ready for transplantation. Specifically, they need to be hardened off.
Prof. Price’s Pointers
Hardening off is the process of slowly acclimating plants to a new environment, usually from indoors to outdoors.
To do this, you can start by lowering the temperature in the room where the seedlings are growing and reducing the amount of light. After a couple days, you can move the plants outside to a protected, shady spot during the day. Don’t do this if it’s windy, raining, or below 45 degrees Fahrenheit outside. Try the garage, near a window, or an unheated sunroom instead. Bring the plants back inside at night. During this process, water regularly but sparingly.
In about 2 weeks, your seedlings should be acclimated enough to make the big move to full-time life in the great outdoors. But don’t push it. Keep a close eye on weather forecasts, and be prepared to rush outside with protective coverings for your newly planted babies should a cold front come through.
Starting Early with Cold Frames
A cold frame is essentially a greenhouse device, usually made of glass or transparent plastic and set directly on the ground. Cold frames give you the opportunity to start the spring planting season early and extend fall growing time past frost dates.
You can use a cold frame for hardening off young seedlings without the nuisance of moving pots in and out of the house. Or plant seeds of cool-tolerant plants (like peas, lettuce, or spinach) directly in a cold frame laid on prepared soil. The sun will warm the soil inside the cold frame well before it does the exposed garden soil.
Cold frames should have the slanted, glazed top facing south for maximum sun exposure. It helps to place them up against the southern wall of the house, garage, barn, or garden shed because the wall helps capture warmth. Painting the interior white and sinking the foundation a few inches also makes it warmer.
Food for Thought
Make a cold frame using old storm windows and some scrap lumber or metal, cinder blocks, or bricks. Ask contractors you know to save old windows and lumber from renovations, or put a “wanted” post on Freecycle. You can find precise instructions from a number of sites on the Internet. Just type “make a cold frame” into Google or another search engine.
Cold frames can become too warm inside, which can encourage disease and fungus. Keep a thermometer inside the frame; if the temperature goes above 70 degrees Fahrenheit, open the frame to vent it. Most commercial cold frames have optional automatic vents like a greenhouse.
Planting Seeds Outdoors
Planting seeds outdoors is a far less complicated undertaking than doing it indoors. All you really have to do is prepare the soil properly and plant the seeds according to the directions on the seed packet.
Although just about all plants can be grown from seeds (there are a few exceptions, but we’ll get into that later), it’s not always the most practical approach. The seeds of some plants can be difficult to germinate or might take an inconveniently long time to sprout. Home gardeners typically grow some plants from sets, tubers, crowns, divisions, and offshoots.
Set Out the Onions
Onions, garlic, and shallots are all members of the same plant family. And as you learned in Chapter 10, the bulb part you eat is actually a collection of leaves that
Garden Guru Says
Most onions are grown from sets, but there’s one exception: scallions. These small green onions with edible stems are typically grown from seed.
grow underground. Almost no one except commercial growers attempts to grow these plants from seed. Instead, we use sets.
Usually the sets are sold in bunches of 50 or 100 and look like tiny flower bulbs. Some might have sprouted a little stem by the time you buy them in the spring, but that’s okay. Each individual set grows into one large plant.
One Potato, Two Potato …
Potatoes (Solanum tuberosum) and sweet potatoes (Ipomoea batatas) are usually grown in the home garden from little tubers. These are basically tiny potatoes that are grown commercially as seed stock.
Prof. Price’s Pointers
The crown is the part of the plant where the roots and stem meet.
Other plants that home gardeners don’t generally grow from seed are asparagus, which are usually started with dormant crowns, and rhubarb, which are grown from rooted offshoots or divisions of existing plants. These are available from garden centers, nurseries, and specialty mail-order houses.
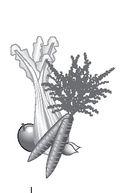
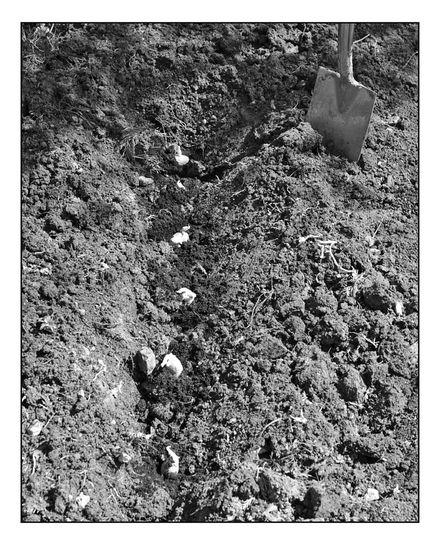
Seed potatoes are available from garden centers, farm supply stores, and online. If you have old potatoes in the pantry that have grown some “eyes,” you can plant those, too.
©iStockphoto.com/Peter Garbet
Starting With Seedlings
Gardeners who want more immediate gratification can start their gardens using seedlings. It’s really a much easier way to go and is also helpful if you get a late start in the spring or early summer.
Vegetable seedlings are readily available at garden centers, nurseries, farm markets, and even grocery stores and places like Kmart and The Home Depot.
When you pick out seedlings, look for plants with strong, thick stems and plenty of healthy-looking leaves. Avoid any wilted plants. Stay away from yellowed leaves, those with brown or curling edges, and any with signs of insect damage. Look under the leaves to be sure there aren’t any nasty bugs lurking there either. Plants with some tiny flowers might set fruit earlier, but that’s not guaranteed.
When you take home your new plants, water them thoroughly and put them in the shade until you have time to plant them. They’ve probably had a rough life up to this point, so pamper them a bit.
Planting Time Frames
Most plants have a preference as to what time of year they’re planted, especially in places where the climate ranges from very hot to very cold. In parts of the country where the temperatures stay within a much smaller range, planting seasons are less meaningful.
Most plants fall into one of three categories: cold weather, cool weather, and warm weather. This refers to the time frame in which to plant them whether as seeds or as seedlings, sets, crowns, or divisions.
Cold-weather plants should be planted in the early spring, as soon as the soil can be worked, in places like the Northeast, Midwest, and Northwest. In the South and the Pacific Southwest, many of these plants are planted in the late summer or early fall for late fall harvest.
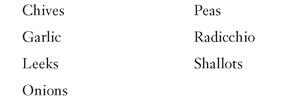
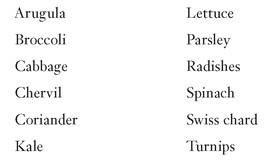
Some plants to start in cold weather include the following:
Garden Guru Says
Rhubarb divisions prefer an early spring planting.
Cool-weather plants are usually planted just before the last expected frost of the year. They don’t like frost, but they’ll survive a mild hit. These plants generally don’t do as well in very hot weather. In places where it never frosts, plant these so they’ll grow during the coolest part of your year.
Some plants to start in cool weather include the following:
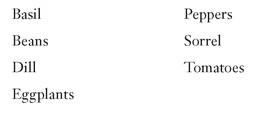
The majority of vegetables and annual herbs are warm-weather plants in colder zones. These plants won’t tolerate cold weather and shouldn’t be put out until all danger of frost is past. Many of them like the soil to be nice and warm, too. They might not die if you plant them too early, but their performance might suffer.
Some plants to start in warm weather include the following:
If in doubt about what to plant when in your area, call on your local county extension office or Farm Bureau for advice.
Setting Up Support Systems
Most plants can grow with little help beyond regular watering, feeding, and weeding. But some plants want to climb, sprawl, or otherwise spread out and need a support system to keep their foliage and fruits from winding up on the garden floor.
To keep plants tidy, to support their climbing habits, and to protect ripening fruits, gardeners use a variety of support systems, including stakes, trellises, netting, and old-fashioned string.
String It Along
Lightweight twining plants like peas and beans will happily climb up trellises, fencing, or other structures, but you can also meet their needs by preparing a grid of twine strung between a few bamboo poles.
This is a one-year-at-a-time technique because the twine will probably rot after one season. You can use plastic twine for a long-lived grid.
Tomato Cages
Tomato plants, especially the larger varieties, generally want to sprawl. This can become very untidy and often results in too many fruits lying on the ground where they’ll rot or pick up insects.
To support the tomatoes, place a wire tomato cage over the plant when it’s still small. The tomato will grow up inside the cage and rest its stems on the wire, making it easy for you to harvest the tomatoes. Cages also hold the plant so more of it is exposed to sunlight, which encourages growth.
You can buy tomato cages at home and garden centers. Or you can fashion your own using fence wire or concrete reinforcing wire and heavy-duty metal stakes. Be sure the openings between the wires are large enough for a big tomato to grow through.
Stake Your Claim
Stakes made of bamboo, metal, or plastic are indispensable in the garden. You’ll need them to support pepper or eggplant plants that are heavy with fruit. You can also stake smaller varieties of tomatoes, especially the grape and cherry types. And you’ll want to stake up any plant that seems to need a little bit of help standing up straight.
Use twist ties, twine, plastic plant ties, or foam-covered wire ties to attach the plant to the stake. Or place three stakes around the plant and wrap twine around the stakes to make a support all the way around.

Compost Pile
To avoid choking or breaking delicate stems, tie your ties gently around the stem. The ties should be tight enough not to cut into the stem, but not so loose that they’ll slip down. Also be sure to place enough ties on long stems so they won’t bend over and break off above the tie.
The Least You Need to Know
• You can ensure an earlier, more diverse harvest by starting seeds indoors.
• Use a light, airy potting mix to give your seedlings their best possible start.
• Harden off young seedlings before planting them in the garden.
• Use a cold frame to extend the growing season in the spring and fall.
• When purchasing seedlings, select healthy ones with no signs of yellow, browning, or curling leaves or insect damage.
• Use stakes, cages, netting, or twine to support your plants.