Advanced Transformations (Multiple Translations and Rotations)
OpenGL is a very powerful and simple graphics library but it still needs some familiarity in order to use it. One of the most problematic areas for new programmers is the transformations which include modeling, viewing and projection operations.
The topic of this tutorial is modeling and viewing transformations. These are translate, rotate and scale. The most important thing to remember is that the order of transformations matters!
Imagine that you have an object in the center of your world and you are thinking of rotating it 30 degrees and translating it by 10 units on the positive x-axis. As you can see in the following figure the order that you apply these two transformations not only matters but is critical, as translating and then rotating and rotating and then translating results in two extremely different results.
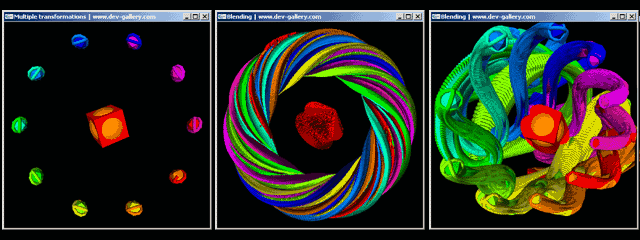
In this tutorial we will create a quite complicated scene consisting of 1 cube, 1 sphere, 10 icosahedrons and 20 toruses moving in the pattern shown in the introductory image of this page. The middle screenshot is quite informative as it shows the trajectory of our objects. It was created by repeatedly drawing on the buffer without clearing it. In the final application the user can interactively select whether the color and depth buffers should be cleared or not using the 'a' and 's' keys.
OpenGL applies transformations in the reverse order. This means that if in our OpenGL code we first translate and then rotate an object, it will appear rotated on the x axis, which is exactly the opposite as shown in the figure. We should instead translate and then rotate the object, if we want the results appearing in the left hand corner of the previous picture.
Because of this reason, it is better to construct our scene in a reverse order. So, instead of trying to place everything in the correct place the first time we will start from the end and move towards the start of the hierarchy. Note that a hierarchy exists as the toruses rotate around the rotating icosahedrons and the icosahedron-torus system rotates around the origin where the cube-sphere object in turn rotates around itself.
When you are confident with OpenGL transformations you can create great looking effects in a very little time and effort. Imagine that the graphics shown in the figure at the bottom of the page were created by simply inserting an extra glRotate call in the proper place in the scene. When running the application you can use the 'd' key to switch the two different modes.
Use the links at the bottom of this page to continue with the actual tutorial and or get the code and windows application.
Step1 : 2 toruses rotating in opposite directions around a rotating icosahedron
First of all we would like our icosahedron to rotate around itself. To do so, we save the current transformation matrix using glPushMatrix and then apply a rotation before drawing the actual object. The following code saves the matrix, rotates the origin by a variable angle on all three axes and then draws an icosahedron using the glut function glutIcosahedron.
glPushMatrix();
glRotatef(angle,1.0,1.0,1.0);
glutSolidIcosahedron();
glPopMatrix();
Now, we would like to add two toruses which will rotate around the icosahedron on all three axes but in opposite directions. To make the toruses follow the icosahedron, this code should go inside the "current matrix" just after the glutSolidIcosahedron call.
To draw two rotating toruses we can either save the matrix, rotate, draw the first torus, reload the saved matrix and rotate the second one in the opposite direction or just rotate the first one and then rotate the second one twice in the opposite direction. Transformations are cumulative; when we rotate the second torus twice in the opposite direction, the first time we cancel the previous rotation (10 degrees + (– 10 degrees) equal zero), and the second we rotate an equal amount of degrees in the opposite direction.
This is much faster than saving and reloading the matrices, as every time OpenGL saves and load a matrix several multiplication and additions happen behind the scenes, slowing down the application.
Thus, the complete system of two toruses and an icosahedron can be written as:
glPushMatrix();
glRotatef(angle,1.0,1.0,1.0);
glutSolidIcosahedron();
glRotatef(angle, 1.0, 1.0, 1.0);
glutSolidTorus(0.2, 1.0, 10, 10);
glRotatef(-2*angle, 1.0, 1.0, 1.0);
glutSolidTorus(0.2,1.0,10,10);
glPopMatrix();
In order to save space in this tutorial and make our program more modular we can replace the previous code block with a function, named for example createIcoToruses(). please note that the actual implementation of this function contains some extra code to color the icosahedrons and toruses.
Step2 : Placing multiple toruses-icosahedron systems around a circle path
Ok, lets forget for a moment what we created in the previous section and think what should we do in order to place 10 points on a circle path on the x-y plane on the screen. We could either do some trigonometry and calculate where each point should be or use OpenGL's transformations to place the points on such a path.
If you noticed the transformations figure in the introduction of this tutorial, you should remember that when you rotate an object and then translate it, the translation you apply to it is done in respect not to the object but to the center of the axes. This means that if we translate a point radiusunits on the x-axis and then rotate it angle degrees on the z-axis we would get our object sitting on a circle path, angleunits from the original x-axis.
Thus to place multiple, in this case 10 objects, on a circle path, with each point equally displaced from its neighbors we can divide 360 degrees (a full circle) by 10 (objects) and thus place the objects 36 degrees apart from each other.
The sequence of OpenGL transformations that would result in such a scene is (remember OpenGL 'thinks' in the opposite way):
• rotate 36 degrees on the z-axis
• Translate radius units on the x-axis
• draw the object
• Translate -radius units on the x-axis (to cancel the previous transformation
• rotate 36 degrees more on the z-axis
• draw the second object
• repeat
Note: do not repeat for ever like in the advertisement of the famous shampoo (apply shampoo, massage scalp, rinse, repeat). When you have 10 objects drawn you should stop the loop. This makes it perfect for a for loop.
The same result can happen also with the following sequence:
• Push the matrix
• rotate 36 degrees on the z-axis
• Translate radius units on the x-axis
• draw the object
• pop the matrix
• push the matrix
• rotate 36 degrees more on the z-axis
• draw the second object
• pop the matrix
• repeat
This code, while slightly slower (the difference can be nearly zero) than the previous one as it involves pushing and popping matrices, provides us with the extra ability of inserting more transformations and rotations without complicating thinks.
For example, we can add two extra lines of code in order to make the icosahedron-toruses system to rotate around its circle path:
• Push the matrix
• rotate 36 degrees on the z-axis
• Translate radius units on the x-axis
• rotate 2*radius degrees on the y axis
• Transform 2 units on the z-axis
• draw the object
• pop the matrix
• repeat
Step3 :Creating complicated paths in simple ways
By now you should start thinking that transformations are not so difficult after all. At the moment our code looks like that:
glPushMatrix();
//draw ten icosahedrons
for (int i = 0 ; i < 10 ; i++) {
glPushMatrix();
glRotatef(36*i,0.0,0.0,1.0);
glTranslatef(10.0,0.0,0.0);
glRotatef(2*angle,0.0,1.0,0.0);
glTranslatef(0.0,0.0,2.0);
createIcoToruses(i);
glPopMatrix();
}
glPopMatrix();
At this point, we can simply add a glRotatecall just before the firstglPushMatrix, in order to rotate the whole system in 1, 2 or 3 dimensions:
glPushMatrix();
glRotatef(-angle,0.0,0.0,1.0);
glPushMatrix();
…previous code…
glPopMatrix();
glPopMatrix();
Resulting in the following:
Ops, what is this cube doing in the middle of our system? It is there to show how to add a new completely unrelated system of transformations in our scene. To do so we have to add some new code before the previously explained one.
This bit is easy, we just save the matrix, rotate it in all three axes, draw the cube-sphere object and restore the matrix before drawing our system of icosahedrons and toruses:
glPushMatrix();
glRotatef(angle,1.0,1.0,1.0);
glColor3f(1.0,0.5,0.0);
glutSolidSphere(2.5,20,20);
glColor3f(1.0,0.0,0.0);
glutSolidCube(4.0);
glPopMatrix() ;
glPushMatrix();
…the previously explained code that creates the icos. and toruses
glPopMatrix();
Are you impressed? You should not be,… yet. This system of objects looks very impressive but still you can see that the objects follow a certain pattern. If we add another rotation just before drawing the current scene, then things become quite chaotic:
glPushMatrix();
glRotatef(angle,1.0,1.0,1.0);
drawCubeSphere();
drawIcoToruses();
glPopMatrix();
If now we 'forget' to clear the color buffer, but remember to clear the depth buffer we could have a commercially looking screen saver!
PS: Thanks to Chris Mathers for the clearing the depth buffer idea.